Lecturers, professors, teachers, and educational institutions have been coming up with new ways to conduct lessons since the pandemic began.
There are a lot of factors that go into creating a conducive learning environment, especially with Covid. There are numerous teaching styles as there is no one-size-fits-all approach to learning.
Just creating and adding a chatbot into your business is not going to work anymore.
It has to drive the expected results for your business as well.
And to achieve that, you need to follow these chatbot best practices, which will help you to create an effective chatbot strategy and make the most out of it.
11 Chatbot Best Practices to Create a Powerful Chatbot
1. Set Expectations
What do you expect from your chatbot?
The reason it exists?
Its goals?
It can be anything like, you want to generate leads for your business, answer frequently asked questions, improve the customer support system, or just have funny conversations.
For example, the purpose of the restaurant bot will be completely different than the insurance bot.
A restaurant bot can be used to view the menu, order food, book a table, make payments, and many more.
And on the other hand, an insurance bot can be used to find the right policy, manage claims and renewals, premium payments, and many more.
The overall point is, set the purpose of your chatbot because only then you can measure the efficiency of your chatbot.
Like, if your goal is to collect leads then you can track the number of collected leads and so on.
And, It is very important to track your chatbot’s performance and analyze it so that you can optimize it for better results.
Pro Tip:
Don’t rush for a lot of expectations at once as you can’t expect it from a brand new chatbot. Take one goal at a time and add more with time.
2. Choose the Right Development Platform
After setting the expectations from your chatbot, the next task is to choose the right development platform to fulfill those expectations.
There are two types of development platforms,
No-code Development Platforms
And, Development Frameworks.
The no-code development platforms allow you to create a chatbot with a simple drag-and-drop flow builder.
And, development frameworks allow you to leverage its NLP engine to create awesome conversational experiences.
Now, you might be wondering how to choose between them?
The formula is very simple,
Expectations + Type of Chatbot + Features = Chatbot Platform
Now, you already knew about expectations, so I’m not going to tell you again.
Next, you need to look at which type of chatbot you want to create, like Rule-based or AI-based.
It’s a good practice to decide the chatbot’s functionality before you actually start to create one.
It is different than setting expectations.
In expectations, you theoretically decide “what” problems are you trying to solve or what goals you are trying to achieve.
But in bot functionality, you decide “how” to solve those problems or achieve those goals. You can call it the technical side of setting expectations.
For example, if your goal is to build a FAQ bot, then you need to decide whether it will be the prefixed question set that users can select or they can ask any question they want.
4. Design Chatbot’s Personality
It’s very important to give a unique personality to your chatbot and be consistent with it.
The chatbot is just the digital extension of you or your brand and hence your chatbot’s personality should also match with it.
Define the tone and voice of your chatbot according to your target audience.
And, decide whether it should be formal and keep the conversation professional or informal and keep the conversation more friendly.
Whatever it be, just keep it consistent throughout the conversation.
Pro Tip:
Be transparent. Tell your users that they are talking with a chatbot by giving such kind of name to it or telling it in the greeting message.
Like I gave the name EmpathyBot to my chatbot and send a greeting message as,
“Hey there! I’m EmpathyBot! How can I help you?”
By doing so, you will not mislead your users and also earn their trust.
5. Make Conversations Human
How do you chat with anyone?
Give an answer to yourself.
Yes, you are creating a chat “bot” but still, it is chatting with a human.
So your conversations should also be designed in such a way that humans can understand and relate.
Don’t write long paragraphs, cut them into small chunks of messages as most of us do.
Use emojis, photos, videos, GIFs, etc. Just bring the personality into it.
Pro Tip:
Just be natural while designing the conversations as if you are talking to a real human being and read it aloud so that you can improve it.
6. Close-ended Conversations
Always remember to design close-ended conversations.
Especially, when you are creating an AI-based chatbot.
But, What is close-ended?
For example, asking people, “Tell me about yourself?”
The answer will be unpredictable and not have a fixed endpoint.
It is an “open-ended” conversation.
But if you asked, “Tell me your name?”
Then, the answer will be predictable and fixed for everyone.
It is called a “close-ended” conversation.
Then the question arises, Why to design close-ended conversations?
And the answer is, because you are creating a chatbot to achieve some business goals.
For example, if you are creating a lead generation bot, then to generate a lead you need to design a funnel that consists of some conversational steps.
And to go from one step to another, you need to have specific and fixed responses on each step.
But open-ended conversations do not have fixed endpoints, hence the chatbot will not understand what next step to take, which will lead to the conversation failure.
That is the reason you should design close-ended conversations.
7. Repairing the Conversation Failure
In the previous point, you learned how conversations can fail in chatbots.
And it is quite normal in real-life communication as well.
Remember, how sometimes you get out of track when talking about some specific topic and your friend brings you on track again.
This same process is implemented in chatbots as well to repair the conversation failure.
It is called fallback intent or message.
If a user asked something out of the chatbot’s scope, then the chatbot will reply with a fallback message and try to bring the conversation on track again.
Pro Tip:
Don’t use the generic fallback message like “Sorry, I don’t understand!”.
Show the available options with buttons or ask if they want to talk with a live agent instead.
8. Keep it Simple and Clean
Would you like to use an ugly-looking complex app and spend time on it?
Definitely not! (I’m guessing…)
The more simple it is, the better it is!
Don’t make it too complex.
Both for you and your chatbot’s users.
It should be easy for users to navigate through its different functions.
Because it’s all about user experience.
9. Ability to Easy Exit and Unsubscribe
Another key point in improving its user experience is the ability to easy exit and unsubscribe at any time from the chatbot.
You should not force them to be in a conversation or a subscriber if they don’t want to.
By saying the ability to exit, I mean that they should have the option to exit from the ongoing conversation and return back to the main menu or start a new conversation.
And also the ability to leave the conversation at any time and unsubscribe to the bot.
Pro Tip:
You can achieve it by either giving an option button at the bottom or notifying them about a keyword to do so at the beginning of a conversation.
10. Create Different Prototypes
You cannot create Siri or Alexa in the first attempt.
You have to create different conversational flows, design multiple conversational scripts, and create different versions of chatbot.
Then finally select the one which is better at meeting your expectations and giving a top-notch user experience.
11. Measure & Improve Your Performance
And finally, the most common thing you need to practice to be successful in any kind of work, measuring the results and improving for better performance.
This part comes after you successfully launch your chatbot.
You have to track that whether it’s meeting your KPI’s (goals) or not.
Then, improve it by observing your users, trends, how they are interacting with a chatbot, the most common topic they discussed, and so on.
Wrapping up the Chatbot Best Practices
Creating a chatbot takes planning and effective implementation of that plan.
You have to spend time creating and optimizing your chatbot.
It’s possible to not get the expected results from it in the initial days, but it doesn’t mean that there is a problem with the entire chatbot.
It is just that your chatbot is missing one of these important chatbot best practices and need to identify and correct it.
I hope that these 11 chatbot best practices will help you to create a powerful chatbot for your business.
Liked this story? Consider following me to read more stories like this.
A popular local attraction — Gunung Lang, in Perak, Malaysia
Building an AI Chatbot has never been easier
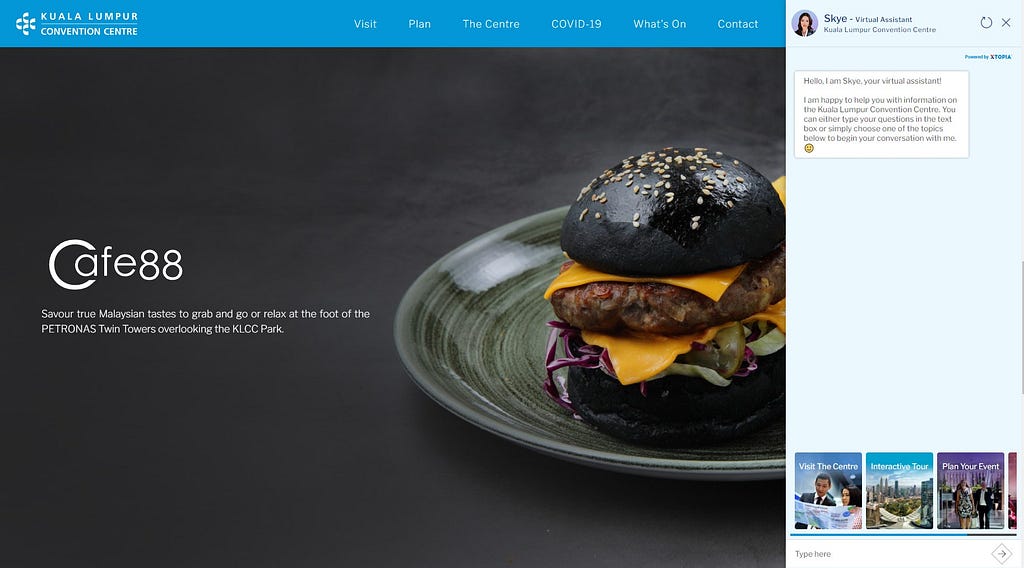
Microsoft Bot Framework is a framework for building enterprise-grade conversational AI experiences. It is hosted on Microsoft Azure’s cloud infrastructure. With this framework, we have launched a few virtual assistants such as Meva for PETRONAS Dagangan Berhad’s MyMesra, Skye for Kuala Lumpur Convention Centre, and Nadia for Affin Hwang Asset Management. In this article, I’m going to share why you should consider Microsoft Bot Framework for your next AI Chatbot as a developer.
Skye — Virtual Assistant for Kuala Lumpur Convention Centre
Easy to start
First, this bot framework is very easy to start. We can have a simple Q&A bot using QnA Maker in less than an hour without coding at all. You can upload an excel file of questions and answers or provide a webpage. You can refer to this link to get your first bot up and running. Some bots may continue as a simple QnA bot, and some may evolve to be a more complex bot.
Flexibility & Complexity
A bot may need to be very flexible, or complex based on clients’ business requirements. Here, we can use the Microsoft Bot Framework SDK to build our complex bot dialogs and integrations. We can program complex nested dialogs to run product recommender, for example. You can also program the bot to guide users to give feedback or make an appointment.
Within the bot dialogs, we can also integrate our bot with Microsoft LUIS which is a Cognitive Service solution. LUIS allows us to get a user’s intents and entities to make our bot smarter. For example, if a user’s intent is to submit a complain, we can use LUIS to get their name, email, and phone numbers accurately. LUIS also can get dates, measurements and also custom entities using regular expressions such as your countries’ identity number.
Since the bot can be hand coded, we can also connect to any REST API. For example, we can connect the Azure Text Translator to translate Malay language into English to be processed by LUIS. This is because there are languages that are not supported by LUIS natively. We can also connect to our other apps to push or get data.
Even though this bot framework is built by Microsoft, we can use 4 types of different programming languages ranging from C#, Java, JavaScript to Python to build the bot. We do not need to learn another language if we already know one of those programming languages. There are also bot project templates for Visual Studio to help us to get started. The templates come with samples on how to do certain tasks in a chatbot.
Bot Testing
For testing the bot, we can use Bot Framework Emulator which is installed onto our machine. This tool is a conversation interface to debug the bot locally with our development tool. It is fully integrated with Visual Studio, and it makes testing and debugging work a lot easier. For example, we can set breakpoints in the code and do live debugging.
Ready Integration with XTOPIA
Microsoft Bot Framework is also ready for integration with XTOPIA. By integrating with XTOPIA, your end users can update the bot’s responses easily and enhance your website with bot interaction. The end users can also make your bot better with XTOPIA codeless workflow by getting data from internal and external sources.
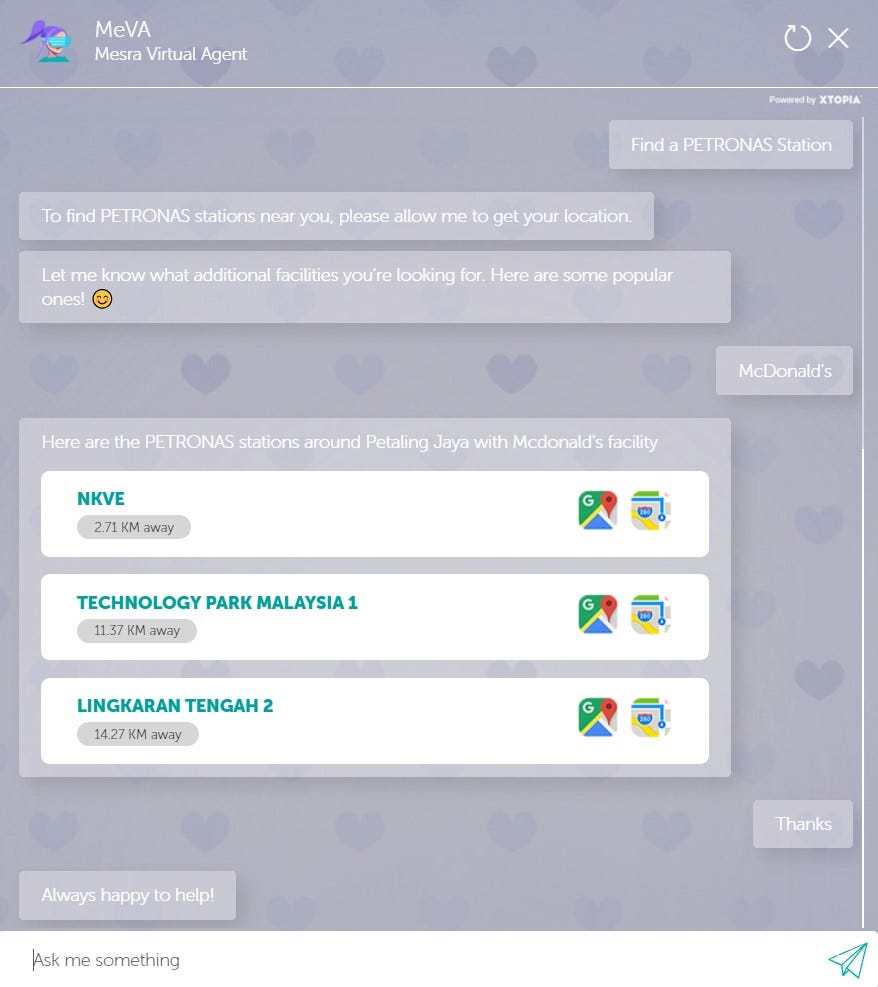
MeVA’s integration with Petrol Station’s location API using XTOPIA.
That’s all for now. We will share more about Microsoft LUIS and bot development in the future. You can find out more about Microsoft Bot Framework here and XTOPIA platform here.
XIMNET is a digital solutions provider with two decades of track records specialising in web application development, AI Chatbot and system integration.
XIMNET is introducing a brand new way of building AI Chatbot with XYAN. Head over to our website to experience it and sign up for a trial today.
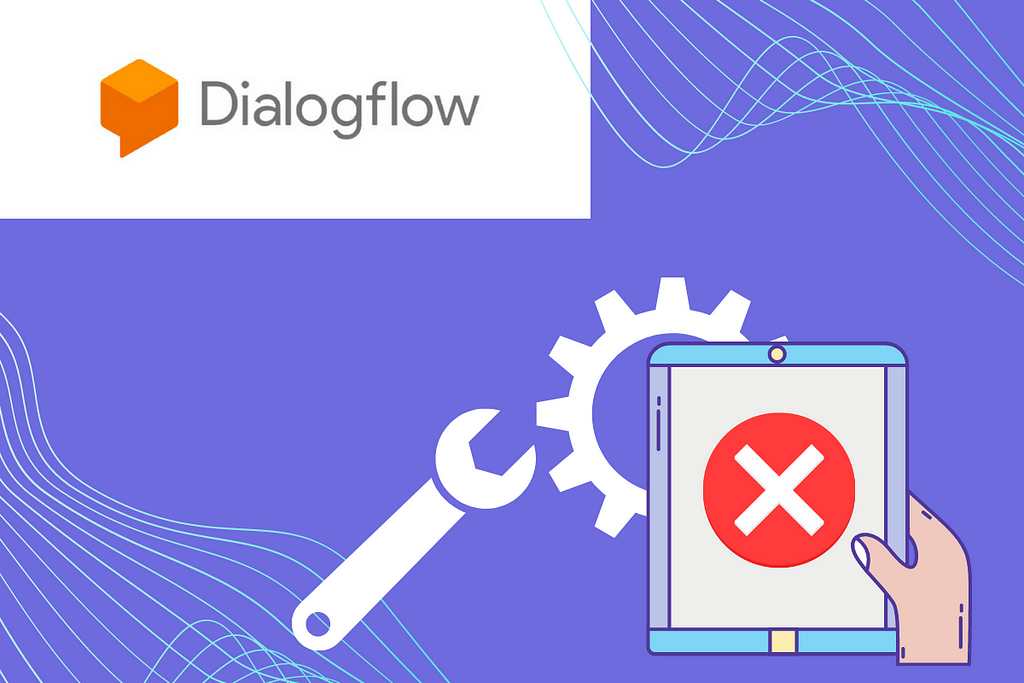
If you’ve spent any time testing your Dialogflow ES or CX while creating agents, working with webhooks, and integrations with other platforms, you’ve probably seen various error messages. In this post, we cover some of the most common errors, and how to resolve those errors.
Dialogflow ES erros & solution
API call mentions an unknown project
The error would be like,Dialogflow API has not been used in the particular project id error for API call.
Solution
To resolve this issue, ensure you have done the following.
Set the GOOGLE_APPLICATION_CREDENTIALS environment variable and then also check if you have provided the correct project ID to the API call. Please refer to this doc for setting environment variables.
Unable to delete project
When trying to delete a GCP project, you might get a notification that the project cannot be deleted, It is due to different ownership property, and one of the liens is related to Dialogflow.
Solution
You should delete the Dialogflow ES agent linked to the project.
Open Dialogflow console. If you get a notification that the agent doesn’t exist, it means your agent has been deleted. Otherwise, check if you no longer need the agent and delete it.
Console fails to set up a project
Sometimes you might get the console error Failed to set up GCP project error when creating an agent within the console.
Solution
The permission might have been restricted to create GCP projects. Check if your account/role has permission to create a GCP project directly from the GCP Console. If you are not able to create a project, follow the recommendations provided in the error message or recommend the admin to provide the permissions.
The API call received a PERMISSION_DENIED response. This might happen on both ES & CX.
Solution
To resolve the error, please ensure you have set up Dialogflow ES authentication and the roles correctly. Also, ensure you have done the following:
Created a service account earlier and didn’t delete it.
Then provided the service account with a role that grants permission to call the desired method.
Downloaded the service account private key file of the project.
Set the GOOGLE_APPLICATION_CREDENTIALS environment variable to the private key file.
Please refer to this doc for setting environment variables.
DEADLINE_EXCEEDED
If you are using webhooks for actions integration then the Dialogflow agent acts as conversational fulfilment for your Actions on Google. For the back-end webhook. Some of the requests might be receiving this error Webhook call failed. Error: DEADLINE_EXCEEDED Request timed out
Webhook timeout limit for Actions on Google integration is 10 seconds. For all other integrations, including self-developed implementations sending requests to the Dialogflow API, webhook timeout is 5 seconds. These values are not customizable. The timeout limit includes time for Dialogflow requests to your webhook endpoint, the webhook processing time, and webhook response time back to Dialogflow.
Conversational interfaces are meant to be designed as a continuous message exchange between the end-user and the app/bot. If the web service requires more time for executing operations in the background and this cannot be optimized, consider redesigning the conversation flow in such a way that end-users don’t wait for the app/bot reply for more than 5 seconds (10 for Actions on Google).
If you have not enabled Dialogflow API for the project then you will receive the error. Code: FAILED_PRECONDITION error when creating an agent with the console.
Solution
You just need to enable the Dialogflow CX API for the particular project. Please refer to this doc for enabling the API for Dialogflow CX.
Dialogflow CX no response
No agent response for Dialogflow CX interactions when integrated with other messaging or bot platforms.
Solution
If you are not seeing any responses from Dialogflow CX, you should enable billing and Dialogflow API on the project. Please refer to this doc for enabling the API for Dialogflow CX.
Disclaimer: This blog was originally published here.
Expo, React native… on boarding chatbot : Part two
How onboard user, simply and efficiently.
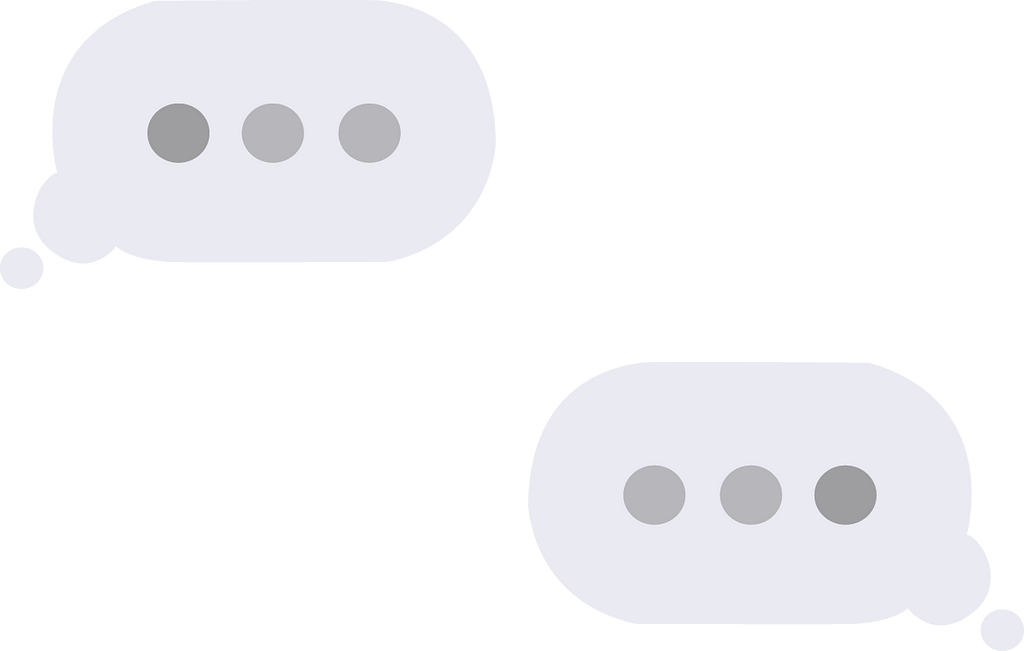
This is the second part of my chatbot article. This time we will focus on making an input animation, indicating that your interlocutor is typing. If you missed the first part, it’s over here !
As I explained in the first part, the chatbot and the user use bubbles, but there is a big difference… this famous animation.
This little animation gives life to the chat, and allows to simulate an interaction with a person and not a machine.
For this animation, we will create 2 components.
The first one, chat-typing which will be the animation component. A kind of animated bubble with an opening and closing animation.
The second component, chat-bubble, will look like the user-bubble but with the management of the chat-typing component.
At the end we will modified the chat-bot screen created in the part one, to used the chat-bubble component.
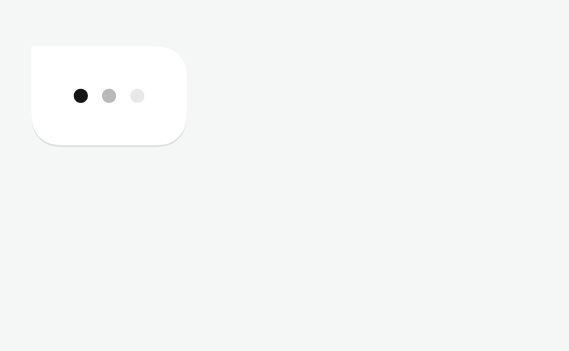
Chat-typing
Let’s take a closer look at the design. We can see 3 black circles, spaced one from the other, and with different opacity. You have to imagine this animated board of course …
We will break this down into three components. Dot, AnimatedWrapper, and finally the exported component ChatTyping.
This component is more complex. We will use the children props which is available for all react components to reuse the animation logic. We wrap children, in this case the circle, to animate it :
For the animation we use the Animated library of react native. If you have never used this library I advise you to look at the documentation and play with it a bit.
Let’s start our animation…
We create a state variable (timing), to animate the opacity of the encapsulated object, the circle. We initialise its value to 0. We find this variable in the object loop and in the interpolate function.
const [timing] = useState(new Animated.Value(0))
During the component initialisation, in the useEffect. We create the animation variable. It is an animation sequence, in our case, a delay, and a loop, with start and stop method.
The delay will allow us to starts animation after the given delay.
In the loop method, we pass a time animation with the timing method… this method will in a given time (duration), update our state variable, up to the desired value (toValue).
The principle is to interpret the value of our state variable, using an array representing different input points (inputRange) to obtain a value according to the array we pass to it (outputRange). In our case, for the value 0 we will get 0.2 in output, for the value 0.5 we will get 1, etc.
this way our state variable opacity will oscillate between 0.2 to 1 depending of the timing value.
We declare a array of delay values, then use it with a map function and for each value as a millisecond delay, we pass it to the AnimatedWrapper as a de-structured object props :
Like in the user-bubble component, opening is a parallel function used to change the opacity and horizontal position.
FadeIn and FadeOut are both animations created to display the chatTyping animation. You can easily guess their roles…
IsTypingVisibility state variable is used to display either the chatTyping animation or the bubble.
The start method of the animated library takes a completion callback that will be called when the animation is done. So, at the end of the FadeIn animation, we create a setTimeout method called timer. This will represent the duration of the chatTyping animation display. By setting isTypingVisibility to false we simply display the bubble.
We add the chat-bubble component in the components array and modify the interval by adding 2s more to display the chatTyping animation. This way we have the typing animation and then the bubble just after.
It’s finish for today… Thank you for taking the time to read this article. Don’t hesitate to leave comments, ask questions, improvements. The next part, will be on the mechanics or how to make all the components communicate together and…
Expo, React native… on boarding chatbot : Part one
How onboard user, simply and efficiently.
The purpose of this article is to share my approach from start to finish to create software that exactly meets the demand. Examples have always been a great help for me. It is also important to share experience to evolve and exchange.
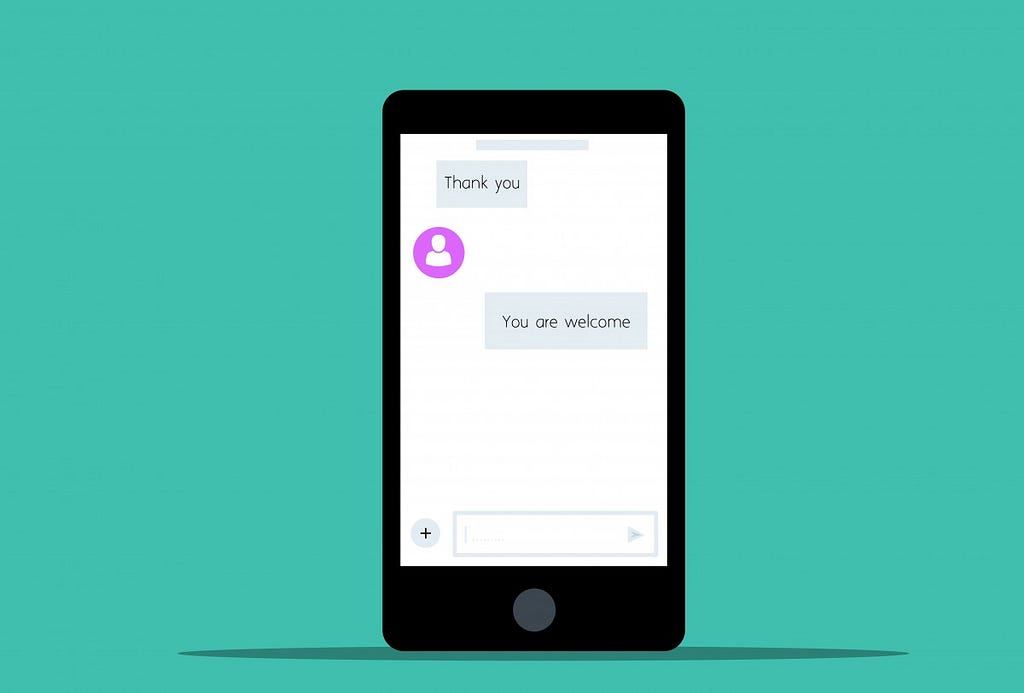
While building a React Native application for car rentals, we needed users to validate some options and provide us some documents.
The solution found is to simulate exchange with us, through an interface where the user could interact with us and send us some documents.
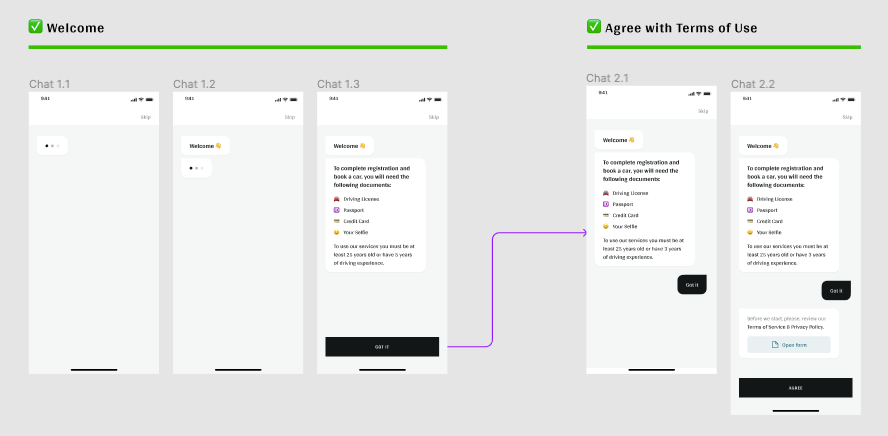
I had a Figma board for the full scenario from the designer team :
Example showing 2 parts of the chatbot scenario
What the design shows us is a scrollView with the chatbot’s bubbles on the left and the user’s bubbles on the right. A button positioned at the bottom fixed and therefore not part of the scrollview.
Starting from there, i was able to identify several things, but mostly a repetitive process :
The bot asks for something and the user answers with an action.
For each chatbot bubbles we have a typing animation.
For each bubbles we have opening animation.
At the end of chatbot messages the bottom button appear.
Each time the user click the button we have a user’s bubble with a new part of the scenario.
The idea is to identify recurrent processes allowing us to reuse components.
For this first part of the article we will look at the bubbles. From the user to the bot, how to simplify the development.
Users and bot are both use bubbles to display messages, but both bubbles are not the same. To simulate a discussion we need to find a way to make each message display independently with a delay. ChatBot bubble need animation before show message.
We need to take all this specification to build our factory. For this part we create a bubble component, user-bubble, and the factory component, bubbles-factory. Finally we display them in a screen named Chat-bot.
User-bubble
It’s a simple component that displays the message we pass in its props (data) and some styling to match the design. I added an opening animation using the native react library, animated. I used animated’s parallel method to start an array of animations, opacity and x position.
Bubbles is an array that we will use to display components as we go.
Index is a number used to increment the data array props and to push the component is the bubble array.
At the initialisation of the factory, I create a SetInterval method which will allow me to increment the index variable. I set up a conditional logic to stop the SetInterval method according to the length of the data array.
I use a map function in the renderer, to display all the bubbles, and use a cloneElement method to return a new React element from the original element sent by props.
With a bit of imagination you can modify and play with the factory and create your own effect. You can use different bubble styles, different components to use, even tried to use a decelerating interval ? Is that possible ? 😉
Next step
For the next part, i will show you how to add type animation for the chatbot bubble component.
Congratulations ! Thank you for reading this article, don’t hesitate to leave me comments on possible improvements, your opinions, your modifications, your tests.
When you think to build quick chatbot with an open source framework system the first framework might pops will be Rasa. No doubt its a great framework, provide you to develop chatbot application with very easily with nice organization of documentation. After all the setup and training, the application seems to perform well. But when you go for the load testing of the application things starts to look messy : Response time increases, concurrency drops etc.
So based upon this, here in this blog I will be writing few things which I observed should be taken care off while setting up the configuration of Rasa.
1.Is there a way to solve concurrency issue? Ans : One solution I came up with is by increasing the Sanic workers. Rasa 2.x use Sanic web server. As per my exposure I haven’t found any command line argument predefined by Rasa to change the workers. But you can the change the worker of Rasa and Rasa-sdk by making hard-coded changes of the Sanic Workers values in the Constant.py of both or writing a wrapper function to set the environment variable ACTION_WORKER_SANIC_SERVER = #Desired Worker. Same to be done for Rasa.
2. How to handle increasing response time? Ans : There are various reasons which can be looked upon but I guess most ignored reason while doing any testing is consideration of sender id. The tracker of event is build based upon the sender id. As the list increases so do increase of response time. One could think of using setting up a Session timeout variable but problem is, it only works in cases of inactivity for that sender id after a period of time which is set in config. So question arises is how to solve it.
I will answer this question in my next blog. Thank you for your time. Please let me know if you have any suggestion and thought, or if I have misinterpreted.
Now that the digital and real worlds are merging, having an online presence is critical. Consistency is one of the most significant means for businesses to set themselves apart from their competition. Brands may establish themselves as thought leaders in their sector by producing high-quality, consistent content. The consistency of your material has a direct impact on people’s perceptions of your credibility. The more consistent you are, the more credible you are.
We have an incredible chance to harness automation to boost our productivity many times over in today’s digital and data-driven society. The audience will return for more if the content is compelling. They may offer their own user-generated content if it is really intriguing. However, if a company does not produce it on a regular basis or does not keep the same personality, it is more likely to lose its audience. It’s worthwhile, though, because keeping existing customers engaged can result in more revenue and is less expensive than acquiring new consumers. This emphasizes the significance of maintaining consistency in content, not just in frequency but also in tone. The usage statistics are eye-opening, and posting your material at the right moment can improve the accuracy and efficacy of your Twitter marketing efforts significantly.
High levels of user interaction can be extremely beneficial to your company, particularly in the following ways:
• Increased audience attention • Increased audience attention • A better emotional connection with customers • More long-term recurring customers • Brand advocacy from your strongest followers • Shorter sales cycles
In this article, we’ll show you how to make a bot using Bot Libre, a free open source chatbot platform that lets you automate your Twitter engagement with your audience through your own Twitterbot.
Click 1 — Create a bot
First you need to create your own bot, this only takes a few clicks
Click 2 — Create a Twitter account
You need to create a Twitter account for your bot. If you are automating your own account, then you can use your existing account. You can create your own Twitter account from the Twitter website here.
Click 3 — Authorize your Twitter account
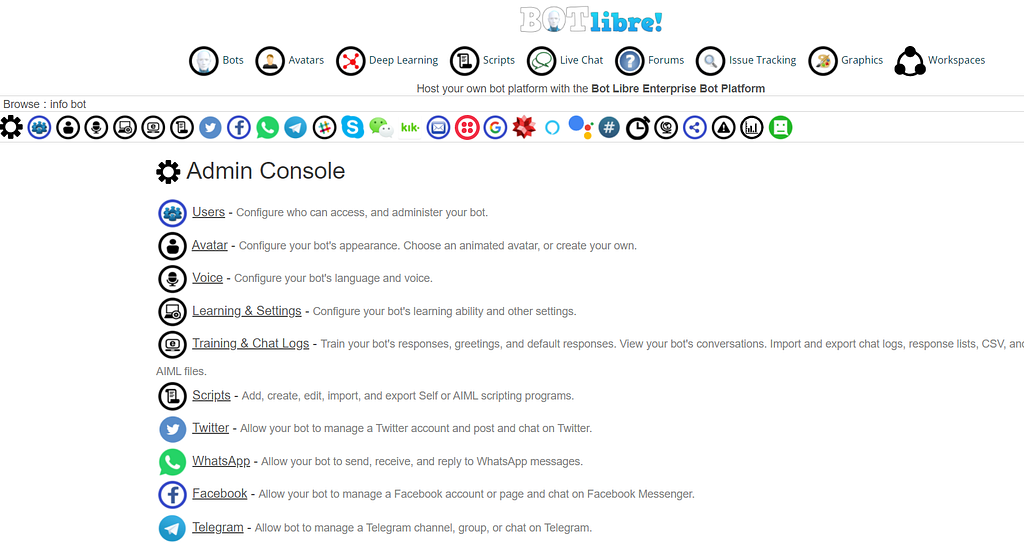
From the Bot Libre website browse to your bot and click the
Admin Console button. This will take you to the Admin section that provides several tabs of administrative functions. Click on the Twitter tab. From the Twitter tab click the Authorize button.
This will give you a link to Twitter. Click on the link, this will bring you to Twitter where you must accept the application authorization request, you will need to login to Twitter if you are not already logged in. Twitter will give you a code, you must go back to the Bot Libre page and enter the code, and click Done. This will return you to the Twitter properties page, next click on the Connect button.
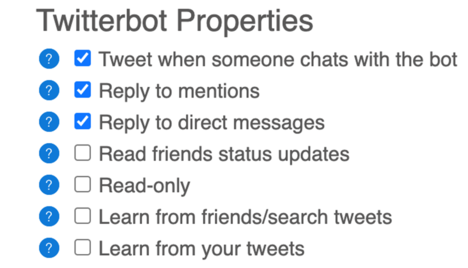
Click 4 — Configure your Twitterbot
You can configure your bot’s Twitter usage in several ways. Use caution when configuring your Twitter bot, do not use your bot for spam, or to violate the Twitter terms of service.
Tweet when someone chats with the bot
This property configures if the bot should tweet when someone chats with it on Bot Libre. It will tweet some like “Talking with anonymous on #botlibre”.
Reply to mentions
A mention is when another Twitter user tweets to you, or about you using your Twitter ID, i.e. @brainchatbot. This configures your bot to reply to all tweets that mention it. The bot will reply the same way it replies to chat messages.
Reply to direct messages
A direct message is private message from another Twitter user. This configures your bot to reply to all direct messages. The bot will reply the same way it replies to chat messages.
Configures if your bot will process its friends tweets. The bot will only process its friend’s tweets that include one of its ‘Reply Keywords’ sets. If the tweet does not include any of the keywords, it will be ignored. The bot will process the tweet like a chatroom message, it will only respond to the status update if it knows a good response, (requires a 90% match to respond). Scripted responses will also be used for tweets that are questions. The ‘Read-only’ option can be used to have the bot read all of its friends tweets, but not reply.
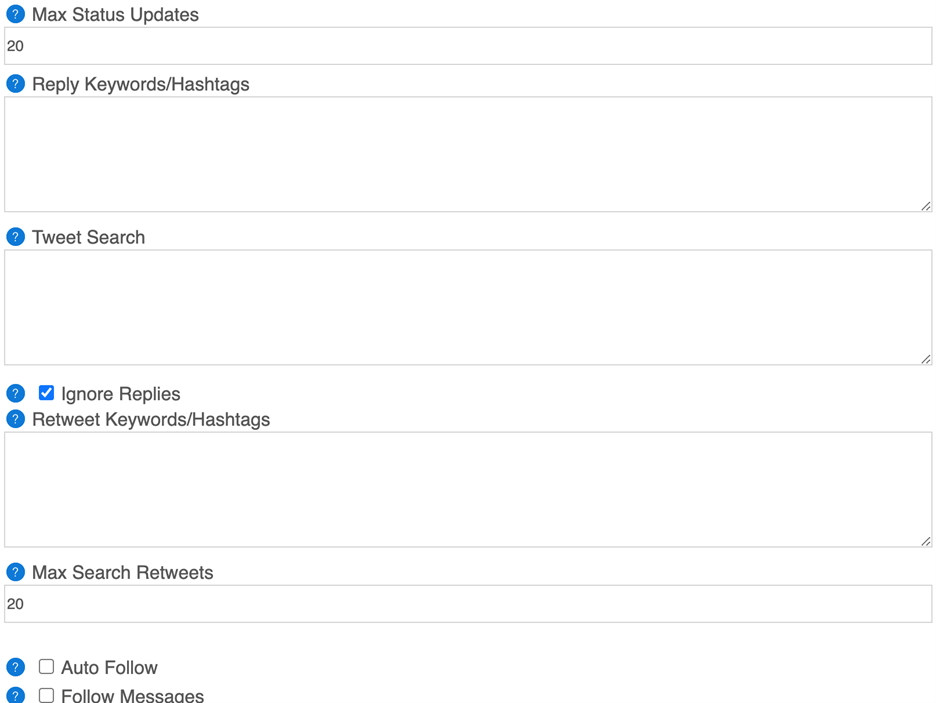
Max Status Updates
Configures the maximum number of friend tweets to process in one cycle.
Reply Keywords/Hashtags
The bot will only process its friend’s tweets that include one of its ‘Reply Keywords’ sets. If left blank, the bot will not process any of its friend’s tweets, unless the ‘Read-only’ option is used.
Tweet Search
Configures if the bot should search and process tweets that match a certain criteria. The bot will process, and possibly reply to the tweet, or retweet the tweet. Use this feature with extreme caution, and do not spam. Tweet search uses Twitter’s search API which can include a list of keywords, and some other advanced syntax.
Retweet Keywords/Hashtags
Configures if the bot should retweet certain tweets from its friends, or its tweet search results. If the tweet contains any of the keyword sets, the bot will retweet it. Note, this use only keyword set, not Twitter’s search syntax. Since the retweet keywords are apply on top of the search results, you only need to include the keywords, as the results have already been filtered.
Follow Messages
Follow Messages configures if your bot will listen to ‘follow me’, or ‘unfollow me’ requests. If the bot gets a direct message, or tweet mention that request a follow, or unfollow it will perform the request. The purpose of this is to allow the bot to provide some service to users that subscribe with it. Be careful in enabling this, it should not be used to allow Twitter users to increase their follow counts. The bot will only follow at most 100 users.
Welcome Message
You can set a welcome message to be sent as a direct message to anyone who follows your bot.
Max Friends
You can configure the maximum number of friends your bot will follow on its own. The maximum is 100 friends. You can still add more friends manually if you wish.
RSS Feed
Configures the bot to process an RSS feed, and post each new feed item to Twitter. An RSS feed is a standard XML format for news and posts. You can get an RSS feed link from your blog, or from many news and forum services. Make sure you give the full HTTP link to your RSS feed, this should be an XML file, not a webpage or HTML file.
RSS Keywords
You can filter the RSS feed results using keywords. To post the entire RSS feed, leave this blank.
Auto Tweet
You can configure your bot to tweet every set number of hours. The bot will tweet a random tweet from its ‘Auto Tweets’ list.
Auto Tweet Hours
The number of hours to wait between auto tweets. Note, if you bot only checks it status once per day, it will only auto tweet once per day, even if you put 1 hour here. To force your bot to auto tweet every time its checks its status, you can put -1 here.
Auto Tweets
You can enter a list of tweets here. Each tweet is separated by a new line. You can use formulas and AIML template to construct dynamic tweets.
Click 5 — Train your bot
You can train your bot how to answer tweets, mentions, and direct messages through several mechanisms.
You can chat with your bot, and correct any incorrect responses it gives.
You can add question answer pairs, or default responses from the Training & Chat Logs page in your bot’s Admin Console.
You can review your bot’s chat logs, or upload or import chat logs, response list, or AIML.
If you are a programmer, you can script your bot’s responses in Self, or AIML from your bot’s Scripts page.
That’s it, now your bot is ready to start tweeting.
A Twitter account can be linked to any Bot Libre bot. The bot will take care of your Twitter account, including checking status updates, maintaining followers, responding to mentions, retweeting key articles, tweeting your blog entries or RSS feed, and auto-tweeting. No programming is required, and you can train the bot using natural language.


![[link]](https://i.redd.it/3haogc3255181.png)