Expo, React native… on boarding chatbot : Part one
How onboard user, simply and efficiently.
The purpose of this article is to share my approach from start to finish to create software that exactly meets the demand. Examples have always been a great help for me. It is also important to share experience to evolve and exchange.
Prerequisites :
You need to know React and React-native’s ecosystem and familiar with react hooks, functional component and their life cycle. I’ll provide source code for each part of this article, but you can easily create you own project using Expo CLI.
While building a React Native application for car rentals, we needed users to validate some options and provide us some documents.
The solution found is to simulate exchange with us, through an interface where the user could interact with us and send us some documents.
I had a Figma board for the full scenario from the designer team :
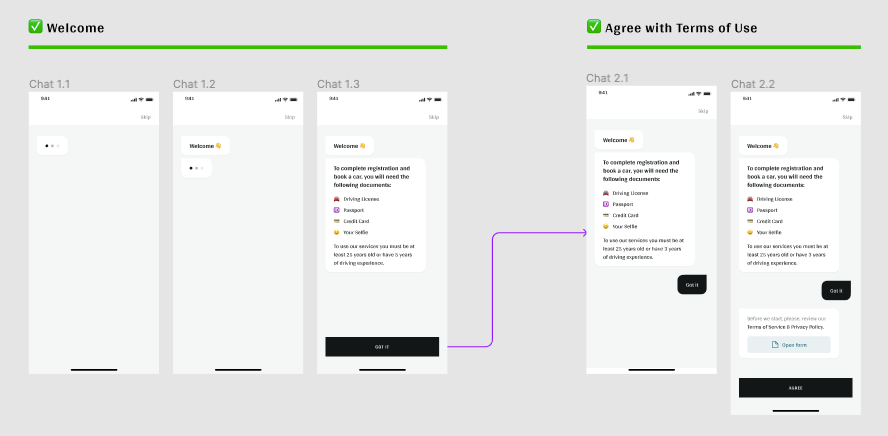
What the design shows us is a scrollView with the chatbot’s bubbles on the left and the user’s bubbles on the right. A button positioned at the bottom fixed and therefore not part of the scrollview.
Starting from there, i was able to identify several things, but mostly a repetitive process :
- The bot asks for something and the user answers with an action.
- For each chatbot bubbles we have a typing animation.
- For each bubbles we have opening animation.
- At the end of chatbot messages the bottom button appear.
- Each time the user click the button we have a user’s bubble with a new part of the scenario.
The idea is to identify recurrent processes allowing us to reuse components.
For this first part of the article we will look at the bubbles. From the user to the bot, how to simplify the development.
Trending Bot Articles:
2. Automated vs Live Chats: What will the Future of Customer Service Look Like?
4. Chatbot Vs. Intelligent Virtual Assistant — What’s the difference & Why Care?
Make a Bubbles Factory !
Users and bot are both use bubbles to display messages, but both bubbles are not the same. To simulate a discussion we need to find a way to make each message display independently with a delay. ChatBot bubble need animation before show message.
We need to take all this specification to build our factory.
For this part we create a bubble component, user-bubble, and the factory component, bubbles-factory. Finally we display them in a screen named Chat-bot.
User-bubble
It’s a simple component that displays the message we pass in its props (data) and some styling to match the design. I added an opening animation using the native react library, animated. I used animated’s parallel method to start an array of animations, opacity and x position.
const UserBubble = ({ data }) => {
const positionAnimated = useRef(new Animated.Value(10)).current
const opacityAnimated = useRef(new Animated.Value(0)).current

const Opening = Animated.parallel([
        Animated.timing(
            opacityAnimated,
            {
                toValue: 1,
                duration: 100,
                useNativeDriver: true
}
        ),
        Animated.timing(
            positionAnimated,
            {
                toValue: 0,
                duration: 200,
                useNativeDriver: true
}
        )
    ])

    useEffect(() => {
        Opening.start()
    }, [])

return (
        <Animated.View style={{ ...styles.bubble, opacity: opacityAnimated, transform: [{ translateX: positionAnimated }] }}>
            <Text style={styles.textBubble} >{data.text}</Text>
        </Animated.View>
    )
}
Bubbles-factory
Bubbles-factory is more complex. We have 2 very important props, data, bubble.
- Data is a simple array of objects. Each object represent a bubble, with a text object property.
{
  "chatBot": {
    "messages": [
      {
        "text": "test 1"
      },
      {
        "text": "test 2"
      },
      {
        "text": "test 3"
      }
    ]
  }
}
- Bubble props is the component to use to display the message. for now we use user-bubble only.
- Interval is just the delay we want to show the next message by default i have set this props to 1000 (1 second).
This is the code for the Bubble-Factory component :
const BubblesFactory = ({
    data,
    bubble,
    interval = 1000
}) => {
const [bubbles, setBubbles] = useState([])
const [index, setIndex] = useState(null)
const componentsLength = useMemo(() => { return data?.length }, [data])

    useEffect(() => {
let count = 0
const timer = setInterval(() => {
if (count === componentsLength) {
                stopBubbles()
                clearInterval(timer)
            } else {
                setIndex(count)
                count++
            }
        }, interval)
    }, [])

    useEffect(() => {
if (index !== null) {
            setBubbles([
                ...bubbles,
                data[index]
            ])
        }
    }, [index])

const stopBubbles = () => {
console.log('stopBubbles - end of sequence')
// Code here to dispatch next action
}

return (
        <Fragment>
            {bubbles.map((component, index) => {
return cloneElement(bubble, {
                    key: index,
                    data: component
                })
            })}
        </Fragment>
    )
}
First, we declare 2 stateful values, and a functions with the useState hook :
const [bubbles, setBubbles] = useState([])
const [index, setIndex] = useState(null)
- Bubbles is an array that we will use to display components as we go.
- Index is a number used to increment the data array props and to push the component is the bubble array.
At the initialisation of the factory, I create a SetInterval method which will allow me to increment the index variable. I set up a conditional logic to stop the SetInterval method according to the length of the data array.
useEffect(() => {
let count = 0
const timer = setInterval(() => {
if (count === componentsLength) {
                stopBubbles()
                clearInterval(timer)
            } else {
                setIndex(count)
                count++
            }
        }, interval)
    }, [])
As the useState is asynchronous, I use a second useEffect hook only when the index value changes to add the next data value.
useEffect(() => {
if (index !== null) {
        setBubbles([
            ...bubbles,
            data[index]
        ])
    }
}, [index])
I use a map function in the renderer, to display all the bubbles, and use a cloneElement method to return a new React element from the original element sent by props.
return (
    <Fragment>
        {bubbles.map((component, index) => {
return cloneElement(bubble, {
                key: index,
                data: component
            })
        })}
    </Fragment>
)
Make Bubbles !
You can find the all source code here.
With a bit of imagination you can modify and play with the factory and create your own effect. You can use different bubble styles, different components to use, even tried to use a decelerating interval ? Is that possible ? 😉
Next step
For the next part, i will show you how to add type animation for the chatbot bubble component.
Congratulations ! Thank you for reading this article, don’t hesitate to leave me comments on possible improvements, your opinions, your modifications, your tests.
Don’t forget to give us your 👏 !


React native onboarding chatbot : Part one was originally published in Chatbots Life on Medium, where people are continuing the conversation by highlighting and responding to this story.