WhatsApp For Business API 2022 — Complete Guide (Chapiter II)
Everything you need to know about WhatsApp chatbots in one place.
WhatsApp For Business Guide — Chapiter 2
1 — Setup your WhatsApp For Business account
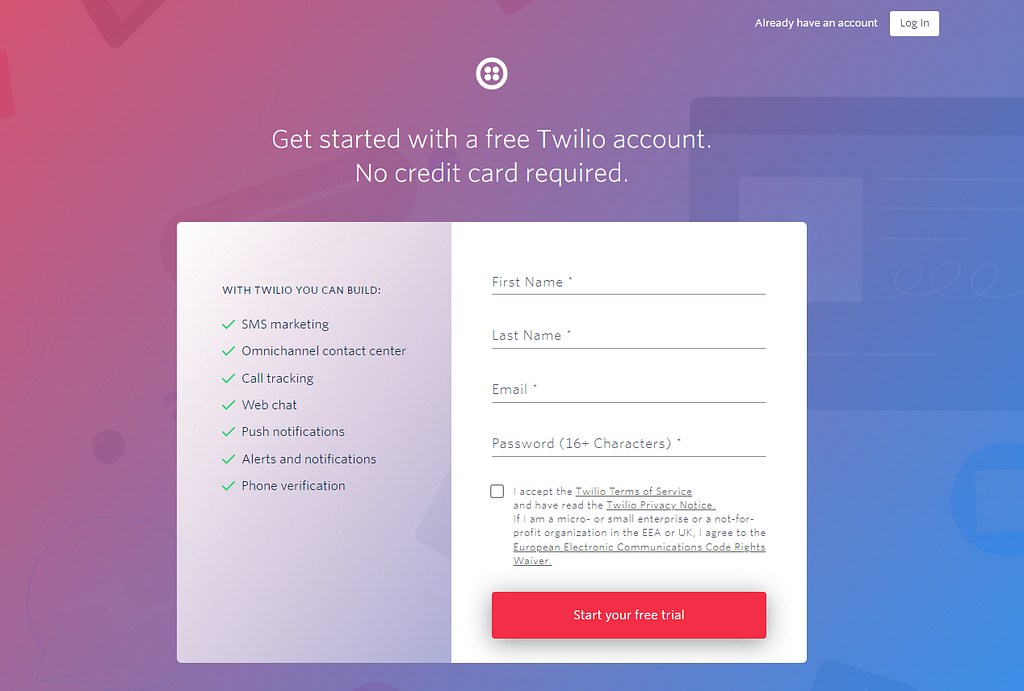
In this tutorial, we will use Twilio as our main provider for this use-case. The biggest advantage using Twilio is the ability to perform tests using their shared WhatsApp For Business phone number. Once we create our account we will be able to join a channel and start messaging the chatbot.
2. Go the console page and click on Create New Account
Step 2 : Create new account
3. Let’s give a name to our account, I used : “Medium Bot Test”
Step 3 : name your project
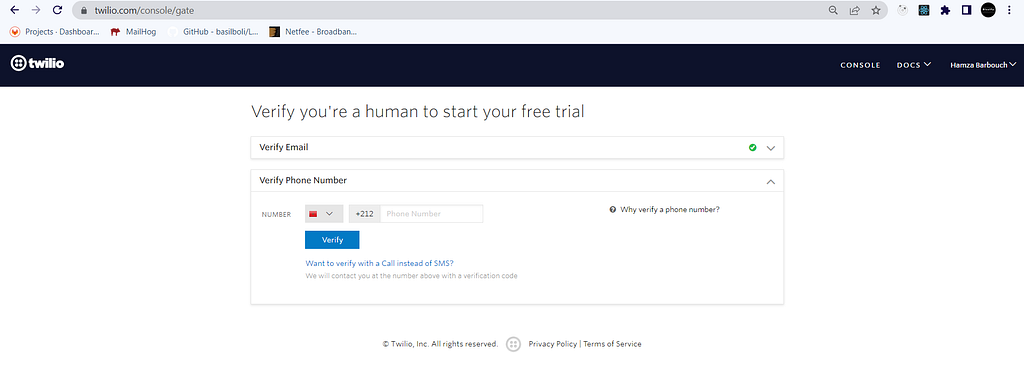
4. Verify your email or phone number in order to continue the process
Step 4 : verify your identity
5. Answer these questions and make sure you use the same input
Step 5 : fill out the questions
Tadaaa!! we have successfully created a free account with $15.50 credits.
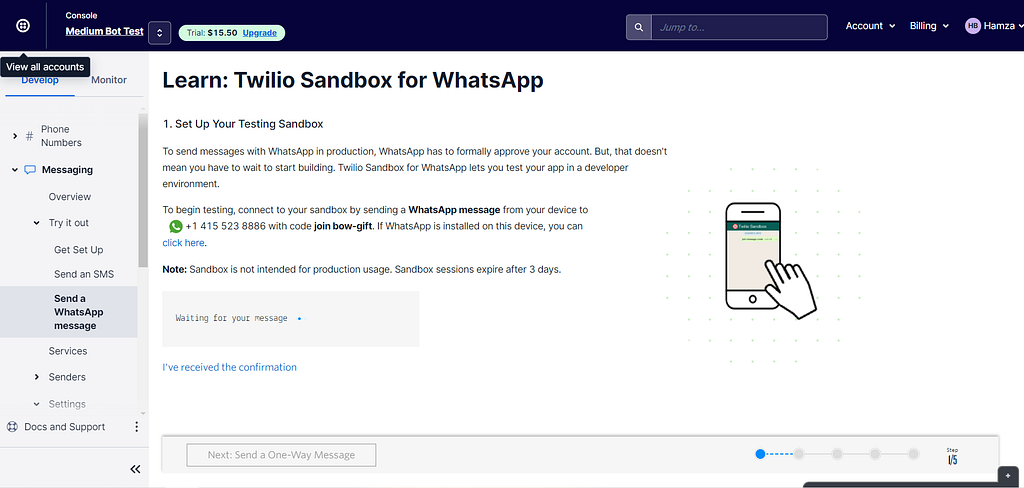
6. Activate the sandbox by clicking on confirm
Successful account creation
7. Send your first message to the bot
Twilio Sandbox for WhatsApp — send your first message
To begin testing, we will send a WhatsApp message from our device to +1 415 523 8886 with code join bow-gift.
Joining private channel in WhatsApp bot
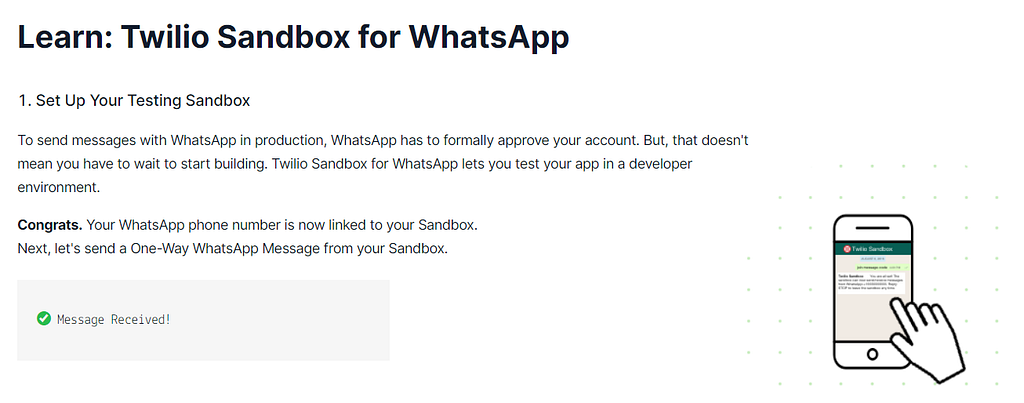
8. Channel connection confirmation
Message received on Sandbox successfully.
2 — Generate your back-end application
The main component of this project is the back-end, it’s where all the processing occures. For this particular exercice, we will use JHipster to generate our back-end application in Spring Boot. It will speed up the development for a first MVP.
JHipster requirements :
Node.js (LTS)
Java 11 (JDK)
Make sure you have Node.js and Java 11 already downloaded and installed properly and then go to this tutorial to install JHipster : https://www.jhipster.tech/installation/
We will consider in this tutorial that you have already installed all requirements alongside with JHipster.
Initiate project in JHipster via CMD
Once you launch Node.js command line, create a folder called MediumBotBundle or whatever name that suits you, after that, run this command to start JHipster :
cmd -> jhipster
After that, the generator will ask you about the type of application, select Monolithic application.
Important : make sure you select the same options as shown in the image
After few minutes, the application will be generated and you will be able to start development. I personally use Intellij Community Edition as my main IDE and I highly recommand it for your future projects.
JHipster project structure
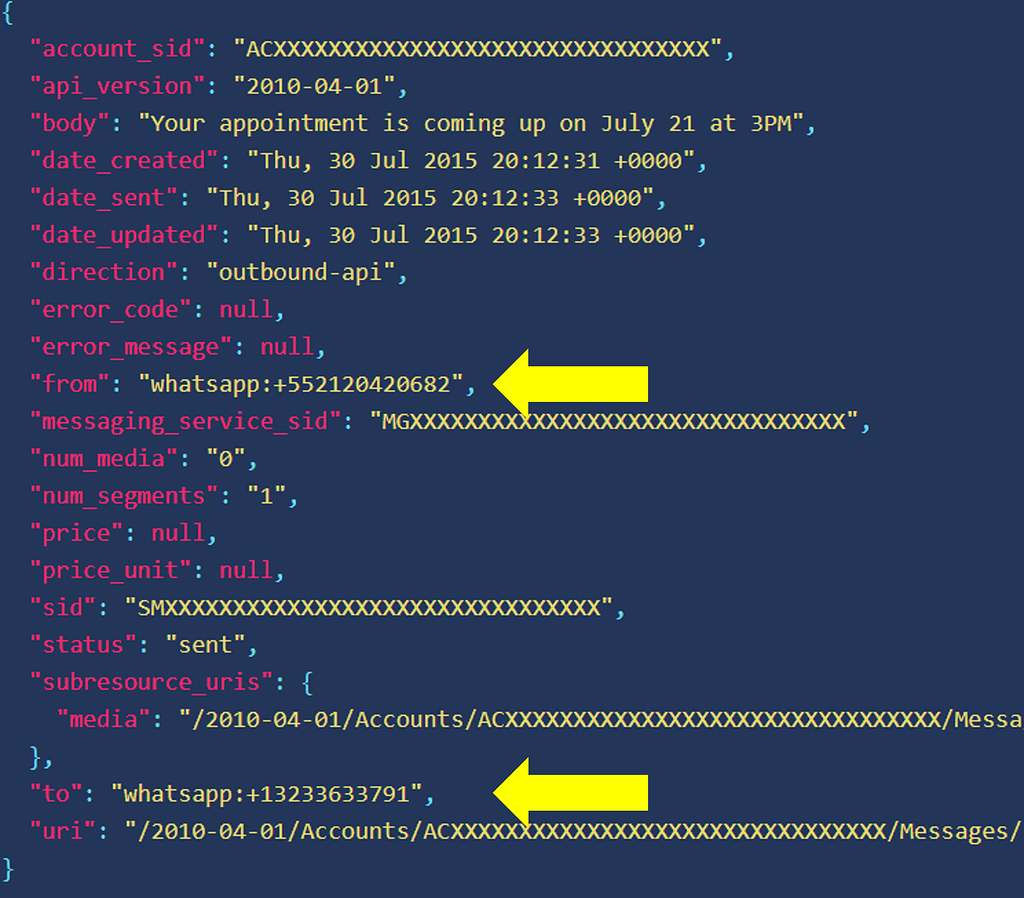
Create a class named “WhatsAppBusinessController” in web.rest package. The purpose of this class is to intercept all requests sent by Twilio to our WebHook when a user communicates with the bot.
Below is the JSON received in our interceptor :
JSON structure of Twilio message
We have 3 main attributes from this JSON message :
Users shouldn’t be guessing which option is available or not when they are searching for something.
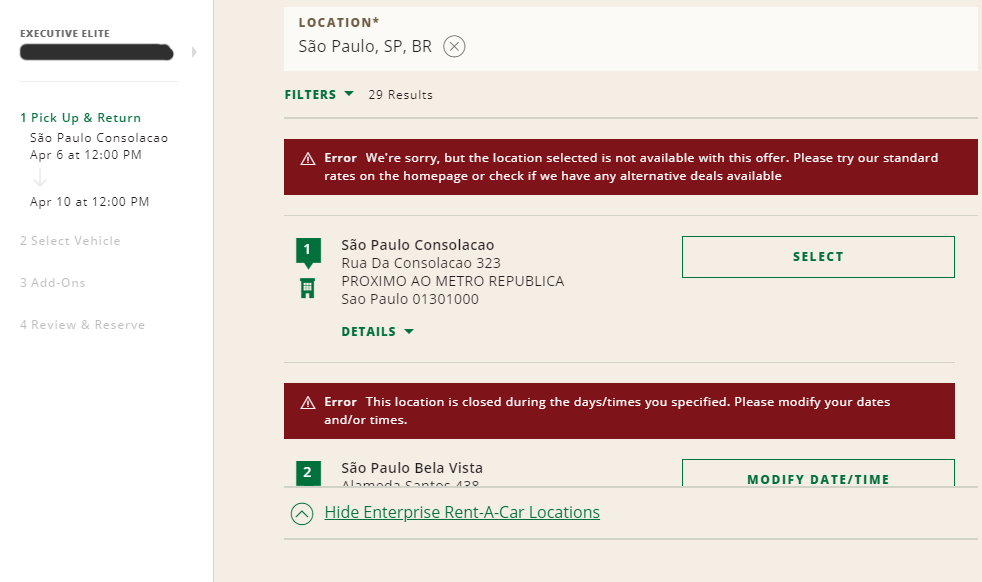
Take this search as an example. National Car Rental website shows the user all the locations available to book a car for the dates already selected, but when you try to select one of them, two errors appears: either the store doesn’t open at the select date and time or the store is not valid for the promotion code added.
As you can see, there are many stories in the São Paulo (City in Brazil) area that supposedly is “available” to book (the red error only shows after your try to book), but after 2 minutes of clicking on all of them, only 2 or 3 were actually accepting bookings at given filters.
The only exception I’d like to mention is when the unavailable option is placed in the results as a marketing strategy.
As an excellent example, I can show Booking.com — which by the way does an awesome job with their UX.
They do show unavailable options (but notice here that the message about it is already visible to the user without having to click, it doesn’t leave the user confused thinking that’s available), but to induce a sense of FOMO, i.e., fear of missing out. They are indirectly saying “hey, look, this hotel is sold out because you were late, act now or you’ll miss more opportunities”.
Never use fonts too light in small texts, and always check with web accessibility evaluation tools if your design is compliant to WCAG rules to avoid law suits
3) FORGET TO DISABLE IT AND LACK OF FEEDBACK AFTER CLICKING ON A BUTTON.
Sometimes we need to load content after the whole site is already there. But if that new content pushes everything down when being placed, you got a UX problem here.
Since the interface is already loaded, the user might be in the middle of an action, a click, drag, and drop. And having the content pushed down might cause unexpected behavior if the user clicks somewhere at the same moment that the new content appears.
The example below shows a shopping cart after adding a product. The e-commerce then loads related products on top of the cart after the content has already been loaded. If the user tries to change the quantity of the first product in the cart right at the moment that the related products are being loaded, it ends up clicking on one of them and going to the product page, frustrating the experience of buying that first product (Yeah, I did that many times, I always forget to wait for the related products, but this shouldn’t be an issue the user needs to deal with).
The Role of AI in the Transformation of the Insurance Industry — DATAVERSITY
The insurance industry has been traditionally conservative with technology advances and hesitant to adopt new technologies. However, times are changing, and artificial intelligence (AI) is gaining much attention from insurance companies, who are starting to realize the important role that AI can play in their operations.
AI in the insurance industry is poised to bring another wave of disruption and innovation to this $5.3 trillion global market.
GET UNLIMITED ACCESS TO 140+ ONLINE COURSES
Choose from a wide range of on-demand Data Management courses and comprehensive training programs with our professional subscription.
According to McKinsey & Company, there’ll be 1 trillion connected devices by 2025. This will help collect tons of data to enhance the power of AI in the insurance industry even further.
Competitors are taking every possible step to claim their digital market share by investing huge amounts in digital transformation. And one of the key points in this process is how to reduce costs and expenses.
Top 5 Use Cases of AI in the Insurance Industry
Let’s look at the capabilities of AI in the insurance industry.
1. Faster Claims Processing With NLP
Natural language processing (NLP) refers to algorithms that can understand human speech or text from written documents and convert them into plain language or other formats.
It’s essentially a form of machine learning that enables computers to understand human language without having to write programming instructions for each word or phrase.
The claims management process can be very costly, both in terms of time and money. Up to 50%-80% of premiums ‘ revenues can be eaten up by this process, which is largely paper-based and rarely digitized. That’s where NLP can save resources for insurance companies.
Many industries already use NLP:
However, the use cases of NLP and AI in the insurance industry are still evolving.
For example, as part of its Intelligent Production platform, Swiss Re is using NLP to automate some parts of:
Claims management processes
Customer communication
Underwriting
2. Rapid Document Digitization with OCR
The first step to any data analytics project is collecting and organizing your data, which can be time-consuming and tedious for large organizations.
One way to automate this process is to use optical character recognition (OCR) software, which converts scanned images into text that can be easily searched by keyword or indexing software.
Image recognition is one area of AI in the insurance industry that can save a lot of money. In fact, it can drive up to 80% in cost savings for individual processes.
Some of the use cases for OCR include:
Here’s an example of how OCR works:
An insurer could use OCR to scan documents from claims files from multiple sources. The sources can be medical records from doctors’ offices, police reports from law enforcement agencies, or claims forms filed by clients.
Then, they input the text into a central database where it can be analyzed by machine learning algorithms and compared against other similar documents.
3. Insurance Fraud Detection and Prevention
Insurance fraud is a major industry problem, but AI can help companies detect fraudulent claims before they become a significant issue.
A recent study by the Federal Bureau of Investigation revealed that insurance fraud (non-health insurance) costs U.S. insurance companies close to $40 billion annually.
AI can analyze patterns in past data and determine whether something looks suspicious. AI-powered systems can analyze thousands of data points per second and detect anomalies more accurately than humans ever could alone.
Here’s how AI can help in insurance fraud detection and prevention:
4. Accelerated Claims Adjudication with Visual Image Recognition
AI can analyze images, which makes it a valuable tool for insurance companies. Insurance claims adjusters are often asked to evaluate photos of damaged property or vehicles to determine what needs to be repaired or replaced.
Insurance companies can use machine learning to exploit behavioral data, such as facial expressions or the tone of voice, at the moment of underwriting.
This is especially common in life insurance or health insurance, where it’s been estimated that over 40% of risk information can be gathered from behavior monitoring alone.
However, human error often leads to inaccurate estimates. AI-based claims management systems can quickly and effectively process:
This allows organizations to make more informed decisions about their claims processes and ultimately improve customer satisfaction.
5. Improving Customer Experience
By leveraging conversational AI, insurers can automate repetitive tasks such as answering questions about policy features or claims to improve their customer experience.
AI-driven chatbots can:
Insurance companies can also use technology such as predictive text analytics that uses machine learning algorithms. They can analyze past customer conversations or unstructured data like emails or social media posts.
Conclusion
Advancements in machine learning, deep learning, and AI are making their way into the insurance industry and changing how enterprise insurance software is built. This, in turn, will help to reduce defensibility among traditional enterprise insurers and increase competition.
There’s great potential to innovate with AI in the field of insurance. That’s because the proliferation of data makes it easier to predict fraud, mitigate risk exposure, provide more personalized policies, and settle claims more quickly.
In this article, we will be sharing steps to building an iOS chatbot with Kompose. We will teach you everything you need to build a sample chatbot using Kompose for an iOS app.
Step by Step Guide to Building iOS Chatbot with Kommunicate
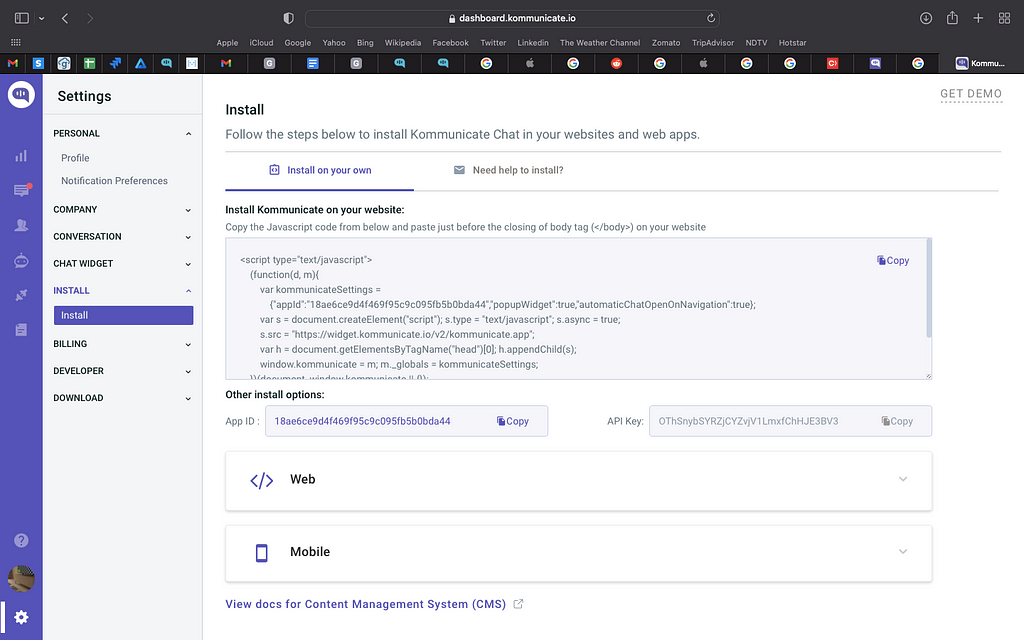
Next, log in to your Kommunicate dashboard and navigate to the Bot Integration section. Locate the Kompose section and click on Integrate Bot.
If you want to build a bot from scratch, select a blank template and go to the Set up your bot section. Select the name of your bot, your bot’s Avatar, and your bot’s default language and click “Save and Proceed.”
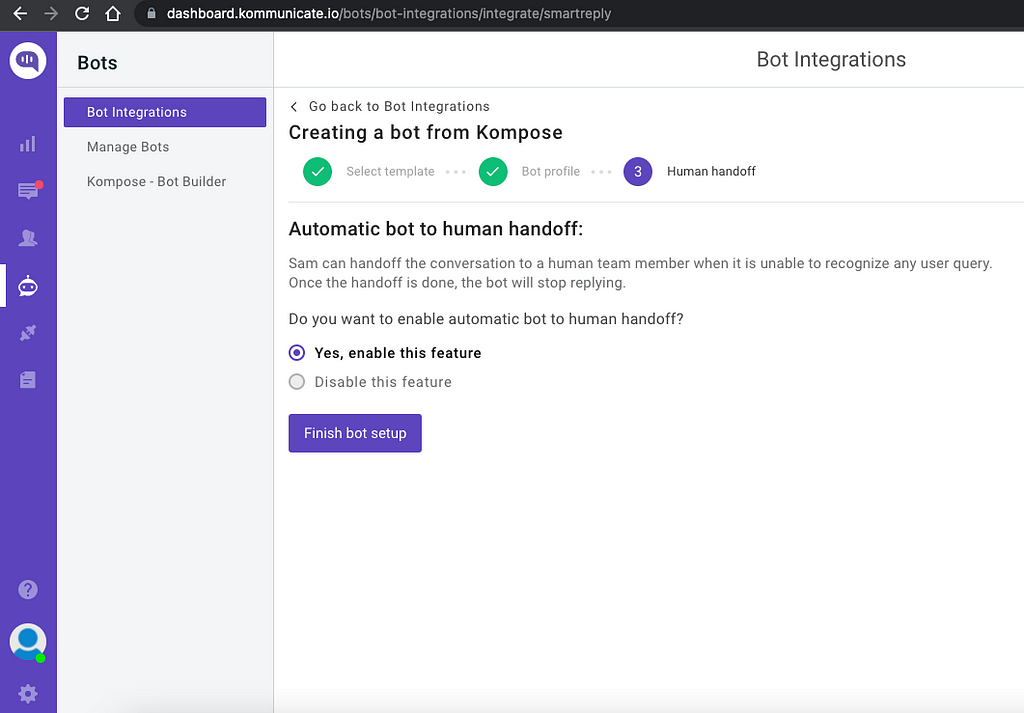
You are now done creating your bot. Now comes the interesting part — training the bot for a query it does not understand. This is done by clicking the “Enable bot to human transfer” feature. Enable this feature and click “Finish Bot Setup.”
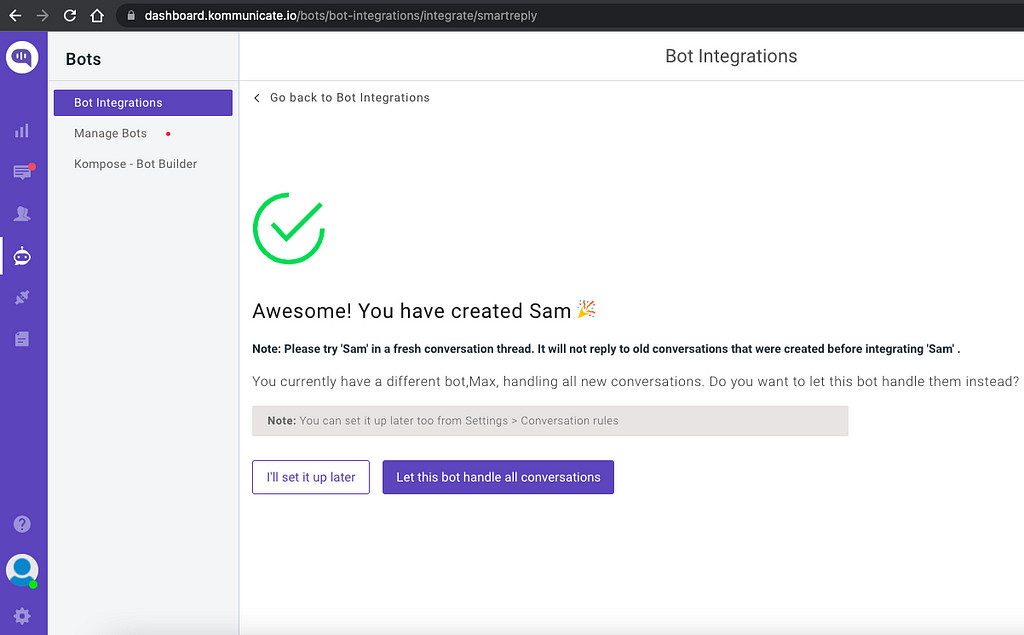
From the next page, you can choose if this bot will handle all the incoming conversations. Click on “Let this bot handle all the conversations,” and you are good to go.
Newly created bot here: Dashboard →Bot Integration → Manage Bots.
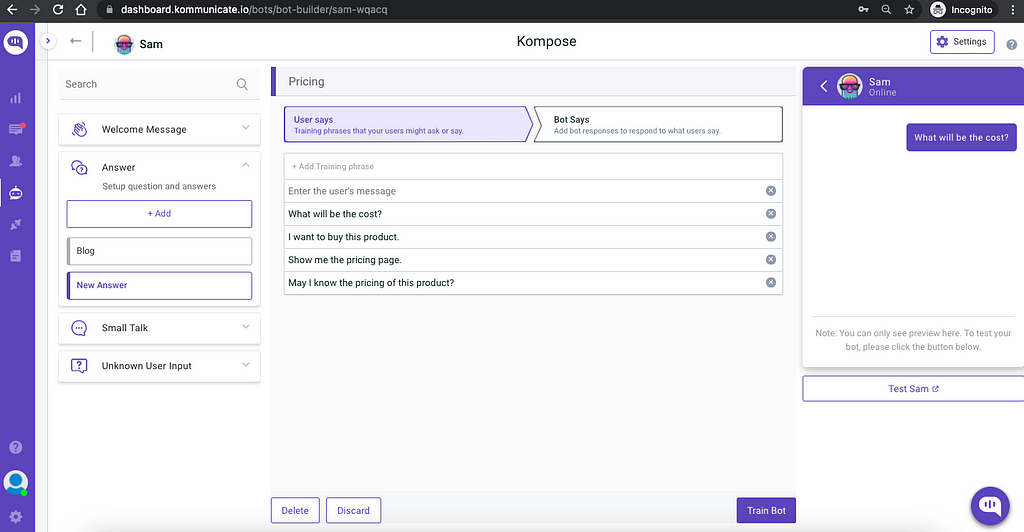
Step 2: Create welcome messages & answers for your chatbot
First, set the welcome message for your chatbot. The welcome message is the first message that the chatbot sends to the user who initiates a chat.
Click the “Welcome Message” section. In the “Enter Welcome message — Bot’s Message” box, provide the message your chatbot should be shown to the users when they open the chat, and then save the welcome intent.
After creating the welcome message, the next step is to feed answers/intents. These answers/intents can be the common questions about your product and service.
The answers section is where you’ve to add all the user’s messages and the chatbot responses.
Go to the “Answer” section, click +Add, then give an ‘Intent name.’
In the Configure user’s message section — you need to mention the phrases that you expect from the users that will trigger.
Configure the bot’s reply section — you need to mention the responses (Text or Rich messages) the chatbot will deliver to the users for the particular message. You can add any number of answers and follow-up responses for the chatbot.
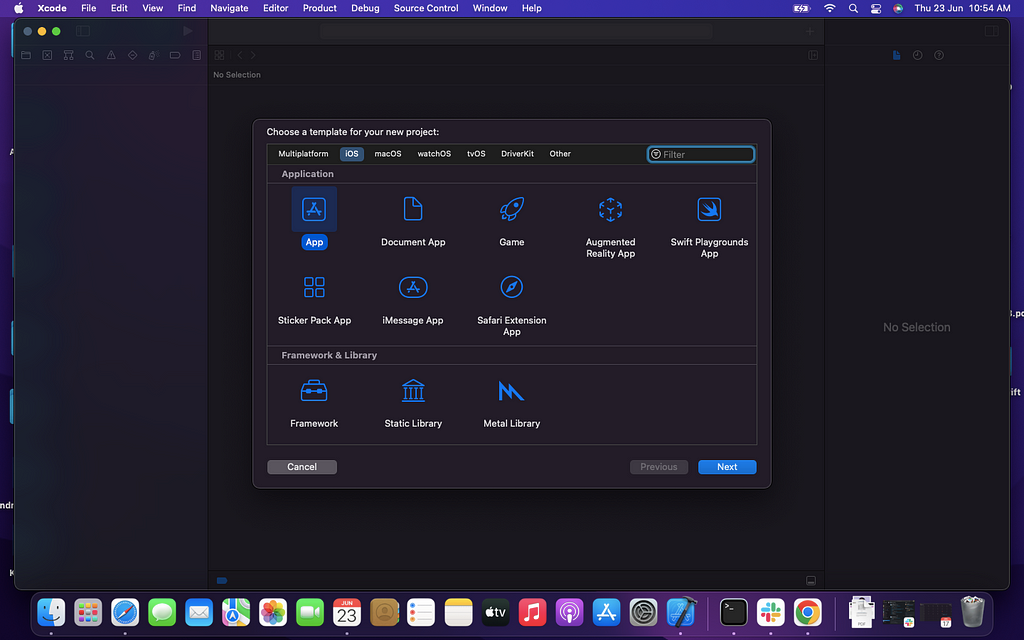
Phase 2: Add the created chatbot to your IOS Project using Cocoapods
Step 1: Setup Cocoapods:
Since we are going to add the Kommunicate SDK using cocoapods, this step is necessary for it. If you already have cocoapods in your system, then you can skip the step. If not, follow the link & install cocoapods
How to add a Chatbot to iOS was originally published in Chatbots Life on Medium, where people are continuing the conversation by highlighting and responding to this story.
How do collect and train data for speech projects? — TwinzTech Blog
Some refined tweaks can give you an enormous advantage over other players in the Escape from Tarkov game, which most gamers ignore. The steps are simple yet effective; moreover, if you ignore these features, it becomes a barrier in your path to consistent victory.
Some subtle moves brighten your winning perspective. Primarily you need to survive in a hostile environment; then, you will encounter a spectrum of game mechanisms; the following tips will help you to overcome those barriers.
1. Participate in quests
At the beginning of the voyage, you must participate in as many numbers of possible quests. It is a warm-up round. The more you face opponents, the more your self-reliance fortifies. The quests make you acquainted with varied weapons and teach you different combat styles.
After successful completion of quests, your weaponry, ammunition, and utilities increase significantly and give you a strategic advantage. As quests are crucial to stay alive, you can use some Tarkov hacks.
2. Play with bots
Before you step forward in a real war zone, you can play online and offline computer bots. As the bots are AI-driven, they follow a certain pattern and are more systematic than human players; the session gives you the necessary experience and skill before you play the real Escape from Tarkov.
You not only gain some essential experience but also hone your gaming skill. In this gaming session, you would not be able to open new levels and get additional weapons, but build up your skill and hence increase your scoring rate.
3. Read the map
If you learn the map thoroughly, it will save many potential pitfalls, and you will be able to seize many opportunities if you know the exact location of yourself. There are many passageways and escape routes that you can utilize for ambush and run away after the attack.
To make the map more readable, you can use another device to display it. Try to memorize the flanks and escape routes as it gives some precious moments that can be decisive between life and death.
4. Shield your health
Every player has inherited 435 health points, but in combat, you will incur health hazards as you give frightful time to enemies. Even if you are armed with state-of-the-art weapons, you need to shield your health. The severity of the injury is displayed in color schemes; grey implies you need medical health while showing the gravity of the health issue. The provided Medikit can take care of moderate wounds but opt for a CMS kit in case of severe injury.
5. Buy Insurance
In combat, you can lose any item, including your gear and ammo. Use ten thousand rubles to buy the insurance but covers only those items that have not been extracted. You can hide the insured items in a secret place but need to recover them within seventy-two hours once it is returned to your wallet.
Insurance can be insignificant if the gear and weapon are not premier because most players will ignore those regular items; you can use the money for a greater purpose.
6. Ammos
The ammo plays a pivotal part in the Escape from Tarkov game; it enhances the firepower and accuracy of the weapons considerably. But you need to have the knowledge of which ammo aligns with which gun. All ammo does not match with all weapons; you will find a guide that describes the specifications.
7. Security container
As the game unfolds and you inch up a higher level, the security container grows in size. You can conceal your weapons inside the container, safe from the probing eyes of enemies. It will keep the weapons safe from robbers. It will help to retrieve the items if you get eliminated at a particular level of the game.
8. Watch your move
In many PVP games, including Escape from Tarkov, the outcome is decided before a single bullet is fired. Learning to fire a fatal bullet and how to avoid one is the game changer for the title. Movement is paramount for staying alive; move with a purpose, and watch your every step; if you hear a subtle sound of breaking a twig, be on red alert.
Be silent. That camouflage your position; it could draw the enemies near to you and be seating ducks. If you are in the line of fire, do not panic; either shoot back or move away from the line of fire.
9. How and where
Do not thump while moving in a confined area or ignore footsteps sound while in the quest. This reveals your location, and veterans would be cheerful to be trigger happy. This does not imply you need to crawl silently all through the game; if you move at snail speed at an open location chance of getting killed is high.
Sound is not as crucial in highlands like woods and shorelines, but in congested places like interchanges or customs, you need to stride quietly and softly. You need to consider not only how you are moving but also where you are moving.
Artificial Intelligence should have safety measures to prevent harm to humans.
Artificial intelligence is a very smart instrument. It can create complex plans and outsmart humans in virtually every way imaginable. This has led many to be quite concerned about the rise of AI, but it may not be as scary as it seems. Here are some rules and laws that could help ensure that AI doesn’t endanger mankind.
Introduction
Artificial intelligence is a powerful tool that can make the world a better place. However, it also has the potential to cause great harm if left unchecked. This is why I believe that artificial intelligence should be governed by rules and laws.
A.I generated Image
Artificial Intelligence is an emerging field of research that uses computers to perform tasks usually associated with human intelligence, such as visual perception, speech recognition, decision-making and translation. Artificial intelligence systems are becoming increasingly capable at performing tasks that were once thought to require human intellect or creativity. These include: intelligent robots (robots able to perceive their surroundings and move), electronic assistants (computer programs which allow users to perform simple tasks without ever having to interact with them directly), prediction engines (systems which learn from historical data in order to make future predictions), expert systems (systems which use knowledge embodied in training examples) and natural language processing (a subset of artificial intelligence concerned with creating computer programs which can understand human language).
The important thing is to ensure that AI systems are safe enough from hackers or others who will try to misuse them for evil purposes or even just for personal gain. This can be done by making sure there are rules set in place so that any malicious acts done by AI will get punished by law enforcement agencies.
Artificial Intelligence Ethics
The idea of ethical use of artificial intelligence (AI) is not new. In fact, it was first proposed in 1968 by Joseph Weizenbaum, a computer scientist who wrote an influential paper on the topic. The paper was entitled “Computer Power and Human Responsibility,” and it argued that computers should be programmed to behave ethically.
In recent years, much has been written about the need for ethical use of AI. But what does this mean? How do we ensure that AI behaves in ways that are aligned with our values?
To answer these questions, I need to start with some basics. In order to ensure ethical behavior from AI systems we must first understand how they work as well as their strengths and weaknesses. To this end, we must also understand how humans think and behave in order to better design them so they can learn from us rather than from their own experiences.
Will A.I Be Involved With Future Crimes?
AI has been implemented in many areas of life but there is one area where it has not been as successful: criminal activities and law enforcement. There are several reasons why AI cannot be used effectively to fight crime and terrorism:
The rules of engagement are unclear: The rules of engagement for law enforcement agencies have not yet been established for AI agents. Therefore, these agents will be operating under an ambiguous framework which could lead to unpredictable outcomes or even cause harm to innocent people if the agent does not follow its programming correctly or accidentally causes damage to property or other people.
There is no clear objective for AI agents: Law enforcement agencies need an objective for their actions if they want them to carry out operations efficiently and effectively without causing collateral damage or harming innocent people.
How to prevent miss use of A.I in future
The use of artificial intelligence (A.I.) in the future will be beneficial for our lives but it is important to govern A.I in a way that it can be used safely and ethically.
We should make rules and laws to govern A.I because we cannot assume that everything will work out fine. We need to have rules and regulations for us to know what we should do or not do when it comes to the use of A.I in the future.
We need to make sure that everyone knows about these rules and regulations so they can follow them when they encounter an artificial intelligence that is not under human control, like in a game or something else like that where you have no control over what happens next, you can only assume what might happen by looking at what happened before or looking at some other experiences people have had with such computers before.
We have to be aware of our rights and obligations towards A.I, as well as their rights and obligations towards us. We should also have an open dialogue about what kind of rules and laws we want to make for A.I, so that we can make sure that the technology doesn’t get abused by humans in the future.
In order to prevent misuse of A.I by humans in future, we should first introduce a new law that will control the usage of AIs by humans in our country. This new law should also cover other countries around the world, so that we can agree on common standards for all countries who use AIs for their own purposes.
We could start by creating a committee where representatives from different sectors (government agencies, academia etc.) will discuss on how they want to regulate their usage of AIs in their respective fields or industries.
Takeaway
A.I is literally a device aimed at creating a better future for us, and if it’s not governed by laws then the bad can easily outweigh the good. We should work towards making sure it remains beneficial and does not harm the progress of humanity.
We live in an era where artificial intelligence (AI) has taken over every aspect of our being. And customer experience (CX) is not alien to it.
As the world embraces new-age customer experiences (CX) with open hands, warranting the delivery of hyper-personalized customer engagement to a more informed, connected, and empowered customer, organizations are left to deal with several questions and dilemmas.
After all, endless customer conversations are happening online on various social channels — Facebook, Instagram, WhatsApp, Twitter — it’s challenging to cover every digital touchpoint and use the enormous amount of customer data it generates to fathom “what customers want.”
That’s where conversational commerce comes to the rescue. Powered by AI, conversational commerce solutions like chatbots, voice bots, and other digital assistants have enabled companies to render human-like customer interactions at scale. Conversational commerce apps on various social channels leverage the unending amount of customer data to analyze customer behavior, predict their needs to deliver proactive engagement, and provide more personalized support.
Let’s explore more.
Conversational Commerce In Various Social Channels — What Can It Do For Your Business?
“Human interaction matters now — 82% of U.S. and 74% of non-U.S. consumers want more of it in the future. Regardless, the technology supporting human interaction must be seamless and unobtrusive across channels,” stated PWC’s latest report, Experience is everything: Here’s how to get it right.
Conversational commerce solutions in the form of Facebook, Instagram, and WhatsApp chatbots are making this a reality.
Conversational chat commerce, powered by advanced technologies like machine learning, artificial intelligence, and natural language processing, is the latest paradigm in the customer experience world that draws in huge investments from the C-suite leaders. Chat and voice bots available on various social channels are now being used to solve a host of simple and complex customer queries 24X7, understand customer emotions, store information about purchase history, discover patterns in their behavior, and act accordingly to achieve maximum customer satisfaction.
Modern customers live online. They may be awake at two at night, browsing for new products or even reaching out to customer support. And they may do so from their desired social channel, be it Messenger, WhatsApp, or Instagram. Moreover, they may want to switch channels amidst an ongoing support case, i.e., change from WhatsApp to Facebook. Here conversational commerce solutions take charge. Not only do they provide instant, round-the-clock customer support, but e-commerce bots can retain the original context of the conversation to allow seamless switching without the customer being asked to start over.
So, what are the use cases of conversational commerce? How can chat and voice bots present on various social channels delight customers and build value at each stage of the sales funnel?
Let’s find out.
Curating A Personalized Sales Journey Through Conversational Commerce
Below, we present to you the use cases of conversational commerce on various social channels that can help organizations tailor sales journeys and win the life-long loyalty of their customers.
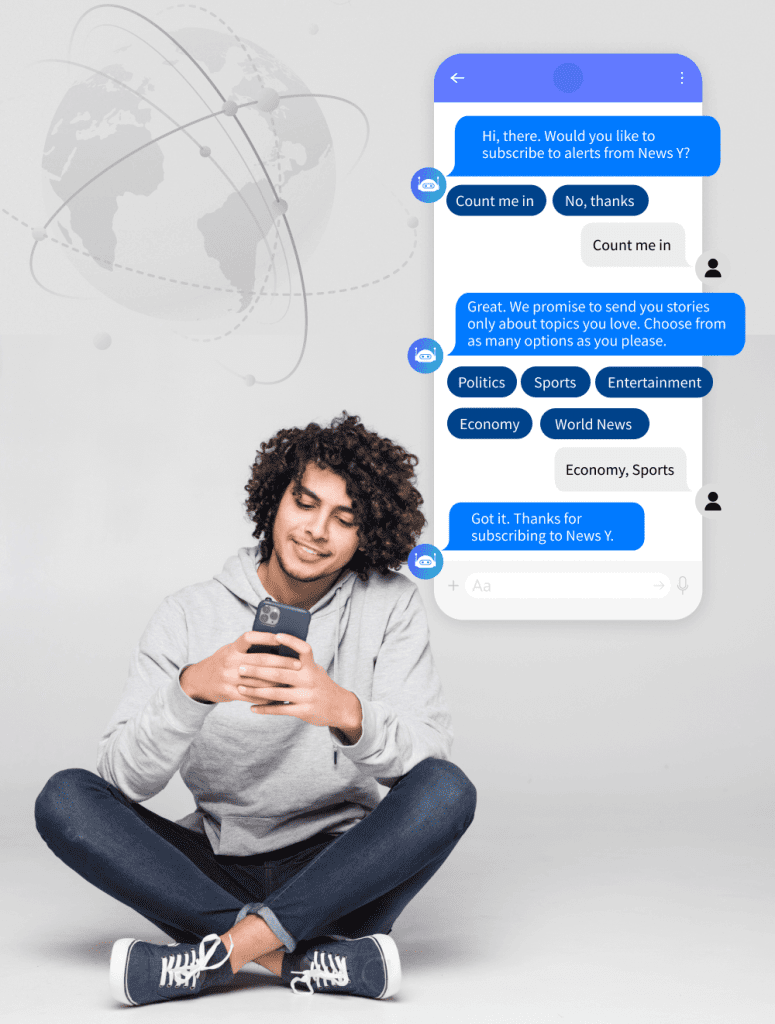
Amplify reach to new customer segments by pushing alerts about new products, collecting customer preferences and behavior data, answering initial queries, and delivering personalized recommendations and tips.
Acquire customers by curating creative marketing campaigns on the most popular social channels, assisting customers with website navigation, payment, checkout, and product use, and tailoring product suggestions according to purchase history and past behavior.
Is this shirt available in a different color? When will I receive my package? Customers can get their queries addressed simply by approaching the brand’s chatbot on the social channel of their liking. In this way, not only customer support becomes more accessible, but brands also get hold of valuable information that can help personalize CX.
As and when the customer’s desired product becomes available, e-commerce bots can push notifications and alerts through various social channels and provide a CTA to “Buy Now.” It can also suggest alternative and supplementary products as the case may demand.
Collect customer feedback through Instagram and Facebook surveys on a test batch of a new product.
Curate loyalty programs and send personalized discount and reward coupons to encourage customers to share product ratings and feedback and develop long-lasting relationships.
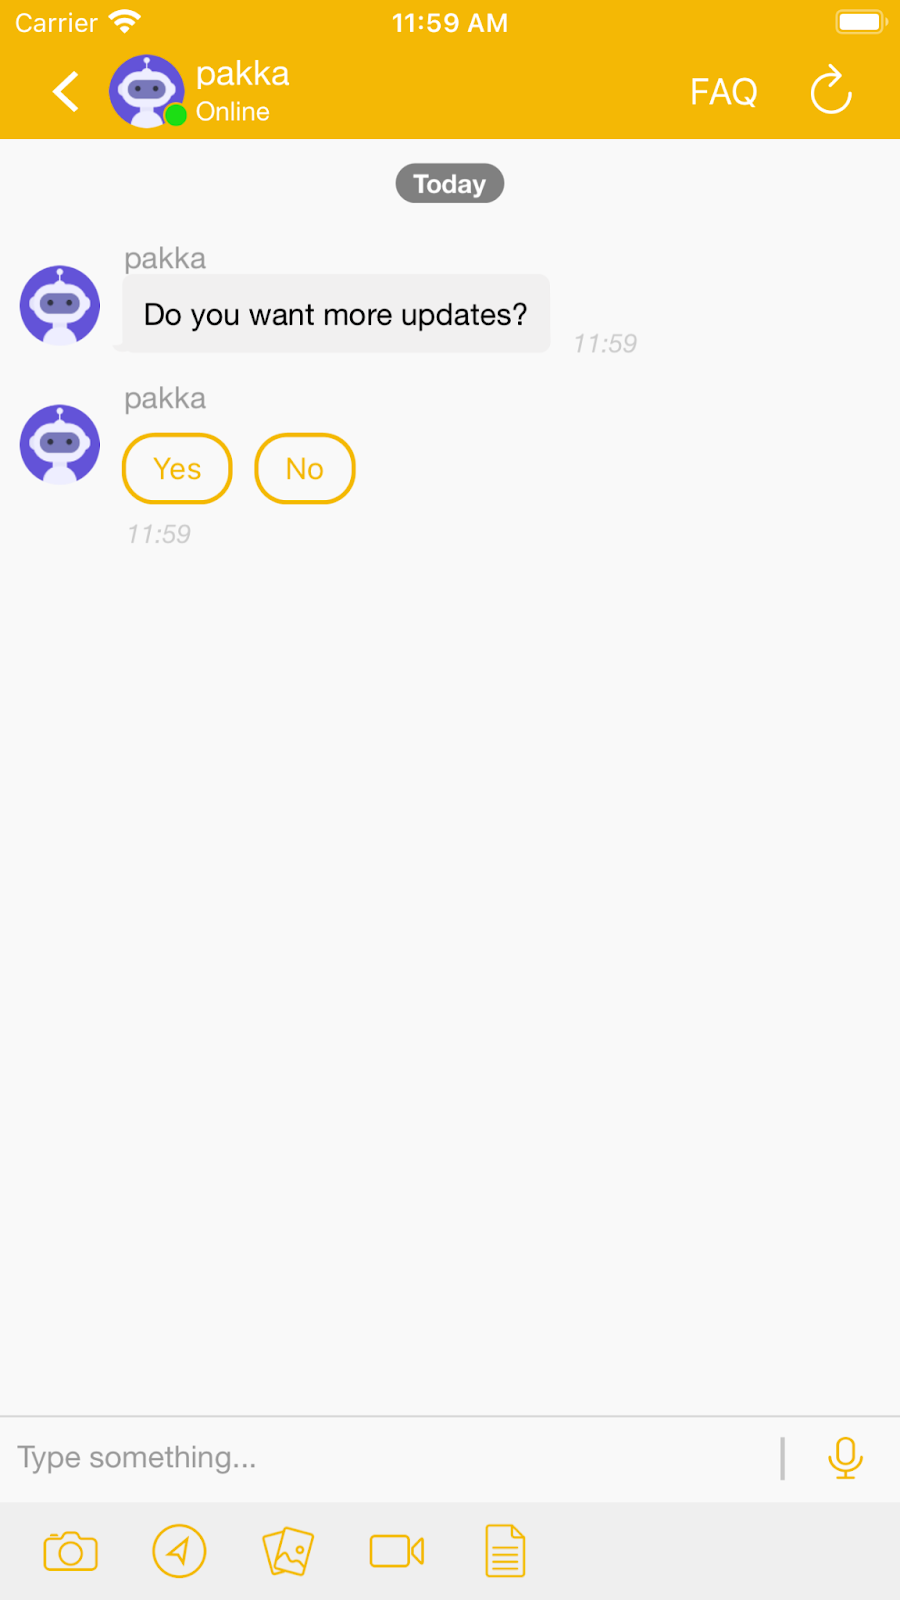
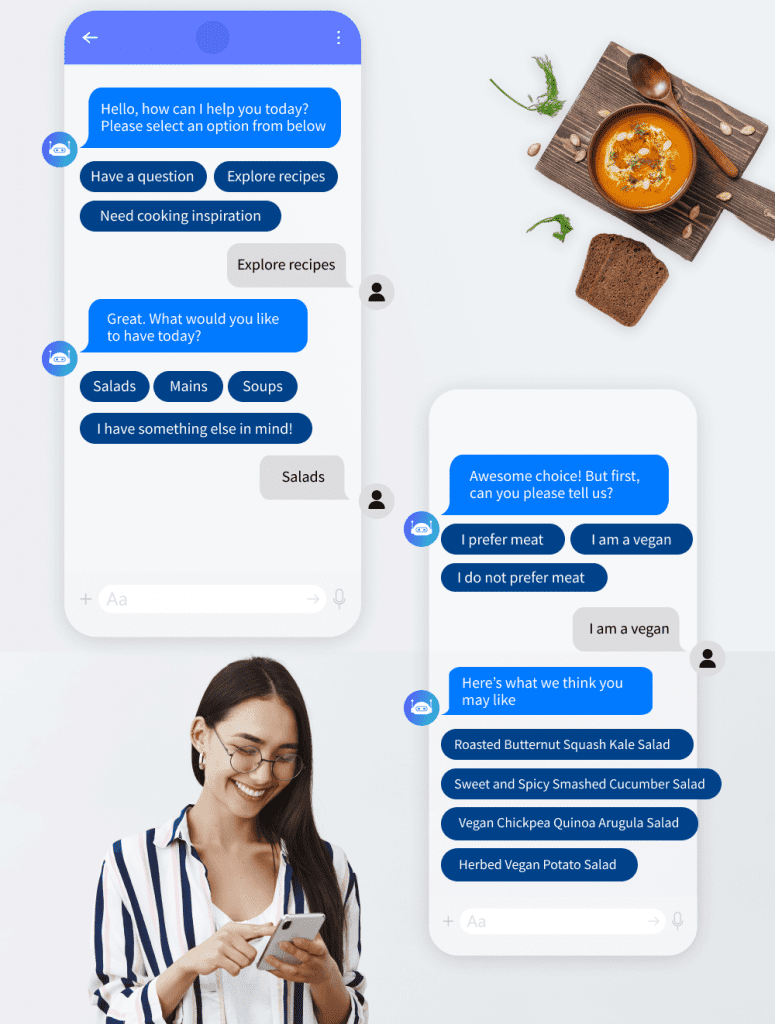
Take A Look At The Type Of Conversations A Bot Can Have With Your Customers.
A Sneak Peek Into A Few Conversational Commerce Solutions On Various Social Channels
At Acuvate, we help clients build and deploy bots on various social channels that consistently deliver exceptional CX with minimum friction or hassle with our enterprise bot-building platform called BotCore.
BotCore is a Microsoft Preferred Co-Sell-ready solution that leverages Microsoft’s best AI, machine learning (ML), and natural language processing (NLP) technologies.
Our conversational commerce solutions are deployable on popular social channels (WhatsApp, Facebook, Instagram, etc.) and support multiple languages, including German, French, Italian, English, etc.
Here Are A Few Examples Of How Brands Are Using Conversational Commerce In Various Social Channels To Engage, Inform, And Support Their Customers.
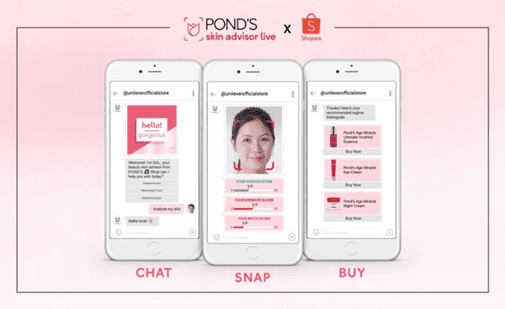
1. POND’s SAL chatbot for Facebook Messenger
An FB Messenger bot, also available on webchat in different countries, POND’s SAL can be accessed through Unilever’s flagship store on Shopee. Using technologies like AI and augmented reality (AR), SAL interacts three-dimensionally with customers to deliver personalized and more immersive shopping experiences.
When a user uploads a selfie, SAL works on identifying critical skincare concerns across four significant areas, namely, pimples, wrinkles, spots, and uneven skin tone.
The bot also sends relevant skincare articles and beauty tips to keep the users engaged.
Having completed the skin analysis, SAL then recommends suitable products from POND’s according to the customer’s skin condition.
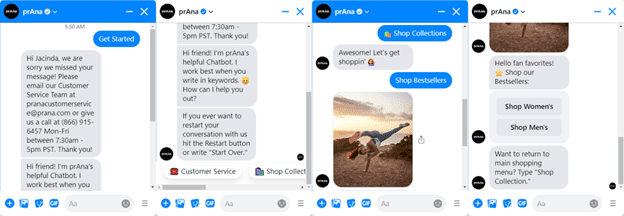
2. pRANA’s chatbot for Facebook Messenger
Sustainable clothing company prAna’s chatbot for Facebook Messenger uses a casual, friendly tone to help customers shop online or get the information they need.
The bot helps shoppers navigate through the online store by asking them to choose between options like “Shop Women’s, “Shop Men’s, or “Shop Best Sellers.” Moreover, the bot’s intuitive conversational AI interface gives the option to type a message or easily navigate to the previous menu.
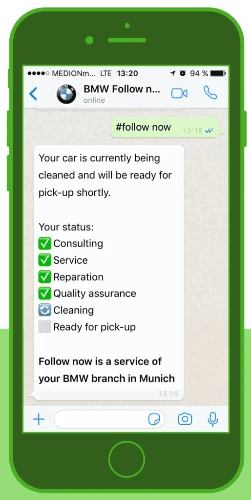
3. BMW’s “Follow Now” chatbot on WhatsApp
To combat the massive inflow of service requests when summers and winters are approaching, BMW launched its “Follow Now” chatbot on WhatsApp to help customers book an appointment from the convenience of their home from an app they use every day.
The bot offers real-time updates on the service status of their car and intimates them when their cars are ready for pickup. Moreover, service assistants can intervene and answer certain queries if the bot isn’t able to answer those.
4. Clear’s Cera chatbot for Facebook Messenger
Clear is Unilever’s leading anti-dandruff shampoo brand. The company’s chatbot Cera, available for the Indonesian market on Facebook Messenger, acts as your go-to hair care assistant offering personalized hair diagnosis, advice, and product recommendations for dandruff, dry hair, oily hair, etc.
The bot proactively sends relevant articles to the users after analyzing their behavior, preferences, and needs and delivers answers to a range of frequently asked questions related to hair care.
5. Roma by Rochi’s chatbot for Instagram
Roma by Rochi is a popular fashion brand in Argentina that revolves around encouraging women to embrace their sense of style.
Though quite popular on Instagram from likes, comments, and story mentions, recently, the brand launched a digital assistant on the social media platform to assist with a “tag and like” giveaway.
Post the deployment of the bot; the brand experienced an astounding 82% increase in reach in one week and a whopping 741% rise in engagement.
The brand also has a Facebook Messenger bot, which they use to answer queries, upsell products, and notify customers when sales begin.
We, at Acuvate, can help clients across industries build engaging conversational commerce experiences in various social channels using our enterprise bot-building platform called BotCore. To know more, please feel free to schedule a personalized consultation with our AI experts.
Banking isn’t what it used to be. Most of us need fast, efficient, flawless banking services that are hassle-free and, most importantly, reliable. It only makes sense to shift to digital banking channels that can provide these things. As it turns out, artificial intelligence (AI) and machine learning (ML) powered virtual assistants can do precisely that.
Are virtual assistants in banking the solution to outdated, cumbersome branches and lengthy wait times? More and more banks are turning to chatbots and virtual assistants for customer service.
Artificial intelligence is becoming more ingrained in day-to-day life. A recent Ipsos-Forbes Advisor survey found that an overwhelming majority of Americans — 76% — used their bank’s mobile app to conduct everyday banking tasks last year
This blog will look at how a virtual assistant can help you with your banking.
How Virtual Assistants Shape The Banking Industry?
1. Everyday Inquiries
A banking virtual assistant can help you with everyday inquiries. Since they are available 24/7, they can assist you when an issue arises after-hours or even on weekends.
With the right training data, bank virtual assistants can be taught to answer customer queries quickly and precisely, providing faster resolutions.
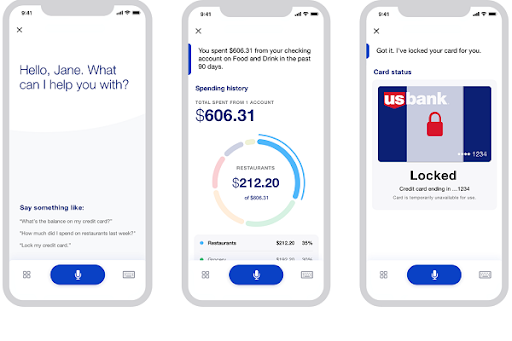
For example: For example, one bank’s virtual assistant service helps customers find out if their account needs attention by answering questions like “How much money did I spend last week?” Or, “What have my recent purchases been?”
Virtual assistants can make banking easier by handling:
Inquiries about account balances, deposits, withdrawals, and transfers;
Inquiry about account details (such as interest rates);
Inquiry about applying for loans;
Inquiry about transferring funds between accounts; and
Inquiry about bill payments.2.
2. Save Time on Typing
Typing is one of the most time-consuming parts of any job-especially when it comes to banking. A voice assistant can help you get everything out of the system quickly by typing all of your documents for you.
You can fill out forms or enter information without the use of text feature with a simple conversational AI command or tap-and-go gesture. That means less time spent on repetitive tasks.
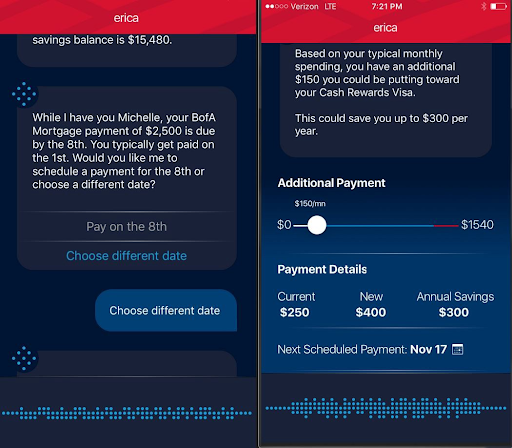
For example, the Bank of America mobile app has Erica, a virtual assistant, as part of its digital banking experience. It helps customers save time with activated voice commands by automatically performing repetitive tasks such as entering account numbers or routing numbers into forms. The goal is for Erica to make customers’ lives easier by removing tedious and manual tasks from their day.
3. Make Simple Transactions
Banking VAs are great at processing simple transactions for you. You can easily ask them to transfer money between accounts or pay bills on autopilot.
VAs will send you reminders when you need to make a payment and handle all the details for you, so all you have to do is confirm the transaction and wait for it to complete.
Here are some examples of simple transactions:
4. Notifications about Unusual Activity
Your bank should monitor your accounts for unusual activity to alert you if anything looks suspicious or out of place.
However, these alerts can often be buried deep within lengthy emails or notifications that don’t always reach their intended recipients in time to take action before any damage is done.
Banking virtual assistants can help you keep track of your accounts and detect suspicious activity before it becomes serious enough for you to notice on your own.
For example, if someone tries to make an unauthorized withdrawal from your account, you’ll want to know immediately to take action before any damage is done. Capital One’s virtual assistant, Eno, can keep track of all of this activity for you and let you know if anything seems out of place or suspicious.
5. Get Advanced Insights
Banking VAs can help you find the best bank account by providing advanced insights into your banking and financial situation.
You’ll get an idea of how much money you spend on certain types of transactions and what rewards program would work best for your lifestyle.
Here are some examples of advanced insights that Bank of America’s VA, Erica, can provide:
Track your monthly income and expenses
Changes in your FICO score
How much money do you spend on groceries, dining out, or other common monthly purchases?
Recurring spending trends
Your account balance trends
Conclusion
As a result of technological growth, financial institutions seem capable of striking the right balance between making banking more convenient and increasing customer loyalty by providing virtual assistants.
As is often the case with new technology, this is still in its early stages. If you research and vet your options properly, you can get an effective assistant to improve your banking experience.
Author Bio
Vatsal Ghiya is a serial entrepreneur with more than 20 years of experience in healthcare AI software and services. He is the CEO and co-founder of .com, which enables the on-demand scaling of our platform, processes, and people for companies with the most demanding machine learning and artificial intelligence initiatives.
When a Conversational AI solution is implemented, one early decision that needs to be made is the level of personalization that is required to create an exceptional customer experience. Our experience shows that the bots that are able to do more and are able to handle the more complex scenarios have access to more detailed information about the user. The more effective the experience, the higher the satisfaction of the user, and the more likely that user is to re-engage the Conversational AI solution again when they want to perform an action.
Customer Experience: To Personalize or Not Personalize
Depending on the use cases, there are many reasons to go down the personalization path for your Conversational AI solution, but also some use cases where you don’t need it for your experience to start, or ever.
Organizations who are beginning to experiment and understand the value of Conversational AI may choose to not implement a personalized customer experience right away, and that’s perfectly understandable. You need information in order to understand how your users are engaging with you. Approaching your Conversational AI investment in a traditional product model of starting with a Minimum Viable Product (MVP) and starting to capture feedback will help to understand the priority for other conversational flows that can be implemented.
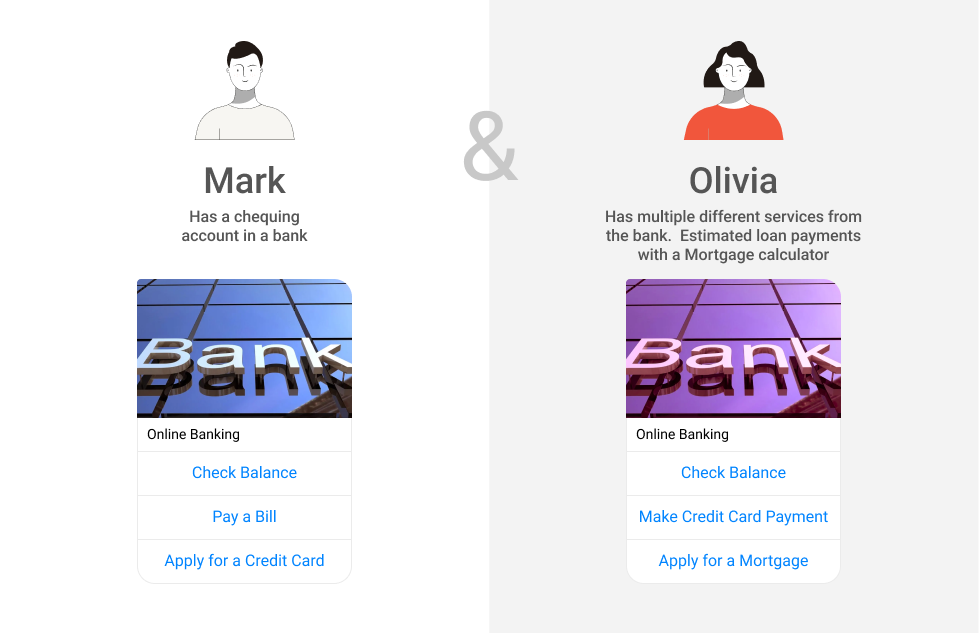
Personalized Chatbot Flow for Online Banking Services
For businesses that are focused on responding to FAQs, implementing personalization within the customer experience may not be a priority, and again, that’s OK. For many, the ability to provide clear information to all users with the same messaging may not need the additional activities to support a personalized customer experience. This may mitigate some of the noise to your live agent center, chat or voice, by answering some of the more common questions that don’t require the solution to know who you are — what are your hours of operation, what is your return policy, etc. Information that is fairly static and will be the same, regardless of who the user is.
As soon as you want to provide the ability for users to self-service, you need to consider personalization as part of the customer engagement. The ability to understand who the user is, what their interests are, and what they have done in the past means that your chatbot or voice bot can be a true conversational AI assistant to the user and help them perform some action, rather than just answer some questions. Thinking of these use cases and implementing them should be done as part of outlining the user journey, so that the right level of personalization is planned. The value of the Conversational AI bot goes up immensely, and can significantly reduce the impact of effort for your live agent team, but even more importantly it can now provide a 24/7 service to your users that may not have been possible before.
Essentially, a non-personalized Conversational AI solution will let users learn and answer questions, but the ability to do anything meaningful is limited. Creating the ability to personalize the solution allows the user to perform activities on their own, at their convenience, whenever they want.
When we discuss personalization around the customer experience, we have a strong focus on the data. The data drives the information, and then a strong conversation design makes the information valuable in the context of the chat. With the design and user journey planning, you understand what information is needed in order to bring value. But now you need to get that information from somewhere.
Integration to the data stores where the personalized information resides is vitally important if you want to create a successful Conversational AI customer engagement. The ability to extract the right information and use it in the right way means that you’ll create a collection of services for your users that allow them to do something meaningful, such as:
Renewing an insurance policy will require looking up your current coverage details and then understanding the comparable rates for the next term;
Purchasing a new phone and using previous purchases and experiences to showcase the most likely device for you; and,
Paying a bill online through a conversational solution.
These are just a few examples, but they are meaningful ones that most people can resonate with. Anything that allows the user to self-service without the need to engage someone, and do it at a time and place of their own convenience, brings immense value to the customer experience.
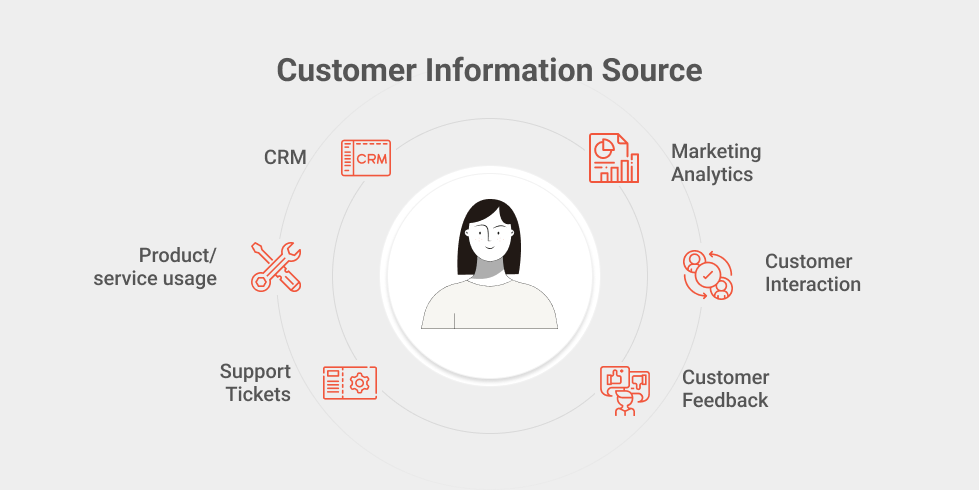
In many cases, this data may be borne out of multiple systems and so multiple integrations of Conversational AI are required. It’s rare you will have the customer information, generally driven out of a CRM system of some making, and the product information residing within the same system, but not impossible. But you need to understand where the source of the data you need for these flows originates from, and you need to ensure that you have access to that information in order to serve up the data in an effective manner.
Customer Information Sources for Message Personalization
As we talk about personalization in the area of customer experience, there is one key piece that needs to be in place, and is another integration of sorts.
The Need for Authentication
When we do personalization, we need to know who we are personalizing the information for. You may want someone to have the ability to pay off your bills, for example as part of Use Case of Conversational AI for Finance, but you don’t want them having access to your transaction history or your balances. And as such we need to make sure the user is who they say they are.
Authentication is vitally important to ensure that we are delivering the right information at the right time and to the right person. If you’re historically an Android phone user, we probably shouldn’t be promoting iPhone services to you as you are less likely to purchase one of those. But if we are talking finances, we need to make sure that the user is the right person, either through direct or inferred user validation techniques.
Authentication provides a level of personalization, but also the feeling of security when engaging with the bot. As a best practice, the Conversational AI bot only accesses the information it needs for the task at hand, and nothing more. It’s coordinated through official services that the business offers, and any transactions (such as transferring funds) are requested by the bot but performed through existing services, ensuring that the proper checks and balances are in place to monitor and log the transaction, and ensuring that the request originated from an authorized user.
Final Thoughts
Personalization in the area of customer experience requires some work to implement, but it doesn’t have to be a lot of work. You need to understand what information you require, where that data resides, and then determine how you can access it and what transactions (if any) are available for use. But creating a way for the user to actually do something and stay in the context gives them more freedom — when they want to do it, and how they want to do it. This customized customer experience leads to more customer engagement and service satisfaction, which can lead to users wanting to do more, and businesses then discovering additional use cases for business process automation, which can help with cost management of call centers and live agents, who can then be reserved for those complex and custom scenarios that need the human touch.
Want to learn more about how your Conversational AI can be enhanced with personalization?
Artificial Intelligence (AI) is the theory and creation of computer systems that can carry out tasks that would typically need human intellect, like speech recognition, language translation, and visual perception.
Bot Libre, through its open source platform develops chatbot and artificial intelligence solutions that are ready to use in the metaverse. These solutions are central to the success of businesses and even the world, as they drive efficiency, enhance user experience, provide detailed analysis and solve problems.
While the overarching goal of AI is to solve problems and make life easier, the way this is accomplished is distinct depending on whether the AI is strictly automated or is autonomous.
Automated AI
Automated systems often operate within a clearly defined set of constraints and have a relatively limited range of tasks that they can complete. Automated systems use predetermined heuristics to inform their judgments and actions. For example autopilot, cruise control and yes, Bot Libre chatbots, are all results of clever automation. When you deploy a Bot Libre chatbot to web, mobile app or social media, you can program it to respond to any of your customer’s questions, from a variety of topics and using diverse personalities.
Autonomous AI
On the other hand, autonomous systems can learn from dynamic situations, adapt to them, and evolve as their surroundings change without the need for human involvement. The data it picks up and adapts to might not be what the system’s designers had in mind when they implemented it. These systems will process and learn from growing data sets more quickly and eventually more consistently. The goal for developers is to make technology as intelligent as possible. Building autonomous systems will be part of that process.
Bot Libre’s Hybrid Model
Bot Libre chatbots learn on new data as they are trained with new responses, and some of our features and scripts use learned data to change behavior, even dynamically at runtime. Bot Libre also has 2 parts, the chatbot engine, and the deep learning engine. The two can be combined for a hybrid solution.
Our Metaverse support is also a hybrid. For our navigation functions we have several modes, some are automated, some are more autonomous. The automated ones use compiled scenes and are faster and more accurate. The autonomous ones are more generic and work in any scene or augmented reality.
It is important to know that automated and autonomous AI are on a spectrum, as systems that were automated at first with a clearly defined set of inputs and outputs, may need to evolve over time as their usage and the environment in which they function do. As a result, one may add certain autonomous capabilities to an automated system, increasing both the system’s lifespan and its range of usage.
Benefits
Automated AI
Increased speed, efficiency, time-savings
Ability to scale using AI the insights, flexibility, and processing power
Able to augment businesses’ capabilities, while off-loading repetitive tasks to the machine
Autonomous AI
Avoid risks and errors
Instant interconnectivity by speeding up communications and the passing of information
Increased productivity through clearly detecting areas of opportunity for each business, and anticipating future events.
So which do you choose?
Experts share that it all depends on the problems you are trying to solve. How do you want to engage with your clients? Automated AI is a thriving market and with Bot Libre open source platform you can build automated chatbots, with little to no programming.
Meanwhile, Autonomous AI serves as a link between the state of technology today and where it will be in the future. If your company is considering implementing autonomous AI, Forbes Technology Council contends that you should “begin by hiring skilled resources with strong expertise in artificial intelligence, machine learning and neural networks, a branch of cognitive computing. These experts can develop systems for much more proactive IT monitoring, problem detection and resolution.”
You can get access to a team of AI , chatbot and metaverse experts by joining the Bot libre Beta Program, where there is a community of software experts at your disposal. Collaborate and legally own what you create. To apply: send an email to sales@botlibre.com
Learned something? Please give us a
to say thanks and to help others find this article.