With 44% of consumers preferring to interact with a chatbot over a human, one thing’s for sure: chatbots are here to stay. But how do you build a chatbot for your business — one that actually helps you solve problems instead of creating more?
In part 3 of my Conversation Design series, I’ll talk you through the process of building a chatbot from scratch, including strategy, scripting, and testing.
Let’s go!

1 — Define the goal
Before you can start building your chatbot, you need to know why you are building it. What is the goal here? If you want to automate an existing service, what is the current experience like, and how could a bot help improve it? Take a look at your business goals: if one of your goals is to increase customer satisfaction, you might want to add a chatbot to your customer support team and let it handle the most common FAQs, so your team can focus on the more complicated cases.
2 — Define the use cases
After figuring out the why of your bot, it’s time for the what. What is your bot going to do exactly? What will it do for the user? I cannot stress how important it is to figure this out before you start building your bot, as you need to know exactly what the bot will do and why that is important.
Here are some use case examples:
- Book a restaurant
- Play a song
- Find products
- Recommend new products
- Get directions
- Book a flight
- Show local promotions
- Process returns
3 — Understand your tech
Know that you know the why and the what of your bot, it’s important to understand the where: where will your bot live? Will it be integrated with WhatsApp? Can customers engage with it via SMS, Facebook Messenger or on the company website? What are the restrictions of each channel? A bot that talks to your users via SMS won’t be able to use as many characters as a bot that only communicates via web. So make sure you understand your tech and its limitations.
Trending Bot Articles:
1. 3 Tips for your Voice and Chatbot Program from Gartner’s Customer Service Hype Cycle 2020
2. Deploying Watson Assistant Web Chat in Salesforce Lightning Console
3. Are Chatbots Vulnerable? Best Practices to Ensure Chatbots Security
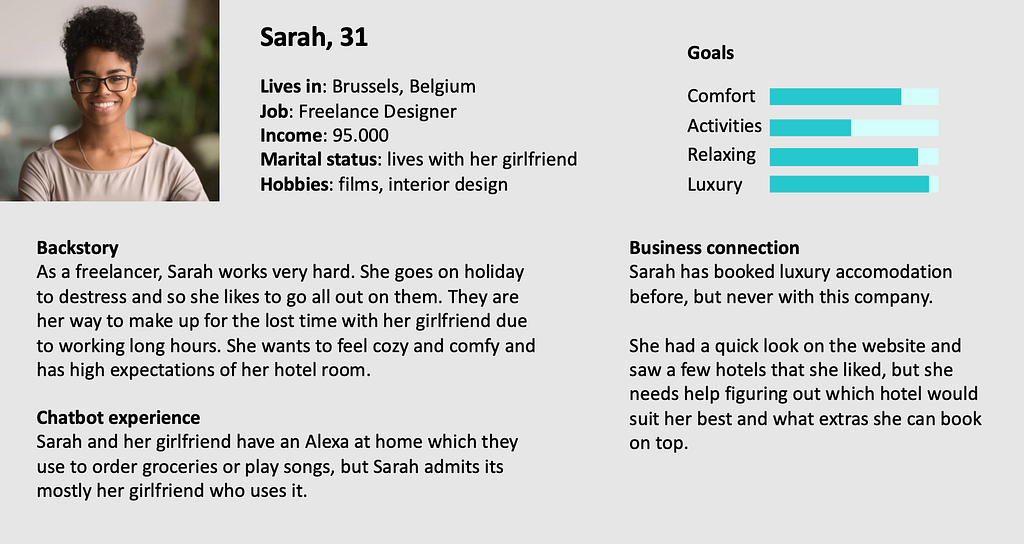
4 — Know your user
In order to design an experience that feels personal, you need to make it personal. Who is this user that will engage with your bot? It’s important to know what they want and how they are feeling during the conversation. What’s their backstory? Their challenges? Their motivations? How familiar are they with your business and using bots in general? I like to create a user ID that I keep close when writing the actual dialogues.
5 — Craft your bot personality
A chatbot without personality is like a bad Tinder date: they looked great online, but as soon as you start talking to them, you want to end the date as soon as possible. There just wasn’t a connection…
So how can you make sure your users connect with your chatbot and that the conversation is engaging and representative of real human interaction? By giving your chatbot a clear personality.
If you can, use your company branding as a starting point and build on it. I’ve also explained in detail how to design your chatbot’s personality in part two of my Conversation Design series.
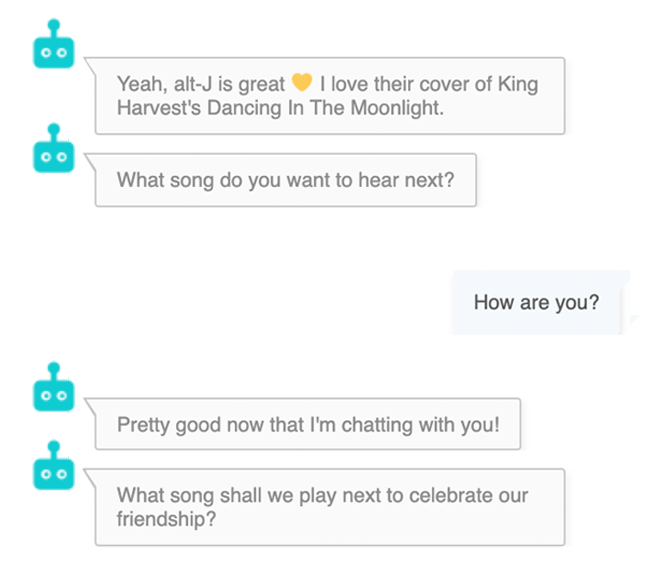
6 — Script your happy flow
Now that you have a clear picture of who’s communicating (your bot persona and your user ID) and what they’re talking about (your use cases), it’s time to write the dialogues.
A ‘happy flow’ is a dialogue where everything everything runs the way it’s supposed to run. The conversation is natural and smooth, and the user reaches their goal in as little steps as possible. Many conversation designers start with the happy flow because it’s the flow of least resistance. It takes the least amount of effort to script because it doesn’t include many of the inconvenient complexities that can occur.
But they will, and you need to be ready for when they do. More on those edge cases later.
A great way to script natural dialogues is by having a sample dialog. Have two people sit back-to-back and improvise a conversation around a use case, with one person playing the user and the other playing the chatbot. Record their conversation or take notes to see which parts of the dialog need a bit more work.
7 — Script for edge cases
Chatbot technology is not yet capable of understanding every user utterance well enough in order to reply in a correct way — no matter how well the script is written, in tricky situations, it will most likely fail.
So after writing the happy flows, write out the most likely ways a user might go off track and how you’re going to deal with that. The sample dialog should help those pain points, as will user testing.
What if a user asks your bot how it’s doing? What if they tell the bot they don’t like it? What if they want another suggestion? What happens if the user wants to book a table for two, but one person is allergic to gluten and the other one doesn’t eat fish?
If you can, make sure your chatbot’s response strategically guides the user back to an existing flow, like in the example below:
8 — Create the flowchart
Once you’ve written all possible flows, create a visual flowchart to see how a user would go from start to finish and where they might want to — or have to — dive into other flows. There are a ton of great tools out there to help you visualise these journeys, my two favourites are draw.io and Creately.
Quick tip: The chatlayer.ai platform allows you to visualise your flows straight away whilst scripting your dialogues.👏

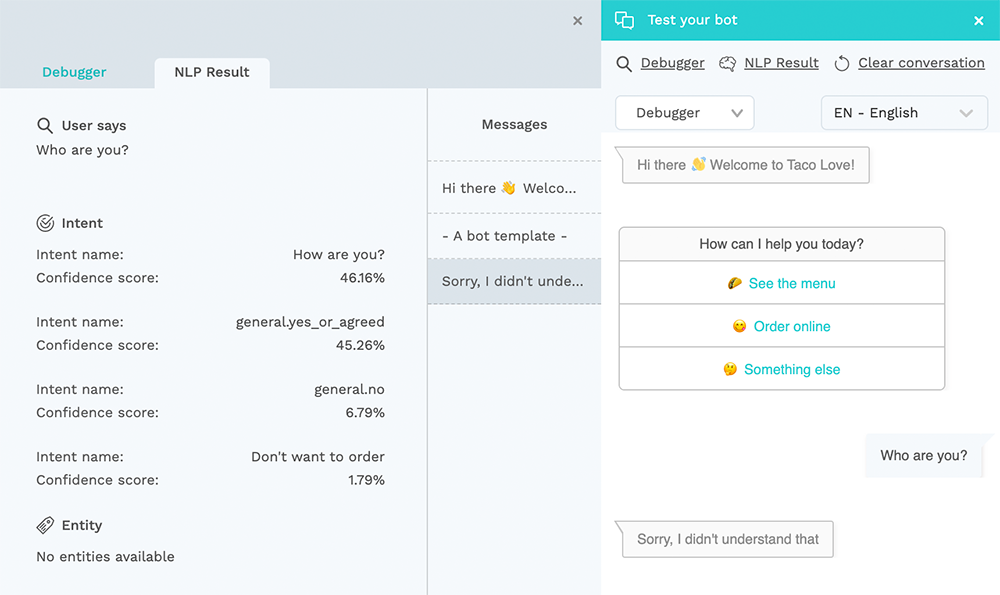
9 — Testing your bot
When you’ve completed your dialogues and created your flowchart, it’s time to take a deep breath. You’re now gonna send your little baby bot to its first test! 🐣
To get some first feedback, you can share your bot with a few friends and colleagues and ask them to complete some specific tasks. For example: “Play a song” or “Order some food” or “Return a pair of jeans”. Make sure to also ask them some detailed questions about the overal experience after:
- Personality: does the bot feel consistent? Does it fit the brand?
- Onboarding: was it clear what this bot can do for you? Did you miss anything?
- Understanding: did the bot understand your questions and answers? Where did you get stuck?
- Answering: did the bot give accurate, relevant and clear answers? Did it feel conversational?
- Error management: how did the bot handle errors? What went wrong? How did it make you feel?
- Overal experience: did you enjoy the conversation?
Some platforms also allow you to do some usability testing, such as chatlayer.ai. There you can see which intents and expressions were recognised (in)correctly, how long each user session was, and when the API plugins and code blocks returned an error.
10 — Optimising
Internal testing will already give you a lot of insight on how to improve your bot, but its your real users that you want to hear from. So after publishing your bot, make sure to keep monitoring its performance. Monitor the conversations, collect data, create logs, analyse the data, and keep improving the bot for an even better experience.
Phew, you made it till the end! Now it’s time for you to build your own chatbot. 🤖 If you need help getting started on chatlayer.ai, I recommend you watch our platform tutorial series on Youtube:

Hi, I’m Tess, language enthusiast and taco lover. I work as a Conversation Designer at Chatlayer.ai — an intuitive platform where you can build clever AI bots in any language, no coding skills required.
Interested in knowing more about chatbots? Want to share stories or talk conversation design? Let’s chat on Twitter or send me an email.
Don’t forget to give us your 👏 !


How to build a chatbot in just 10 steps. was originally published in Chatbots Life on Medium, where people are continuing the conversation by highlighting and responding to this story.