Google has decided to step ahead by bringing the new model of artificial intelligence that is capable of doing multiple tasks. It’s…
Author: Franz Malten Buemann
-
Optimize Your Marketing with Deep Web Scraping

Have you ever wondered how companies like Apple always stay ahead of the curve? They seem to have a crystal ball because they are always ready with a new product as soon as a trend hits! Well, they use a technique called Deep Web Scraping. Keep reading, and we’ll explain what Deep Web Scraping is and how to use it in your business.
What Is Deep Web Scraping?
If you know the basics of SEO, then you know that search engines use AI to crawl the web and collect data on public internet pages. This is called Web Scraping, and it’s been around since the ’90s when search engines first existed. Deep Web Scraping crawls public web pages plus pages on the Deep Web to collect data. The Deep Web is simply pages that need a login to access. Search engines cannot access them because they are behind a paywall or exist in a private database. Examples of the Deep Web include:
· Social media platforms
· Membership sites
· Online newspapers that require subscriptions
· Internal company webpages
Deep Web Scraping allows businesses to obtain better quality data for their market research because they can access the social media platforms where trends start.
How Does Deep Web Scraping Work?
You don’t need to employ a team of people to stare at social media platforms for 8 hours a day; Deep Web Scraping is most effective when conducted by AI. You can tell the Deep Web Scraper what information you seek and where it should look for it. Then it simply runs in the background, depositing the information in your designated folder.
How Can Deep Web Scraping Improve My Business?
One of the most popular uses of Deep Web Scrapers is to collect data to inform marketing and product strategies. The Deep Web Scraper provides information about what customers are saying about your business online.
Deep Web Scraping could even be used to examine how consumers view your competitors and your industry in general. This data could be valuable in helping you stand out from the competition by addressing pain points and adding extra pleasure points to your products. All of this data is available for a fraction of the cost and man-hours of other market research methods. Let’s take a look at the three main ways businesses use a Deep Web Scraper.
Price Tracking
Deep Web Scrapers are popular amongst e-commerce business owners because they allow real-time monitoring of pricing. You can gather information from customer reviews as to how your product compares to competitors and if your product offers value for money. Some Deep Web Scrapers can even make pricing requests from your competitors and retrieve detailed information about pricing and shipping.
A 2018 report showed that price tracking is one of the top 3 uses of Deep Web Scraping by businesses. Using Deep Web Scrapers in this way allows businesses to find the right price for entering the market with a new product and to receive real-time notifications of competitor’s promotions.
Market Research

Deep Web Scrapers pull data from numerous sources to allow you to monitor market trends. You can spot emerging trends before they happen and use the data to inform your product development. Wouldn’t you love to have a product ready for market as soon as a trend hits?
The above infographic was created as a result of Deep Web Scraping property rental listings from Craigslist. While this data was used for a research study, you could create a similar data set in your business to narrow your ideal customer type even further. You could find the interests your best customers have in common and make sure your ads only get in front of prospects who are primed to buy.
Content Analysis
Many business owners use Deep Web Scraping to inform their content strategy. The Deep Web Scraper will analyze what your target market is talking about and how they talk so you can create more effective content. This provides you with the opportunity to engage with your ideal clients on a personal level and be at the forefront of new content marketing techniques.
Apply It To Your Business
Now that you understand Deep Web Scraping, you may be wondering how to implement it into your business. There are a number of Deep Web Scrapers on the market, each specializing in different things. So first, you need to get clear on what you want the Deep Web Scraper to do for your business. The three uses we discussed above are the most popular, but many businesses use it for contact scraping to produce a list of leads or collating data to inform calculations. For example, a logistics company may collect data on weather, road conditions, and events to calculate delivery times.
The uses of Deep Web Scraping are as endless as the data it allows you to collect. You can use it to inform many aspects of your business; product development and marketing being the most popular.
Follow us for more practical advice on how AI can improve your business systems and profitability.
Communicating Knowledge, Saltlux.
- Brief History of Web Scraping
- Web Scraping Examples: Who Use Data Scraping
- The Economics Of Web Scraping Report
- New Insights into Rental Housing Markets across the United States: Web Scraping and Analyzing Craigslist Rental Listings
Optimize Your Marketing with Deep Web Scraping was originally published in Chatbots Life on Medium, where people are continuing the conversation by highlighting and responding to this story.
-
Chatbots vs. Humans: Which One Should You Choose And Why
Customer service has always been important, but as the economy becomes more competitive, it is even more important that clients have a smooth interaction with your company. That’s the only way to retain customers and continue to grow in this economic climate.
Making sure customers have an amazing interaction with your company should be priority #1. They’ve written in with a problem or question, and want answers fast. If they don’t get it, they won’t stick around long.
There are two major options for companies: chatbots and humans.
Both present costs and benefits, and it’s important to weigh them against each other. Chatbots are relatively new to the customer service world, but they’re quickly becoming a popular way to provide highly efficient real-time service.
The global chatbot market was estimated to be worth $396.2 million in 2019 and is projected to reach $1.95 billion by 2027. That is extremely rapid growth and is a sign of things to come on the AI front. But it makes sense when you think about the total scope of customer service and sales. If chatbots can help make these functions work better and for lower cost, the value is technically limitless.
The U.S. Bureau of Labor Statistics estimates that there are 2.9 million people working in customer service in the United States. They also previously estimated that 13.75 million people (or 4.3% of the population) worked in sales. The scale of both of these figures shows that there is massive potential for chatbots to change processes. That’s a lot of people who can either be replaced or empowered to do a better job with chatbots.
They can often be programmed to use natural language processing to ensure the chatbot provides the best answer possible. There are also specialized chatbots designed for tasks like booking airline tickets or requesting restaurant reservations. Each of these options has certain situations where it is more useful.
Strengths Of AI Chatbot In Customer Service
Chatbots are changing how customer service works, largely because of the different economics of running a chatbot vs. a living employee.
Reduced Cost
Chatbots require less upfront financial and time investment than humans do. One chatbot can service a lot more customers than a single customer service representative, which means they scale very quickly. They also require less training, and may only need minor tweaks to their business logic from time to time.
No Language Barrier
Chatbots are capable of speaking in any language, so there’s no language barrier or new hiring necessary in order to service a certain language.
Better Response Time
Chatbots don’t need to make decisions about how to respond and are able to provide an identical customer service experience whether a customer is asking about a general question or an extremely specific one. This can make them seem like they’re more attentive and responsive than actual human employees.
Available 24/7
Of course, as a programmed entity, chatbots are available 24/7. Chatbots are also cheaper to operate than human employees since it’s not necessary to provide them with food, clothing and shelter.
Machine Learning Technology
Chatbots can also benefit from machine learning technology. When a chatbot receives input from multiple users, it can learn how to respond to specific questions based on past responses. This makes it possible to build a single chatbot in which different users will get different answers depending on their individual needs.
Strengths of Humans in Customer Service
As much as you’d like to automate your customer service, humans can still do some functions better than artificial intelligence.
1. Empathize with the customer
Empathizing with customers is key because they’re more likely to interact with you again if they feel they’ve been treated properly. If they feel as though their concerns have been addressed, they’re less likely to complain about products or services on social media or elsewhere.
2. Provide culturally sensitive customer service.
If your company or product is targeted at a particular audience or market, then it’s important to be sensitive to their needs and concerns when delivering your product or services. This can mean providing translations for international customers, for example, or adopting policies for American consumers so that they’re understood in their native tongue.
3. Deal with human emotions on the fly.
Some situations call for a level of emotional intelligence that people aren’t born with but can develop through training and practice. Customer service agents must be able to deal with high-pressure situations like when a customer is angry or disappointed, and chatbots are not (currently) able to handle those situations.
When to Use a Chatbot
Taking all this information into account, there are 3 situations where it makes the most sense to use chatbots.
Chatbots never sleep, so you can be sure there’s always someone there to answer a customer’s question, even if it comes in at an unreasonably late time. The same applies for when all your customer service representatives are overloaded.
If a potential customer arrives ready to buy, a chatbot can facilitate the sale while providing personalized recommendations along the way. If people are going to buy online, you may as well use chatbots to provide a streamlined and personalized service.
One thing we can say for sure about bots is you’ll never have one quit or struggle with training. So as you are training up your human agents, use a chatbot to handle the extra capacity. This way, you can scale more quickly than if you just trained one representative at a time.
Comparison of chatbots and humans based on their strengths
Based on this analysis, there are 4 key areas where chatbots excel over human representatives:
No Maintenance Costs: Chatbots don’t require training, office space, employees, or anything else. Once they are set up, they are good to go and it is up to you if you want to improve on them.
Simple Setup: They’re also easy to set up, which means you don’t have to spend a lot of money on hiring someone.
Faster Responses: Chatbots have lower response times and are always available.
Infinite Scalability: One chatbot can service nearly unlimited customers at the same time.
Industry Use Cases of Chat Bots
Customer service is relevant in nearly every industry, but we’ve found that there are specific areas where they can be leveraged for significant returns:
Banking
Anyone who’s ever had to deal with banking customer service before knows what a hassle it can be. Chatbots can streamline the process and handle frontline customer support. Already, banks around the world are adopting chatbots and seeing great results.
SaaS Companies
Driving more sales is the top priority of almost every organization. However, depending on the long-term value of a customer, certain courses of action may end up being impractical. SaaS companies generally have a lower customer LTV and also lower customization required, so a chatbot can effectively serve leads and create a high-level win for the company.
E-Commerce
Brands are realizing that email marketing has nothing on the engagement levels of SMS notifications and chatbots. Rather than using chatbots just for customer support, they can be a key part of the funnel by notifying users when their shipment has been posted or delivered, or by collecting feedback on the company. This feels more personalized than a form email and can upsell a customer, thus directly contributing to the bottom line and fitting into the marketing funnel.
The Future of Chatbots
It’s easy to think of chatbots in the context of simple business processes like lead generation or customer service, but it’s quickly becoming clear that this machine learning technology has not even skimmed the surface of what it can do for humanity.
For example, studies are already being done on how a chatbot could help patients with dementia or Alzheimer’s. This alone should get you thinking about the interactions you have on a day-to-day basis, and how they could be streamlined or used to improve your life (or the life of those around you).
Another example that is less grandiose is how chatbots are being used for branding campaigns. Marvel ran a campaign for Guardians of the Galaxy (and Spiderman, soon after) that allowed fans to interact with the chatbot. This sort of interactive experience is exactly what users are geeking out over. And excitement leads to sales!
Finally, for anyone who has ever stayed up late trying to match their symptoms up to an online diagnosis, there are now chatbots to help with this. As telemedicine continues to expand, we expect this functionality to improve significantly. Soon, users will *want* to deal with chatbots for the first few minutes because they’ll know it gets them better outcomes.
How Chatbots And Human Agents Can Work Hand In Hand
Making customer service a competitive advantage is a major priority for companies right now. Technology has streamlined so many processes that now the experience has become much more important for keeping customers. The biggest problem with chatbots is that they still require a level of human input, and while they’re getting better at understanding what you’re saying, there’s no guarantee that they’ll pick up on every nuance or question right off the bat.
That means it’s important for companies to keep monitoring their chatbot systems for new questions and patterns and respond accordingly. This is the “combination” approach, which we recommend.
Chatbots are a popular tool for customer service because they’re cheap to design and run. Since there’s no human interaction, the interface is simple — you just type in a question and get an answer.
However, in some ways, the market hasn’t caught up yet. People still prefer the human touch over machines, as demonstrated by this 2018 study showing that ~50% of UK respondents and ~40% of US respondents said they’d prefer to speak with a person. We’re sure this number has shifted by now, but that is still something to be aware of when implementing a chatbot strategy.
Humans are still better at many things, including emotional intelligence, which makes them better listeners and communicators. One of the great benefits of humans is that they can adapt to your needs over time. They may not be able to provide a perfect answer every time, but they’ll learn your preferences and anticipate what you want next.
Chatbot vs. Human — Who Wins?
Chatbots are a trend that is likely to continue for the foreseeable future. Customer service representatives, however, are not going anywhere anytime soon. There are pros and cons to both, and it’s important to know all of them before deciding which one to use in your business.
In general, chatbots are a great way for customer support to cut costs. There are many situations where there’s less need for an actual customer service representative. This is a chance for companies to save money by not paying someone to actually handle client questions.
Chatbots may not be taking over the world and obsoleting human representatives, but they are making a dent in the customer service industry. They’re already being used in various fields, from banking to online shopping. They can be programmed to a specific task and can make your business run better. For more information on how a chatbot may be able to help your company, start a conversation with Kommunicate today.
At Kommunicate, we are envisioning a world-beating customer support solution to empower the new era of customer support. We would love to have you onboard to have a first-hand experience of Kommunicate. You can signup and start delighting your customers right away.
Originally published at https://www.kommunicate.io on February 26, 2022.
Chatbots vs. Humans: Which One Should You Choose And Why was originally published in Chatbots Life on Medium, where people are continuing the conversation by highlighting and responding to this story.
-
Continuous Speech Recognition Testing
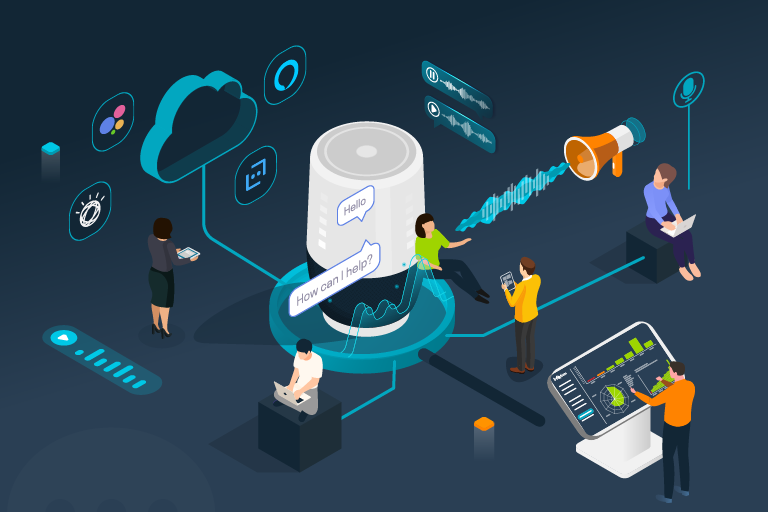
Table of Contents:
Conversational AI and Voice
Continuous Speech Recognition TestingSpeech Recognition (Speech-to-Text)
Speech Synthesis (Text-to-Speech)
Custom Speech Engines
Prepare Chatbots for Speech Synthesis and Recognition
Prepare Test SetLabelled Reference Audio Files
Synthesizing Speech
Record Speech
Run Speech Recognition Test SessionConversational AI and Voice
From traditional IVR systems, still very common in customer service, to voice assistants on Alexa or Google Assistant — voice technology is nowadays part of everyday life, and it will continue to gain importance in future. The component stack of a typical voice assistant includes speech recognition and speech synthesis, apart from the usual conversational components like NLU (natural language understanding), dialogue management and NLG (natural language generation).
Botium Box enables companies to implement a holistic test strategy for voice assistants on all levels of the component stack. This article focuses on the speech recognition part and shows how to build a regression test suite based on audio files, transcription files and word error rate verification.
Continuous Speech Recognition Testing
The big cloud service providers Google, Amazon, Microsoft and IBM all provide high quality speech services with the best recognition rates on the market. But even with those cloud providers, some make it possible to add your own optimizations by uploading additional training data — this is often used for improving recognition rates for domain-specific vocabulary. Apart from the big cloud service providers there are also a number of free software packages available like Kaldi (for speech recognition) or MaryTTS (for speech synthesis), which companies install, train and operate on their own infrastructure.
Continuous speech recognition testing has most benefits for voice assistants using an optimized cloud speech service or completely self-trained language models. As part of a voice assistant test strategy, the quality of the speech recognition should be verified continuously, as all the other stack components. This article will show how to set up a continuous speech recognition test suite.
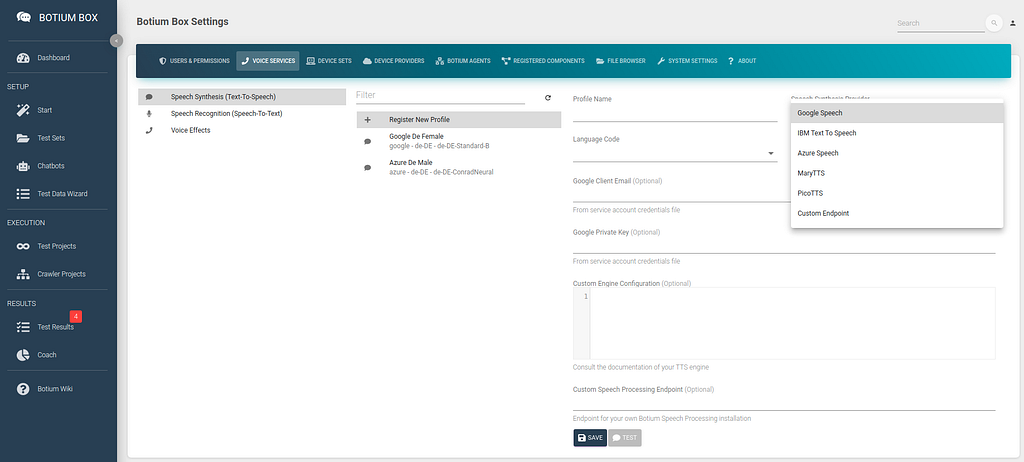
Configure Speech Services in Botium Box
In Botium Box, switch to the Voice Services section in the Settings menu (from the user icon on the top right).
Speech Recognition (Speech-To-Text)
In the Speech Recognition list, we register the speech service (including credentials) and the language and to use. Depending on the speech service there are additional parameters required — for example, for cloud services like Google the credentials are required.
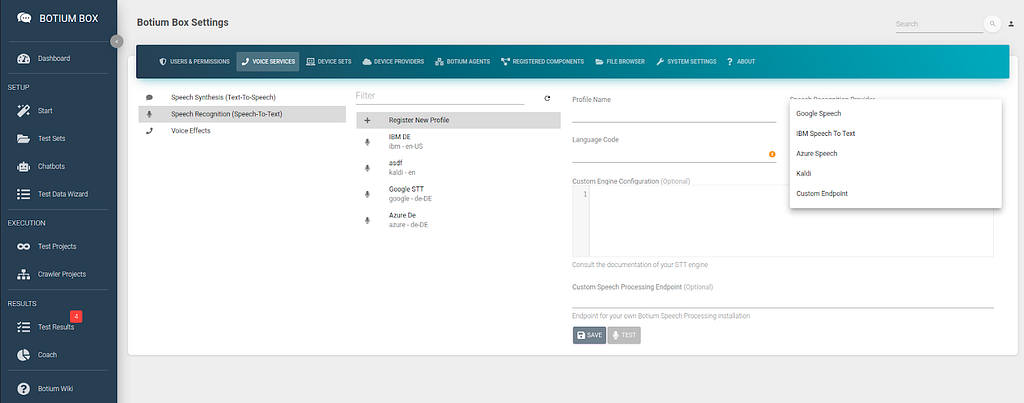
Botium Box allows very fine grained control over how the speech service is used with the Custom Engine Configuration field. For example, to select your own customized Azure speech model:
{"speechConfig": {"endpointId": "xxx-yyyy-zzzzzzzzzz"
}
}
It is possible to immediately test the speech service configuration by using your own microphone.

Speech Synthesis (Text-To-Speech)
In the Speech Synthesis list, we register the speech service (including credentials), the language and the voice to use for synthesizing audio from text. Depending on the speech service there are additional parameters required — for example, for cloud services like Google the credentials are required.
Again, you can test the configuration by listening to a first example.

Custom Speech Engines
Botium Box is using the open source Botium Speech Processing software stack (see Github project). By using the Github source code as base it is possible to add your own custom speech recognition or speech synthesis as well as voice effects to your Botium tests. Be prepared to do some Node.js coding!
Prepare Chatbot for Speech Synthesis and Recognition
Next we will create a chatbot in Botium Box with the Speech Synthesis & Recognition connector. In the Chatbots section, register a new chatbot, select the technology from the list and the previously configured speech recognition and speech synthesis profiles.
The Speech Synthesis & Recognition connector is a very slim Botium connector that is capable of doing simple 2-step conversations:
- use pre recorded audio file or synthesize audio file for a given text with a given voice
- send this audio file to the speech recognition engine and show the text results and WER

The configuration can be tested immediately with the Say Hello or even with the Live Chat. You can either enter some text in the live chat for which voice will be synthesized, or you can record your own voice as well.

Prepare Test Set
As the next step we have to prepare a Test Set. A Test Set in Botium Box is the container for the test data itself as well as the configuration of how to interpret the test data to inject it into the Botium testing pipeline.
Usually, in Botium Box test cases are defined in the scripting language BotiumScript, conversation flow tests as well as NLP tests and other test types supported by Botium. In the case of speech recognition testing, it is not required to use BotiumScript: for testing speech recognition labeled audio files are sufficient to build up the test cases.
- Audio files have to be uploaded as wav or mp3 files to Botium Box
- Botium looks up the expected transcription …
- in a file with the same name but with extension .txt instead
- in a CSV file transcript.csv
- from the file name itself
In the Test Sets menu, create a new Test Set and navigate to the Media Resources Settings. In the Audio File Usage field select the option Use all audio files as Test Case input, and read transcription from file.
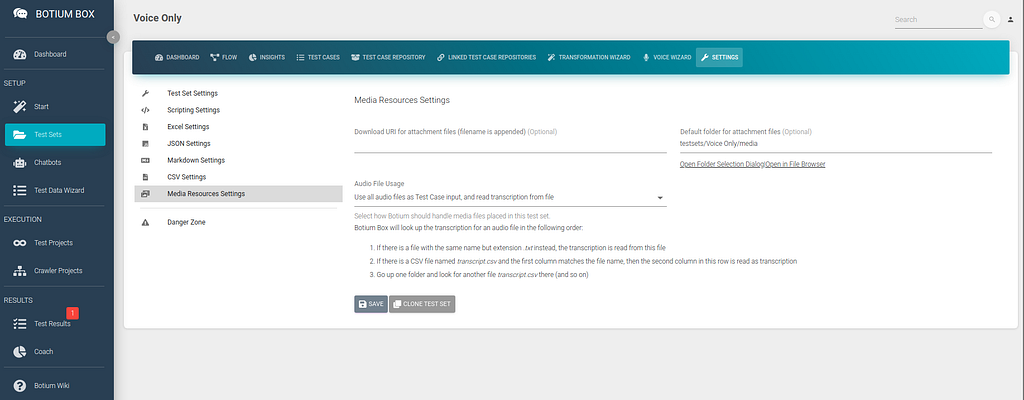
The Default folder for attachment files is the folder in Botium Box where we will place our test audio files in the next steps. You can navigate there by clicking on Open in File Browser to show a now still empty folder in the Botium Box File Browser.
Gathering Test Data
As always, a test strategy is only as good as the quality of the test data. Depending on your goals there are some ways to gather test data.
Labelled Reference Audio Files
If you are working on your own voice assistant you most likely already own reference data in the form of labeled audio files (audio file + expected transcription). Botium expects the expected transcription in a separate text file named after the audio file, or in a separate CSV file.
For example, consider there are a couple of labeled audio files:
- F01-hello-how-are-you.wav, expected transcription “hello how are you”
- F02-hi-whats-up.wav, expected transcription “hi whats up”
In Botium Box, open the Default folder for attachment files of the Test Set you created above in the File Browser.
- Upload the two audio files
- do either of the following
- Place two additional text files in this folder
- F01-hello-how-are-you.txt with text content “hello how are you”
- F02-hi-whats-up.txt with text content “hi whats up”
- Or place a file transcript.csv in this folder
- you can prepare this file with a text editor or with a spreadsheet like Excel
F01-hello-how-are-you.wav;hello how are you
F02-hi-whats-up.wav;hi whats up
Now Botium knows what to expect when sending the audio file to the speech recognition engine.
Synthesizing Speech
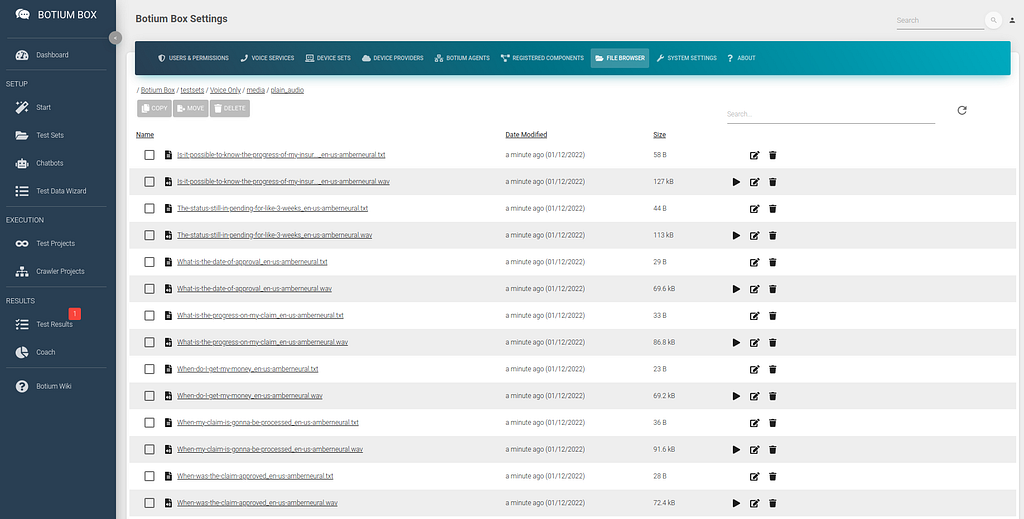
Another way to start testing your speech recognition is to synthesize audio files from text. Botium Box has the Voice Wizard to support you in doing so. Paste the text for which to generate the audio files, select the voices you want to use and the output folder. The Voice wizard will place the audio files as well as the transcription files right there.
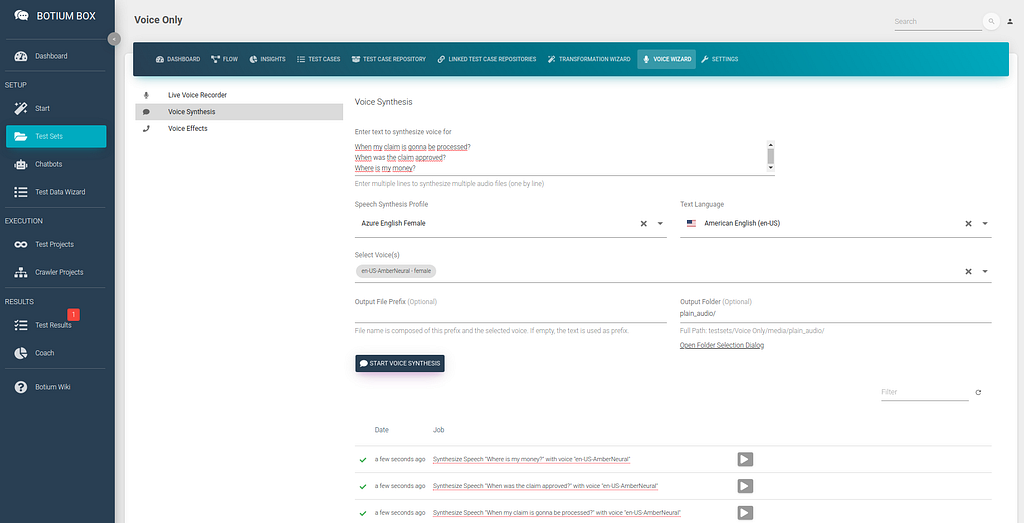
When opening the folder now in the File Browser, you can see a bunch of audio files — one for each line of text and voice — as well as one transcription file per audio file, ending in .txt.
This is by far the quickest way to generate audio test data en masse.
Record Speech
For smaller scale projects it might also be feasible to record your own voice and use it for testing the speech recognition. The Voice Wizard also has the option to record an audio file and place it in the Test Set folder.
You will have to add the transcription files manually if choosing this option.

Run Speech Recognition Test Session
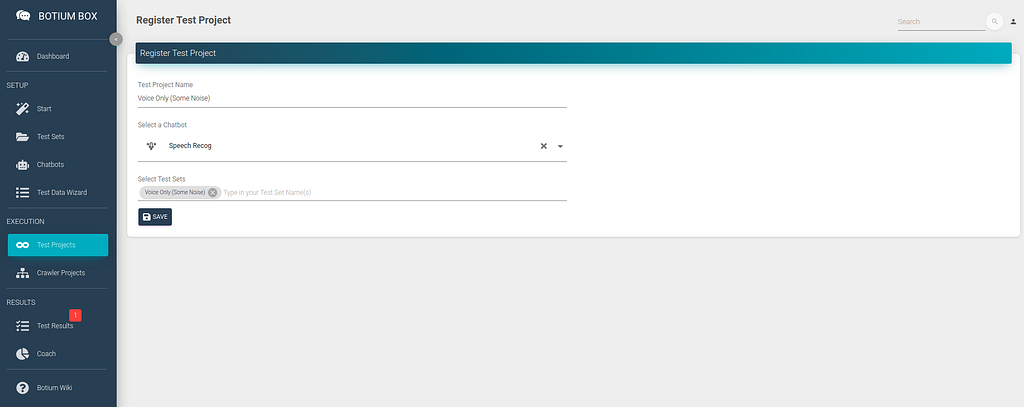
Now that we have everything in place for a first test run — the connection to our speech recognition engine and the labeled test data — we run a first test. For this we create a Test Project — in the Test Projects menu, register a new Test Project, select the Chatbot and the Test Set we created in the previous steps and click on Save.

Now click on Start Test Session Now to start the first test session. A few minutes later you can already start to inspect the results.
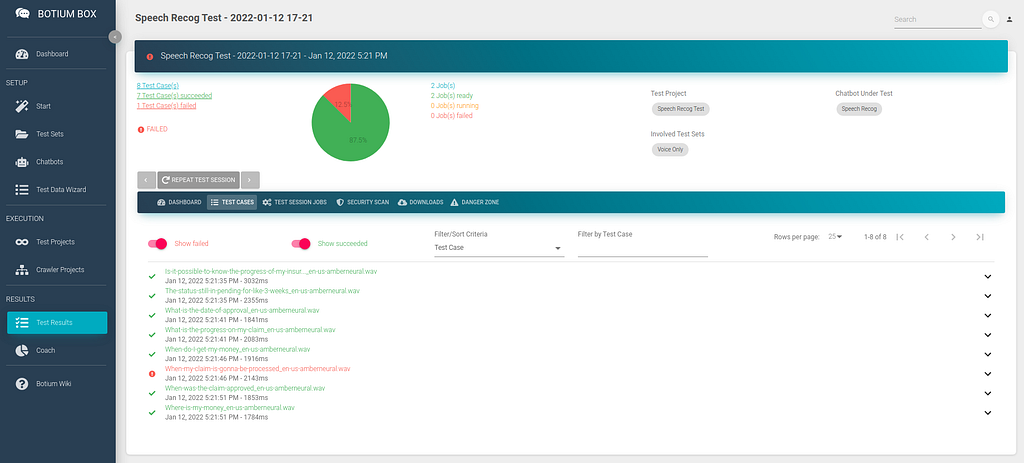
You can see the list of audio files where the speech recognition matched the expected transcription, and the ones where it failed. You can dive into the results, listen to the audio files and view the result details on a JSON code level (use the <> button).

As expected, most of the tests pass now, as we are using the best quality audio files we can get — labeled reference data, your own voice recordings or even synthesized voice, which is per definition extremely clean. We can now add some noise to the audio files to challenge the speech recognition with real-life scenarios.
Humanification: Adding Noise
In Botium Box, the term Humanification is used to describe the application of algorithms to introduce noise into the test data. For text-based testing, this means to consider typical human behaviour patterns and typical human flaws like typographical errors, case insensitivity, whitespaces (or lacking of whitespaces), using emojis and others. For voice based testing, noise can be indeed noise — like adding some environment-specific background noise.
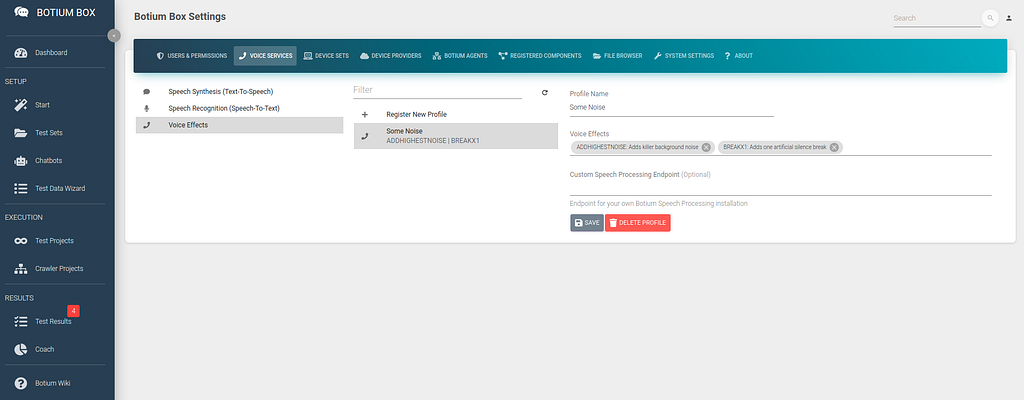
Voice Effects Pipeline
Switch to the Voice Services section in the Settings menu (from the user icon on the top right). In the Voice Effects list you can configure your pipeline of additional noise layers to apply to an audio file. There are several common audio effects available to simulate real-life environments:
- Adding background noise
- Make it sound like a low-bandwidth GSM phone call
- Simulate a slightly interrupted phone line by adding breaks
- … and more
Clone the Test Set from above and add something with “Noise” to the name. This Test Set is initially empty, but has the same settings as the above.
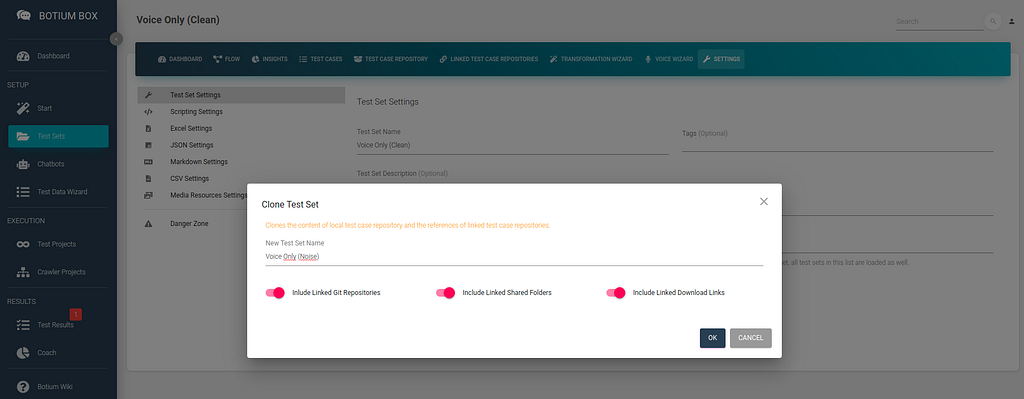
Verify that the Audio File Usage field is indeed set to Use all audio files as Test Case input, and read transcription from file.

Apply Noise Effects
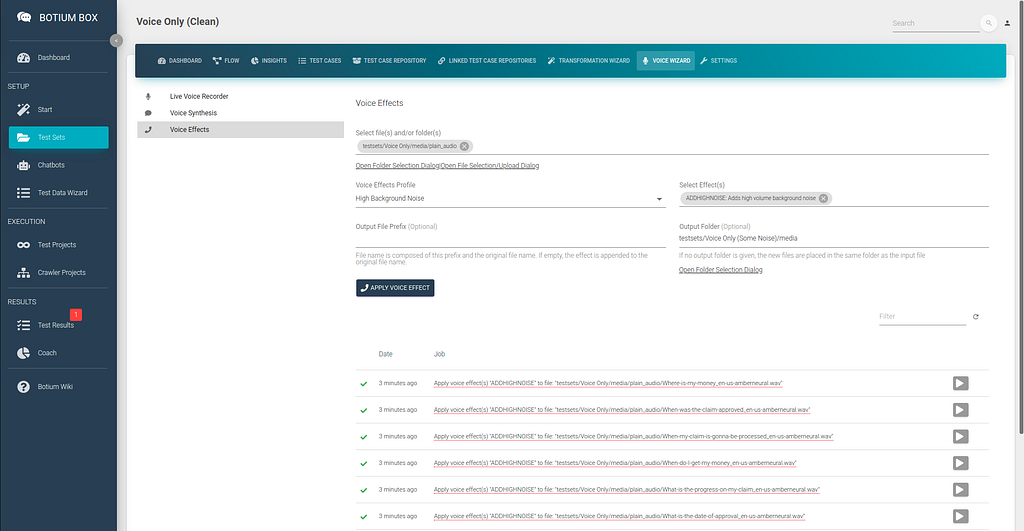
In your clean Test Set, open the Voice Effects section in the Voice Wizard. Select the folder where you placed your audio files before and select the noise profile from above. In the Output Folder, select the media folder from your new noise Test Set you created in the previous step. When clicking on Apply Voice Effect, Botium Box will run all of the audio files in the selected folder (including subfolders!) through the voice effect pipeline and place the resulting audio files in the output folder.
Now create a new Test Project for the new Test Set with noise, and start a first test session.
Again, you can inspect the test results after a few minutes to check if the applied noise makes the speech recognition struggle.

Congratulations, you can now run the speech recognition tests with your reference data and with the noisy data over and over again — it makes most sense when you retrain your speech recognition of course.
Trending Bot Articles:
1. How Conversational AI can Automate Customer Service
2. Automated vs Live Chats: What will the Future of Customer Service Look Like?
3. Chatbots As Medical Assistants In COVID-19 Pandemic
4. Chatbot Vs. Intelligent Virtual Assistant — What’s the difference & Why Care?Bonus: Check Word Error Rate
In many cases, you might not actually be interested in the exact transcription of the audio file, but rather if certain quality criteria about the transcription are met — this is where the word error rate comes into play. It’s a measure of how many words in a single transcription have been recognized correctly — for a perfect transcription fully matching the label it is 0, and the value is between 0 and 1. Depending on your requirements you might consider a word error rate of 0.1 (one wrong transcription out of 10 words) ok. Botium Box can verify the word error rate on a single utterance level instead of the exact transcription.
First, switch the value of Audio File Usage in the Test Set settings to Use all audio files as Test Case input, and calculate word error rate from transcription from file — this will Botium instruct to calculate the word error rate, instead of asserting on the exact transcription.

Currently there is no special Word Error Rate asserter in Botium Box, but we can tailor the Generic JSONPath Asserter for doing this. In Botium Box, in the Settings menu open the Registered Components section. Register a new component there, name it Check WER and select Test Case Asserter as Component Type.
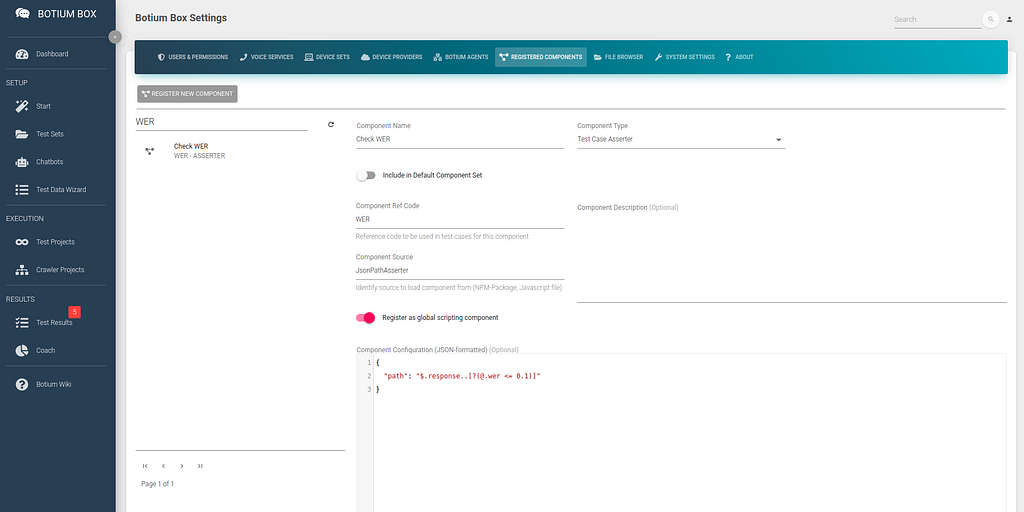
As Component Ref Code, use WER and in the Component Source field enter JsonPathAsserter. This will instruct Botium to use the Generic JSONPath Asserter for this component. Enable the switch Register as global scripting component to make Botium use this asserter for all test cases. Finally, in the Component Configuration, we tell Botium the JSONPath expression which we expect to match the speech recognition response.
If we expect a perfect word error rate of 0, we can enter this expression:
{"path": "$.response..[?(@.wer == 0)]"
}
If we are fine with a word error rate of exactly or below 0.1, this is the expression to use:
{"path": "$.response..[?(@.wer <= 0.1)]"
}
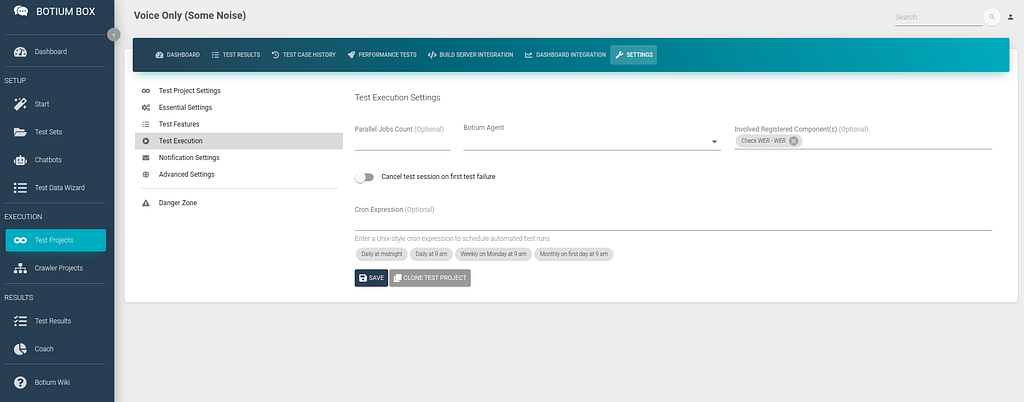
We now have to tell Botium Box to use this asserter in our tests. Save the registered component, and navigate to your Test Project. Open the Test Execution section in Settings, and add the Check WER component to the Involved Registered Component(s) field.
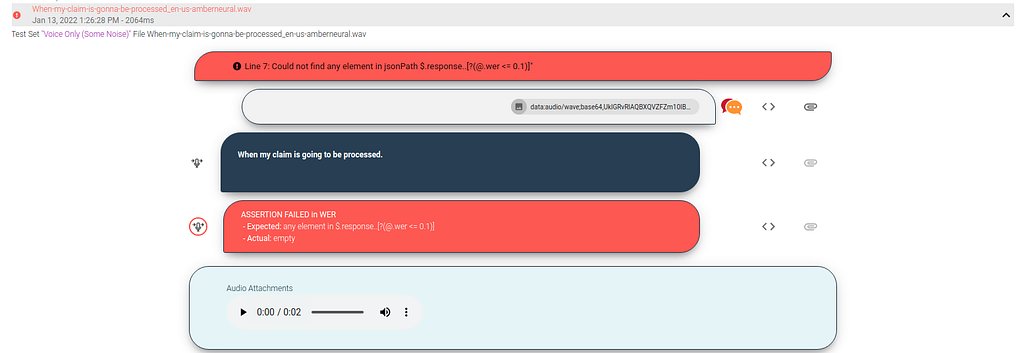
When now running a test session, Botium will not assert on the exact transcription anymore, but it will instead use the Check WER asserter to fail a test case if the word error rate is above 0.1 — you can inspect the detailed results in the test session again:
Bonus: Speech Recognition Regression Tests
When regression testing a speech model, often the word error rate itself is not the main criteria — but to make sure that the transcription for some reference audio files is always the same, before training a new speech model and afterwards. With this it is possible to tell if the newly trained speech model has any obvious defects.
In these cases you most likely have a library of reference audio files, labeled or unlabeled. In this use case we can start with the unlabeled audio files to build up a regression test suite.
- Create a new Test Set, set the Audio File Usage to Use all audio files as Test Case input
- Upload your unlabeled audio files to the media folder of this Test Set
- Start a first test session — Botium Box will send all the audio files to the speech recognition engine and accept any transcription
- In the Downloads section of the test result, download the full transcript as CSV file and open it in Excel
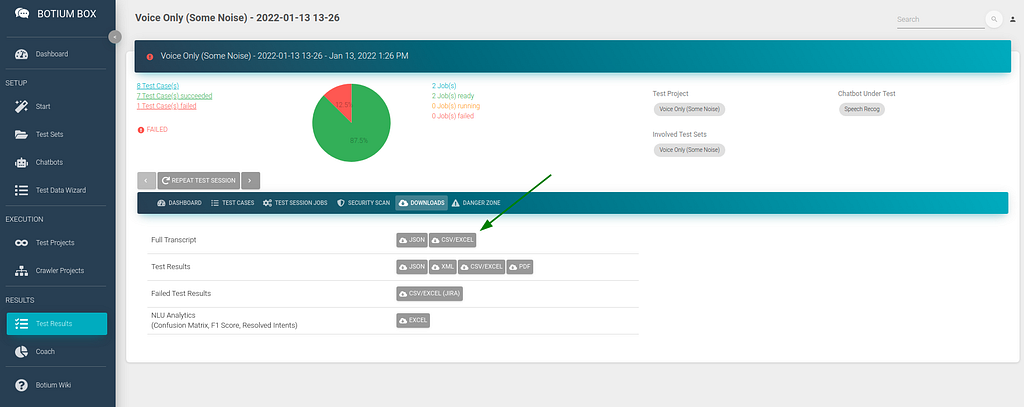
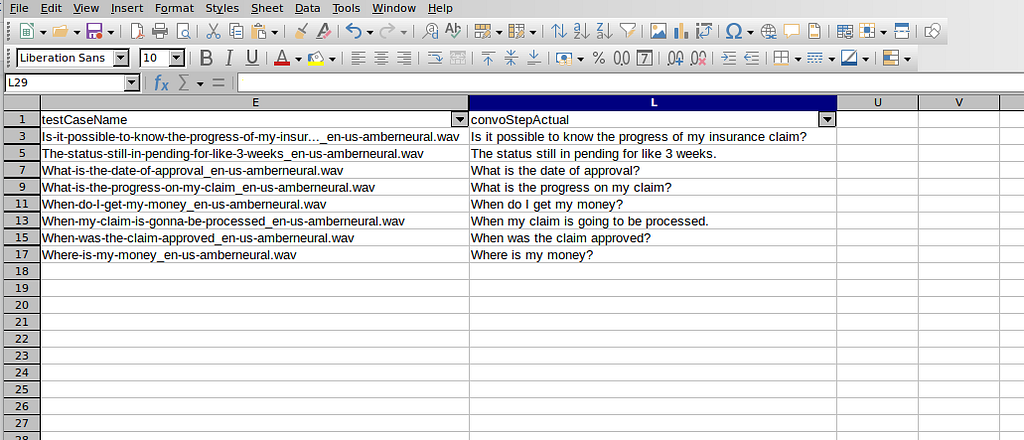
In this CSV file, we are only interested in the columns named testCaseName (which contains the file name) and convoStepActual (which contains the transcription). Filter the convoStepSender column on the value bot and hide all other columns except the two mentioned ones. Copy the remaining data as file transcript.csv to the folder with your audio files in Botium Box.
When now switch the Audio File Usage field to Use all audio files as Test Case input, and read transcription from file, Botium will read the expected transcriptions from this file and any changes in the transcription for your reference files will popup up in the test results.
Continuous Speech Recognition Testing was originally published in Chatbots Life on Medium, where people are continuing the conversation by highlighting and responding to this story.
-
What is a banking chatbot and why it is important?
Conversational ai for banking The terms chatbots and AI have now become a part of our daily conversation. In this digital era, there is hardly an industry that does not know what chatbot is. Still, to be on the same page, a banking chatbot is an AI-powered system integrated into your website, social media channels, WhatsApp, etc. to achieve higher customer experience, operational efficiency, and boost revenues. Here’s everything that you need to know about banking chatbots and why you should be considering chatbots:
Highlights:
- Know Banking Chatbots in Simple Terms:
- Reasons to Adopt Conversational AI Banking Chatbots:
- Conclusion
Know Banking Chatbots in Simple Terms:
Conversational AI chatbots are intelligent assistants in digital form supported with an artificial intelligence-based computer program. These AI chatbots communicate with humans in a very natural form to resolve their queries and to assist them as required.
The core purpose of banking chatbots is to provide the customers with prompt service and to improve the operational efficiency of the bank and its employees. Besides, Conversational AI in banking also assists the staff to distribute their workload. Conversational banking bots assist customers in most banking scenarios, from attending to your customers instantly to helping them out with whatever they need, chatbot serves it all right. It understands human languages, supports voice & text-based communication. The bots do get trained based on the user’s intent and utterances.
A recent study indicates the use of Conversational AI for banking showing that around 32% of the BFSI sector are already using AI chatbots. Another 37% are looking to initiate the same in the next 24 months or so.
Reasons to Adopt Conversational AI Banking Chatbots:
1. Seamless Assistance to both — Bank Executives and Customers:
Conversational AI Chatbots understands the customer concerns and assists them just right, round the clock. In case, there comes a moment when you need human assistance, the bot carries forward your entire conversation to the human executive. The chatbot assists bank customer executives with the needful data and it even responds to a few queries that the executive could use for reference. Chatbots not only serve customers but can also be used to assist employees. They can be used to schedule meetings, send messages between employees and much more.
2. Omnichannel support
The best feature of conversational AI is, it functions on an omnichannel basis. An ai-driven chatbot solution can connect with your customers across multiple channels like Website, Social Media, WhatsApp to improve your customer experience and engagement.
3. Automated Notifications and Reminders
In recent times, various banks are using Conversational AI chatbots to send timely notifications & reminders to customers. Using financial bots you can remind your customers about their upcoming deadlines for loans, pending payments, their credit scores, etc.
4. Helping Customers with Financial Advisory
Banks today with the help of conversational AI chatbots can offer financial advice to their customers, be it suggesting the right banking instruments to the appropriate insurance schemes etc. It helps customers in getting equipped with the required knowledge about any new financial schemes. These bots can also be intelligent enough to track the spending habits of customers and lead them to better financial management
5. Understands the Natural and Vernacular Language
The AI chatbot can be trained to understand most of the widely spoken human languages. Even if the customer is talking in his regional language, the chatbot can be trained to respond accordingly and answer him correctly. To go a bit further, bots may also be trained to understand SMS lingo and respond to the queries aptly
Trending Bot Articles:
2. Automated vs Live Chats: What will the Future of Customer Service Look Like?
4. Chatbot Vs. Intelligent Virtual Assistant — What’s the difference & Why Care?
Conclusion
The dream of wholly personalized banking services on a large scale is now a reality because of Conversational AI chatbots. With some of the prominent features such as 24/7 customer support, financial advisory through bots, payment transactions, omnichannel support, we are certain that Conversational AI chatbots in the banking industry are there to sustain in the future only to enhance customer engagement to an unprecedented level.
Nuacem AI, is a Conversational AI-Powered Cognitive Customer Engagement platform. We’ve worked with many banks and BFSI institutions on various use cases wrt to their industry in solving their day-to-day challenges in customer support. In case you are looking for chatbot solutions to address your customer engagement problems in your banking institutions, we would be glad to assist you. You may please reach us here.
What is a banking chatbot and why it is important? was originally published in Chatbots Life on Medium, where people are continuing the conversation by highlighting and responding to this story.
-
Marketing Agencies: Cloud Messaging
Text Messaging Service has become a popular way of connecting with clients and consumers as the use of mobile phones has increased. Bulk SMS beats traditional marketing tactics in terms of speed, accessibility, and direct connectivity, and is commonly employed by advertising agencies. The most significant advantage of using Bulk SMS Service is that it allows a company to engage directly with its customers, which is something that no other media can give. According to research, 90 percent of SMS messages are viewed within three minutes of delivery. As a result, Bulk SMS Messaging is one of the most efficient and effective ways to communicate directly with your target audience.
Here’s how you can use SMS Services for your Marketing Agency:
- Mass Text Messaging: With an SMS Blaster, you can send mass SMS text message blasts to your clients’ contact lists. SMS conversation blasts reach audiences with business information or promotional content you have to offer, and Cloud Messaging’s SMS opt-in and text message blasting solutions make it easier than ever before.
- Exclusive Deals & Offers: Because SMS is one of the most engaging and cost-effective ways to engage their clients’ prospects and consumers, digital firms utilize it to deliver promotions and sales. Moving prospects to the bottom of your sales funnel is as simple as reaching out and interacting with segments of your audience. Text message marketing is one of the most effective proactive methods.
- Run Contests & Giveaways for Clients: One of the growth hacking tactics that always works to gain additional SMS subscribers is to run a short-term contest. You can choose some winners from among those who have signed up. Alternatively, you may provide a modest prize to each individual that SMS your keyword.
- Send Clients Appointment & Billing Reminders: If hours change, if appointments are postponed, cancelled, or moved, send out an SMS to all of your clients.
- Lead Generation: SMS marketing is extremely successful at generating new leads as well as converting existing ones. In fact, the average time it takes for a business text message to be responded to is only 90 seconds. When you compare this to the average of 90 minutes spent on business email, you’ll see why we recommend including SMS in your marketing toolkit.
- Promote Products and Services better: With mobile coupons, messaging can enhance in-store traffic and revenue. Coupons from Cloud Messaging can be tracked, allowing you to send automated reminders the day before they expire. With our Smart Targeting feature, you can also send out new product announcements to all of your customers or just those who have expressed interest in the product.
- Increase Brand Loyalty: Customers who opt-in to your marketing efforts build a relationship with you that can last for years. As a result, it’s important that you don’t abuse their trust, send them messages that are relevant to their favourite aspects of your brand.
- Text Surveys: A text survey can provide you with additional information that you can use to better target your customers. It can provide you with information about clients and their buying patterns. If you use Cloud Messaging our system can ask them the questions directly and record their answers so you can better target them in the future.
- Get Opt-In from Facebook Messenger: You can welcome leads and customers chatting on a Facebook page to opt-in to SMS updates. So, when a consumer is speaking with your Facebook chatbot, you can now provide them the choice to keep in touch with you and receive updates through SMS. Use Cloud Messaging to send QR Codes for people to Subscribe to your SMS Updates.
- Answer Common Questions
- Event Announcements
- Appointment Reminders
Enrich your client’s experience by using the Bulk SMS Service of Cloud Messaging. Cloud Messaging is the best message marketing software for marketing agencies! Cloud Messaging has a range of helpful text message marketing tools. With this service, businesses of all sizes can create and execute successful text message marketing campaigns and track results.
Marketing Agencies: Cloud Messaging was originally published in Chatbots Life on Medium, where people are continuing the conversation by highlighting and responding to this story.
-
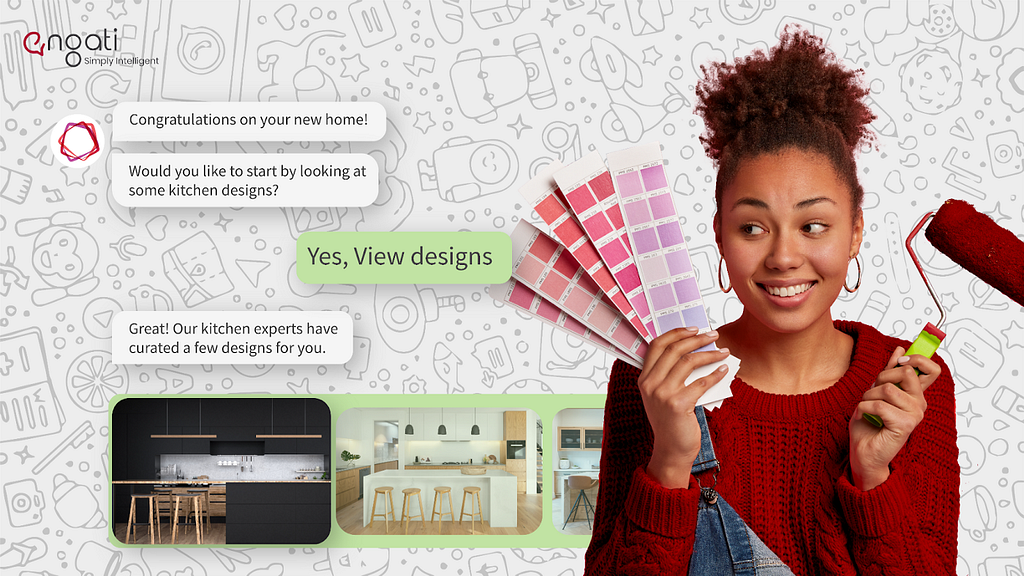
How Livspace used an interior design chatbot to generate leads and slash their resolution time by…
How Livspace used an interior design chatbot to generate leads and slash their resolution time by 89%.
The world of interior design and home renovation can be quite competitive. Just a quick search would be enough to show you how thousands of firms all varying sizes — from globally renowned interior design companies to boutique firms around the world are vying for the chance to spruce your home up and turn it into a place that you’d actually want to live in, rather than just a place that you use to crash at when you’re back from a long day’s work.
Sure, having impeccable design skills is important to survive in this game, but its not enough if you want to actually thrive in the industry. What Livspace realized is that they’ve got the design smarts that they need to craft homes that look and feel magical, but they needed to bring some of that magic to their online experiences as well.
About LivSpace
A long time ago, two college buddies embarked on a journey to build their dream homes. Soon enough, they found that it was a painful process to pick the right professionals, coordinate tasks, and make sure that they were getting great quality at a fair price.
So, what’d they do? They made it their mission to ensure that the interior designing and home renovation process was less painful and more rewarding for homeowners, which led to the birth of Livspace in December 2014 in Singapore. They then launched in India in January 2015 and went on to become the world’s largest interior design and renovation platform.
Fast forward to October 2019 — they partnered up with IKEA and started launching pop-up stores in IKEA outlets and even won the Design Excellence Award for Best Residential Design at the Interior Design Confederation Singapore (IDCS).
The goal… and the challenge
Livspace aimed to create a more interactive and engaging online experience for their customers and they knew that the most important factor for this was to be able to reply to their queries as soon as they came in.
But the issue they faced was that with all the success and recognition that they earned, they gathered millions of followers across multiple social media platforms, making it practically impossible for them to manually answer all their inbound messages and inquiries as soon as they would like to.
They needed a way to scale up their customer engagement strategy in an efficient and effective manner, across multiple channels, and in real-time. That’s where we came in.
The solution
How do you manage to interact with millions of customers in real-time, without making them wait a ridiculous amount of time before they get a response? It’s fairly obvious — you bring automation into the picture.
Livspace knew that they needed to use an AI-powered chatbot to power their customer engagements. But they knew that they couldn’t make do with just any chatbot. As an award-winning interior design and renovation platform, they recognized that they needed to build their bot on an award-winning chatbot platform.
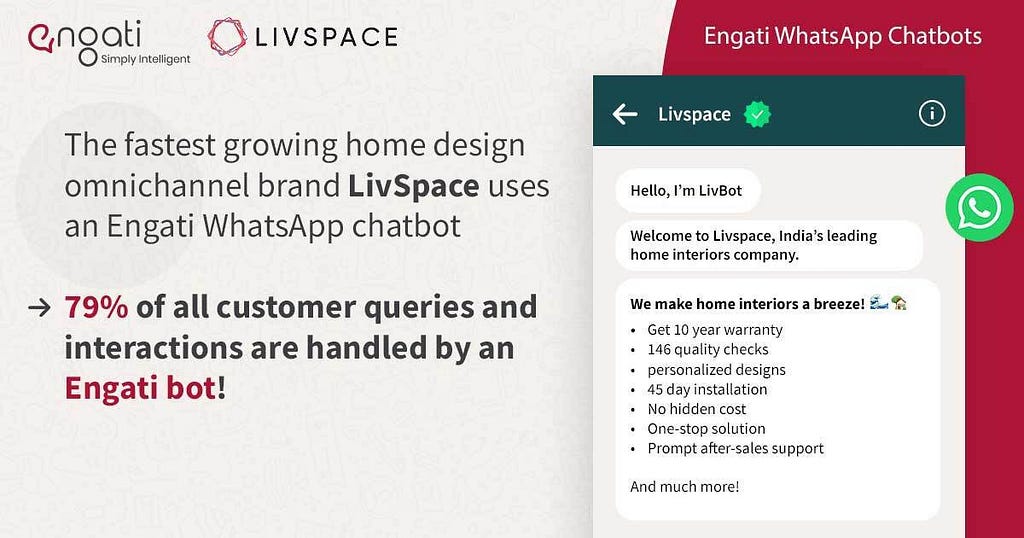
That’s why they picked Engati, the 2021 CODiE Award winner for the Best Artificial Intelligence Driven Technology Solution.
The Livspace team built their artificially intelligent chatbot on Engati’s no-code conversation modeler, making use of our drag and drop user interface that enabled them to build a powerful chatbot with minimum effort, in the least amount of time.
Wondering what makes things even easier? The fact that they didn’t need to manually train their chatbot by painstakingly uploading individual FAQs. We made it easier for them by making it possible to upload FAQs in bulk. But we didn’t stop there, the chatbot training process becomes even easier with our DocuSense feature which allows our customers to train their bot by simply uploading documents like their policies and knowledge base, which the bot can parse through and directly pull answers from.
They deployed their AI-powered chatbot on multiple touchpoints and channels, including their website, and the channel they knew that their customers use the most — WhatsApp.
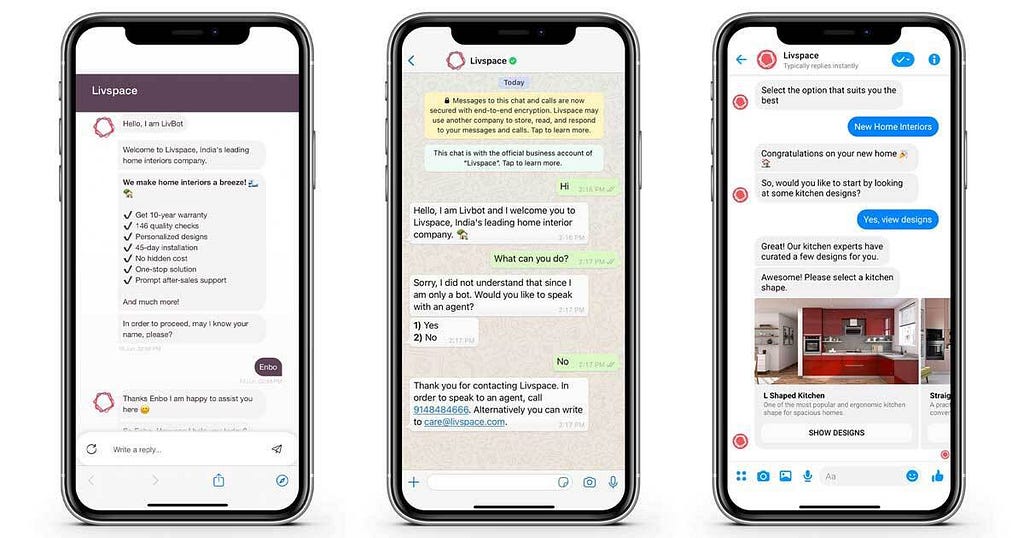
Deploying their bot on WhatsApp was a particularly useful idea, because of the fact that WhatsApp chatbots have been proven to boost conversion rates by up to 54% and the fact that WhatsApp now allows customers to even broadcast promotional messages with discount codes via the WhatsApp Business API.
The omnichannel nature of Engati’s customer engagement solutions allowed them to stitch their customer conversations across multiple channels so that context from past conversations is retained, irrespective of the channel on which that conversation took place. What does this mean? Well, just that their customers don’t need to repeat information that they’ve provided in past interactions (something that, according to Accenture, frustrates 89% of customers).
More than just automation
Automation is good on it’s own, but when it’s paired with human expertise, it becomes fantastic. That’s why Livspace brought multiple live chat agents on board to tackle the complex queries while the bot dealt with the routine, repetitive ones.
The results
We sure came through for LivSpace, doing more than just asking customer queries, but even helping them generate leads by getting prospects to share their contact information and book free design consultations over the chatbot.
On the customer service side, the chatbot handled 79% of their customer interactions, so that the agents could focus on only having to take care of the remaining 21% — the really complex customer queries.
This helped Livspace cut down their response time by 77% and even enabled them to slash their resolution time by a whopping 89%.
This article about “How Livspace used an interior design chatbot to generate leads and slash their resolution time by 89%” was originally published in engati blogs.
How Livspace used an interior design chatbot to generate leads and slash their resolution time by… was originally published in Chatbots Life on Medium, where people are continuing the conversation by highlighting and responding to this story.
-
Conversation Design Resource Guide
Conversation design is a relatively new field that’s expanded tremendously in the last couple of years. This guide aims to organize different resources I’ve found helpful in my journey in becoming a skilled conversation designer. It is by no means comprehensive and I will probably add to it in the coming months.
Get Started
Google’s Conversation Design Resources
My favorite place to start and one I refer back to constantly is Google’s Conversation Design Library. Their articles do a great job teaching how to incorporate well known UX practices into conversation design (see: The Rule of Three).
Going hand in hand with Google’s Conversation Design Library are their docs which is a more actionable guide to best practices in the CxD space. Their docs outline their design process, conversational components and my personal favorite, a comprehensive style guide.
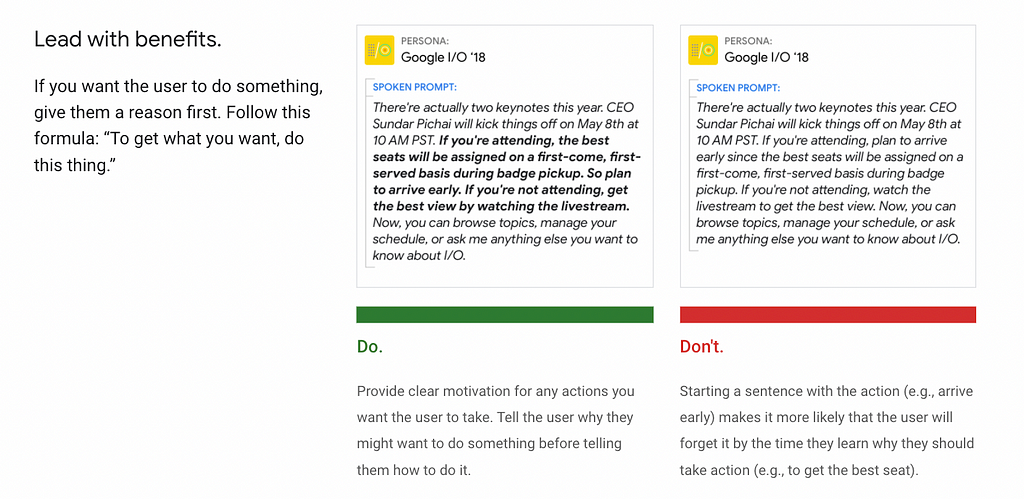
Taken from Google’s Conversation Design Style Guide Google’s style guide provides clear examples of how to write for conversational systems with a “Do and “Don’t”.
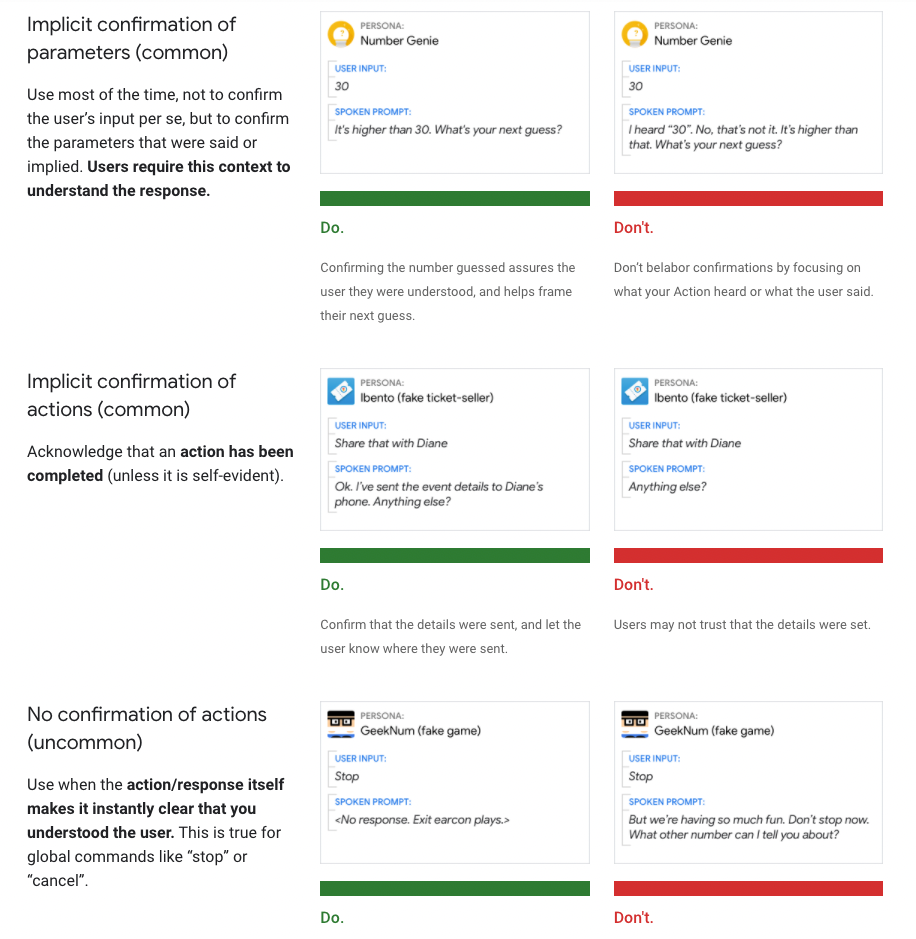
Their conversational components section addresses how to write commands, errors, apologies and more for conversational systems. My favorite (below and linked here) talks about the 3 types of confirmation and when to use which in your design.
Conversation Design Principles
The principles of conversation design are critical in ensuring your content is natural and human sounding. These were first introduced in Erica Hall’s book Conversational Design (also linked here), but the following are great summaries.
Books
I recommend the following books to get started in the space. In addition the authors are all wonderful thought leaders to follow on LinkedIn, Twitter and/or Medium.
- Designing Voice User Interfaces: Principles of Conversational Experiences
- Conversational Design
- Voice Content and Usability
- Designing Bots: Creating Conversational Experiences
Articles
Here are some basic articles I read when I first started in this space. Most include links to additional resources like podcasts and Youtube videos.
- What is Conversation Design and How to Design Your Chatbot
- Behind every great chatbot there’s a great Conversation Designer
- How To Become a Conversation Designer
- How to become a Conversation Designer and make chatbots and voice assistants more helpful, natural and persuasive
Events
Conferences are a great place to meet other people in the space, keep up with emerging trends and learn new skills. Here are some of my favorite conferences in the CxD world.
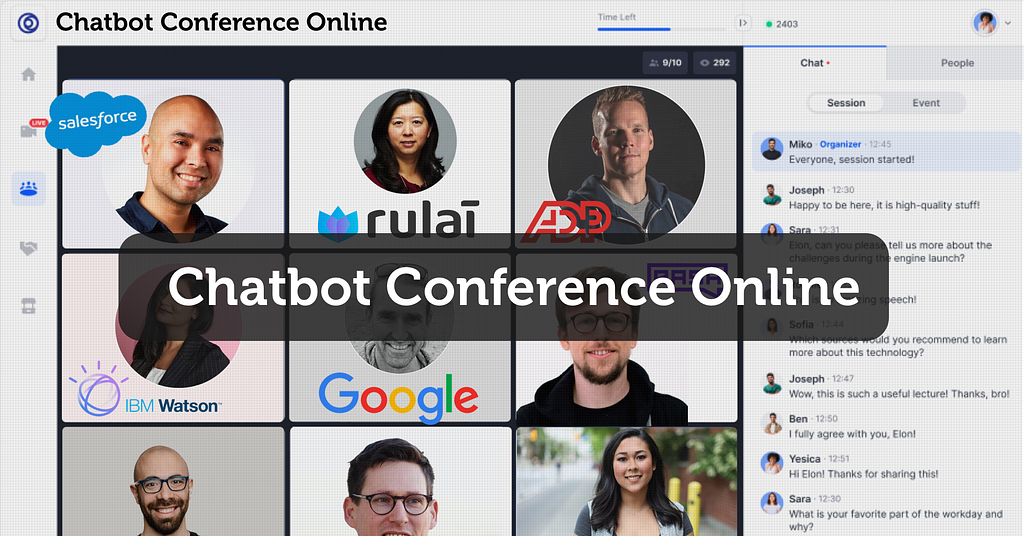
- Chatbot Conference. This year it’s taking place in the Metaverse on April 12th-14th.
- Voice Summit October 10th-13th in Arlington, VA
- Women in Voice Summit. Running virtually on April 4th-7th
Tools
Ready to start designing your first conversation? While Excel and Figma are great they’re not tools built for conversation design. Here are some tools that are:
- Voiceflow can be used to design, prototype and launch voice & chat assistants. They have reusable components, advanced prototyping capabilities and an infinite canvas.
- Botsociety allows you to design for any type of conversational interfaces, on any number of devices.
- Fabble is a voice and conversation design tool that allows you to design and prototype Alexa Skills, Google Actions, chatbots, IVRs and more.
Conversation Design Resource Guide was originally published in Chatbots Life on Medium, where people are continuing the conversation by highlighting and responding to this story.
-
Why Are Teachers Leaving the Force and What Should We Do to Help?

The pandemic has brought along many things, one of which being ‘The Great Resignation’. As people started spending more time at home with their loved ones and diving deeper within themselves, many have realised they are not satisfied with their jobs.
Millions of people worldwide across industries have quit their jobs, with the resignation numbers in America hitting an all-time high in November 2021.
When it comes to education, teachers are no exception.
It is worrying to see teachers leave the force because they are the backbone of our society and they ensure the education of the next generation.
Whether it is because of mental exhaustion, physical exhaustion, a lack of resources, or low salary, the number of teachers in the force are steadily and scarily declining.
So, what should we do to support educators and help them stay in the force? Here are some changes you can make today.

-
Artificial Intelligence Virtual Assistants and Chatbots

There’s a reason people say, “first impression is the last impression.” About 51% of customers will never approach a business again after a single bad experience. This puts pressure on every interaction and missed opportunity with potential customers, new purchasers, and long–term users.
Webchat is often the first impression for customer service interactions. However, while chat services initially connected consumers with actual customer service staff, chatbots have become increasingly common — for obvious reasons and with obvious limitations.
As a result, no platform guarantees an enhanced customer experience. Consumers care most about solving their problems. Whether they do this with a person or a chatbot is secondary.
This is what your consumers want. Chat preference continues to grow: Around 70% of consumers prefer voice chat when given a choice, and about two–thirds of customers who engage with a chat platform are more likely to return to a website and buy again.
A chatbot is a chatbot that communicates with people by voice, text, gesture, etc. It is software that interacts through various environments such as A chatbot with the power of AI (Artificial Intelligence) domains such as NLP (Natural Language Processing), enabling more natural and intelligent conversations between humans and technology.
Chatbots are designed to chat with people. These conversations range from the basic (for example, “Tell me when the bus is coming”) to the more advanced (for example, Alexa and Siri).
– Human–like speech,
– Answering user questions,
– Collecting and analyzing data,
– Guiding users through processes,
– Using predictive analytics to provide personalized services to users.
Types of Chatbots
Chatbots fall into two main categories:
1) Language–Based / Rule Based:
This category of chatbot follows the rule or algorithm to answer any question/query asked by the user. However, these are simple robots built with hard coding that can only answer a pre–programmed set of questions. Therefore, the robot cannot respond naturally, and the intelligence of such chatbots is entirely dependent on the programmer who designed them.
There are many advantages to using rule–based chatbots:
– It is not costly.
– It is easy to use.
– It is incredibly safe.
– It is easy to integrate.
– Images, videos, etc. It may contain interactive elements such as.
2) Artificial Intelligence (AI) Chatbots
To be more specific, Artificial Intelligence (AI) Chatbots that use Machine Learning (ML) are usually made using the NLP (Natural Language Processing) technique; they understand the context and purpose of a question before responding or taking any action. These chatbots generate their answers to more complex queries using natural language responses. The more you use and train these robots, the more they learn and the wiser they get with lifelike types of responses.
There are many advantages to using Artificial Intelligence (AI) Chatbots:
– It gives relatively more honest answers.
– They learn from knowledge and experience.
– There is a broader range of decision–making skills.
The relative strength of Artificial Intelligence (AI)–based chatbots largely depends on their access to training data.
As you can imagine, the wealth of this source material and the quality of the chatbot responses that follow very intensely.
Trending Bot Articles:
2. Automated vs Live Chats: What will the Future of Customer Service Look Like?
4. Chatbot Vs. Intelligent Virtual Assistant — What’s the difference & Why Care?
What Are The Best Platforms For Creating Chatbots?
Chatbot platforms are the best starting point for beginners. These platforms have a simple and easy–to–use design. You do not need any coding knowledge with chatbot platforms. You have to create the flow or algorithm of how this chatbot will work.
Chatbot platforms are divided into two types:
- Development Platforms
Chatbot development platforms allow you to create a coding/no coding chatbot in minutes. You have to create the flow or algorithm of this chatbot.
– Bottr
– api.ai
– Botstar
– Botsify
– Chatfuel
– Flow Xo
– Motion.ai
– Manychat
2) Broadcast Platforms
It is a platform where the user can access and use the chatbot. Here is a list of a few popular platforms:
– Slack
– Viber
– Skype
– WeChat
– Website
– Telegram
– Messenger
– Amazon Echo
What Are the Best Frameworks for Building a Chatbot?
Chatbot Frameworks is a type of SDK that allows developers to build using NLP (Natural Language Processing), NLU, and other cutting–edge techniques. Frameworks provide essential building blocks such as intent, context, assets, and conversational design, depending on which developers need to build bots through coding. However, unlike framework platforms, there is no drag-and-drop functionality and no predefined flow or templates of any kind.
– Chatterbot
– WordPress
– RASA Stack
– IBM Watson
– Amazon’s Lex
– Google’s Dialogflow
– Microsoft’s Bot Framework (MBF)
Algorithm for Creating a Chatbot
– State the purpose of the chatbot. What kind of services will it be used for? What issue will be addressed? What is the purpose of the chatbot’s existence?
– Will it is rule–based or an Artificial Intelligence (AI)–enabled chatbot?
– Find the right platform for you (platform selection will vary based on your time, knowledge, and budget).
– Choose your framework, decide what kind of technique or technology you will use, and how complex will your chatbot be?
What are the Advantages of Chatbots for Businesses?
– Supports leads and issues to provide context to live agents.
– It improves the customer experience by providing 24/7 support.
– It reduces costs by processing larger requests without any additional expenditure.
– It reduces human error as bots instantly pull standardized information from a database.
– It reduces response time as they can instantly respond to multiple users simultaneously.
– It enables you to sell more by actively engaging with potential customers with personalized experiences.
– Chatbots can help businesses smooth operations, engage with customers, and handle requests and complaints faster.
– It analyzes market and customer data to provide instant insights and recommendations that meet the target audience’s needs.
– It increases operational efficiency by allowing people to devote more time to complex tasks rather than being stuck with the essentials.
Click for more information on this topic;
https://www.anumak.com/post/Virtual/
Don’t forget to give us your 👏 !


Artificial Intelligence Virtual Assistants and Chatbots was originally published in Chatbots Life on Medium, where people are continuing the conversation by highlighting and responding to this story.