 |
submitted by /u/akool_technology [link] [comments] |
Author: Franz Malten Buemann
-
Transform. Amaze. FaceSwap. Unleash your creativity.
-
New snapchat ai learning jokes

I did a thing
submitted by /u/Sandy__Baggy
[link] [comments] -
Fast food chatbots

submitted by /u/alaskamiller
[link] [comments] -
Creating Conversational Interfaces with React and Natural Language Processing
Creating conversational interfaces has become increasingly important as businesses look to provide more personalized and efficient customer service. One way to achieve this is by using Natural Language Processing (NLP) and React to build conversational interfaces that can understand and respond to user input naturally.
Understanding Natural Language Processing
Before we dive into creating conversational interfaces with React, let’s first understand what Natural Language Processing (NLP) is. NLP is a subfield of artificial intelligence (AI) that deals with the interaction between computers and humans using natural language. It involves techniques such as tokenization, stemming, and sentiment analysis to extract meaning from text.
Tokenization is the process of breaking down text into smaller units, such as words or sentences. Stemming involves reducing words to their base or root form, which helps to normalize text for analysis. Sentiment analysis is the process of determining the emotional tone of a piece of text, which can be useful in understanding user intent.
Overview of React
React is a popular JavaScript library for building user interfaces. It was developed by Facebook and is now used by many companies to create web applications. React uses a component-based architecture, which makes it easy to build reusable and modular components.
One of the main advantages of using React for creating conversational interfaces is that it provides a way to manage the state of the conversation. React components can be used to manage the conversation flow and update the UI in real-time as the user interacts with the interface.

Chatathon by Chatbot Conference Creating a Conversational Interface with React and NLP
Steps for creating a conversational interface with React and NLP
Choose an NLP library:
There are several NLP libraries available, such as NLTK and spaCy that you can use to analyze user input and extract relevant information. Choose an NLP library that suits your needs and set it up in your development environment.
Design the conversation flow:
Determine the conversation flow and decide what information you need to gather from the user. Use flowcharts or diagrams to visualize the conversation flow and identify the different components you’ll need to create in React.
Set up a React project:
Create a new React project and install any dependencies you’ll need, such as the NLP library and any other packages you need for your project.
Create React components:
Use React components to manage the conversation flow and update the UI as the user interacts with the interface. For example, you might create a component for greeting the user, another component for asking questions, and another component for displaying the results.
Implement NLP features:
Use the NLP library you chose to analyze user input and extract relevant information. For example, you might use tokenization to break down the user’s input into smaller units or use sentiment analysis to determine the emotional tone of the user’s input.
Use state management:
Use state management in React to keep track of the conversation flow and update the UI in real time as the user interacts with the interface. For example, you might use the use State hook to manage the state of the conversation flow and the use Effect hook to update the UI as the state changes.
Test and iterate:
Test your conversational interface to ensure it’s working as expected and iterate on it based on user feedback. Use tools like Jest and React Testing Library to write automated tests and ensure the interface is functioning properly.
By following these steps, you can create a powerful and engaging conversational interface using React and NLP.
To make the conversational interface more engaging, we can also use techniques such as natural language generation (NLG) to generate responses that are more natural and human-like. NLG involves using algorithms to generate text that is similar to what a human might say, based on the input and context.
Best Practices for Designing Conversational Interfaces
When designing conversational interfaces, there are several best practices to keep in mind. First, it’s important to keep the conversation flowing naturally and easy to understand. This means avoiding complex or technical language and using clear and concise prompts and responses.
Another best practice is to provide feedback to the user throughout the conversation. This can include acknowledging user input, providing confirmation of actions taken, and providing hints or suggestions when the user is stuck.
Finally, it’s important to test and iterate on the conversational interface to ensure it’s meeting the needs of users. This can involve user testing, A/B testing, and gathering feedback from users to identify areas for improvement.
Conclusion
Creating conversational interfaces with React and NLP is a powerful way to provide more personalized and efficient customer service. By leveraging NLP techniques and React components, we can build conversational interfaces that can understand and respond to user input naturally. By following best practices for designing conversational interfaces, we can create interfaces that are engaging and effective.
If you’re interested in building your own conversational interface using React, it’s important to have the right development team. Hiring a team of ReactJS developers can be a smart choice for many businesses, but it’s important to find the right team for your project.
To learn more about React and how to hire ReactJS developers for your project. With the right development team and a solid understanding of best practices for designing conversational interfaces, you can create a powerful and effective conversational interface that will help you engage with your customers and provide the best possible customer service.

Get Certified in ChatGPT + Conversational UX + Dialogflow
Creating Conversational Interfaces with React and Natural Language Processing was originally published in Chatbots Life on Medium, where people are continuing the conversation by highlighting and responding to this story.
-
Switching to ChatGPT: My Two-Week Experiment Without Google
Photo by Samantha Gades on Unsplash In today’s fast-paced world, time is very valuable. We often find ourselves struggling to keep up with the demands of our daily tasks. Fortunately, with advanced technologies, we now have access to innovative tools that can help us optimize our daily routines. ChatGPT is one such tool that has completely revolutionized the way I approach my daily tasks.
Since there are already numerous articles and videos about how ChatGPT works and is being used, let’s not write another article about it.
Instead, let’s discuss how I incorporated ChatGPT into my daily life for the past two weeks. In this article, I will share my experience of using ChatGPT and how it has transformed my daily productivity.
Before we proceed, let’s determine the last time ChatGPT was trained by asking a general question:

ChatGPT’s knowledge cuttoff date. As a programmer, I am interested in finding out how ChatGPT can be of assistance to me in my work. So, let’s ask ChatGPT the following question:

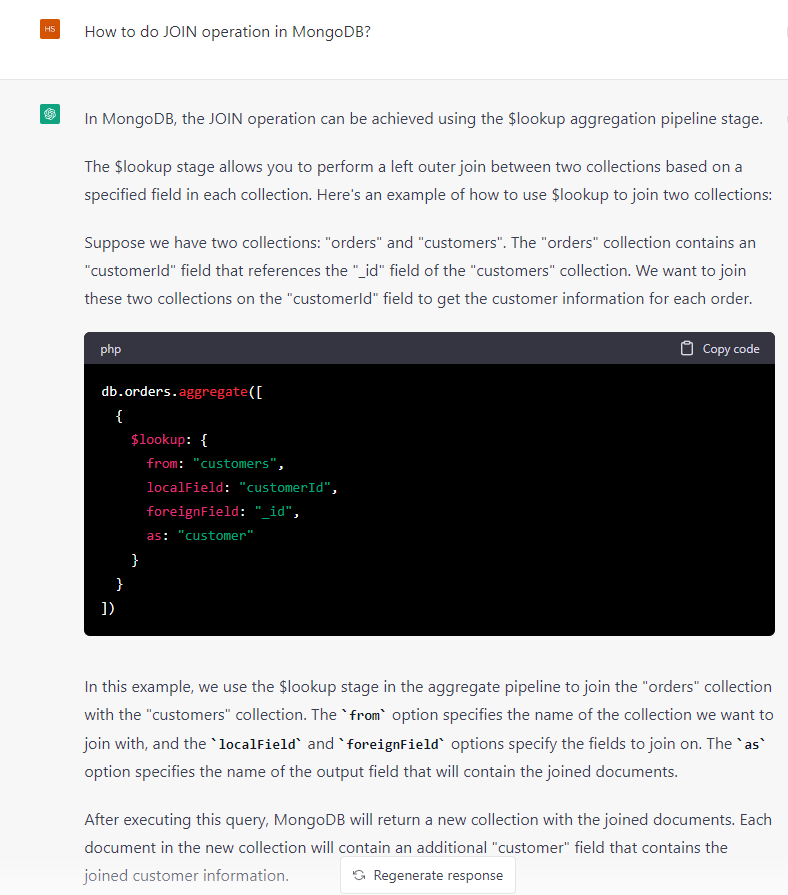
There are numerous ways in which ChatGPT can aid programmers. Wow, there are so many ways ChatGPT can help a programmer. Guess what? Currently, we are working on our awesome new platform (XYAN) and thought it’d be cool to give MongoDB a try. We would like to know how to do JOIN, just like in Microsoft SQL Server. So, I asked ChatGPT for some help, and, it recommended using $lookup and even gave us some code to get started.
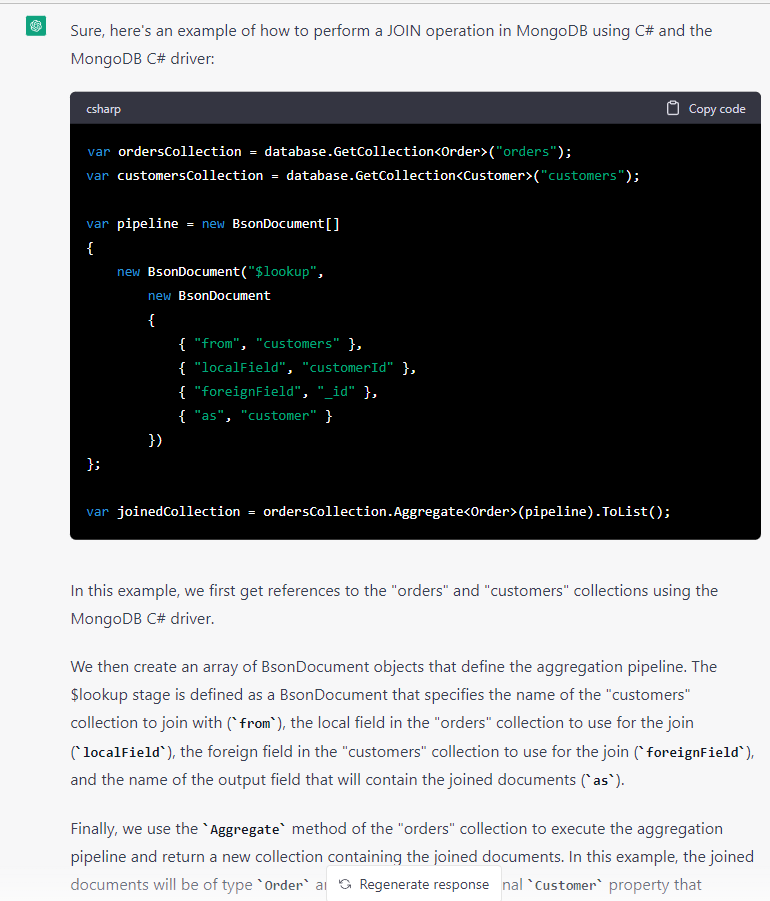
But wait, we are C# developers. The code given is in PHP. we asked ChatGPT if it could show us how to do it in C#, and it rewrite the code in C# as below:
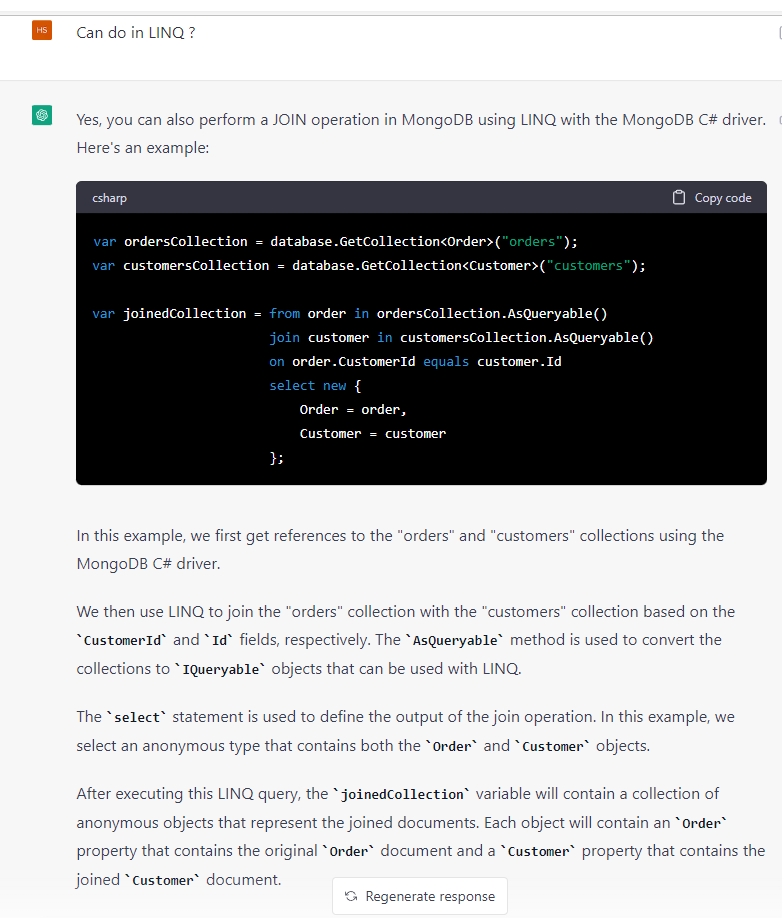
Shall we attempt it using LINQ? Let’s give it a try.
This is quite remarkable as it enables us to obtain code snippets more quickly than through conventional Googling. However, it is important to bear in mind that we should comprehend and verify the code to ensure that it functions as intended.
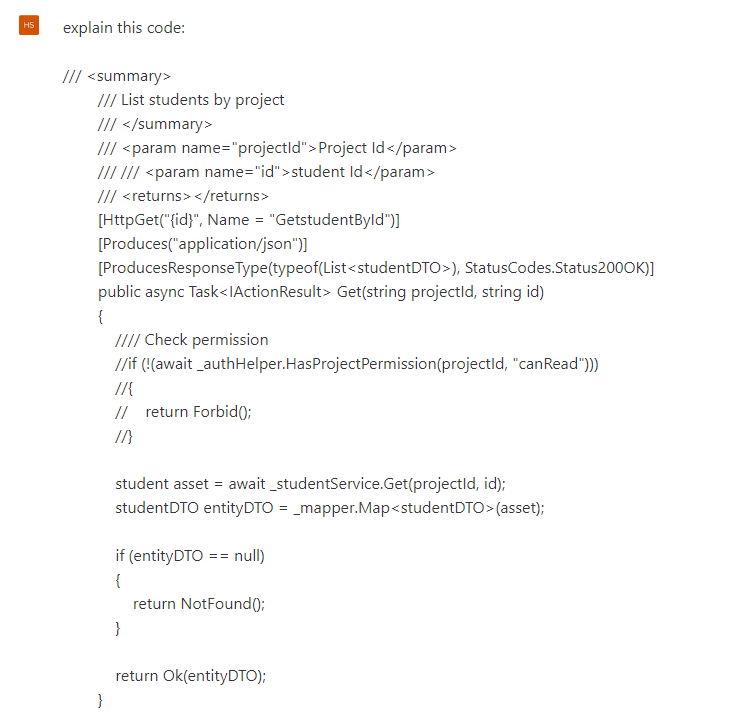
The advantage of ChatGPT is that it provides explanations for the code, and we can even paste in code snippets and request ChatGPT to clarify them.


Chatathon by Chatbot Conference In my humble opinion, the quality of the code explanations is exceptional.
The other day, I encountered an error in a MongoDB BSON document. I attempted to seek assistance from ChatGPT:
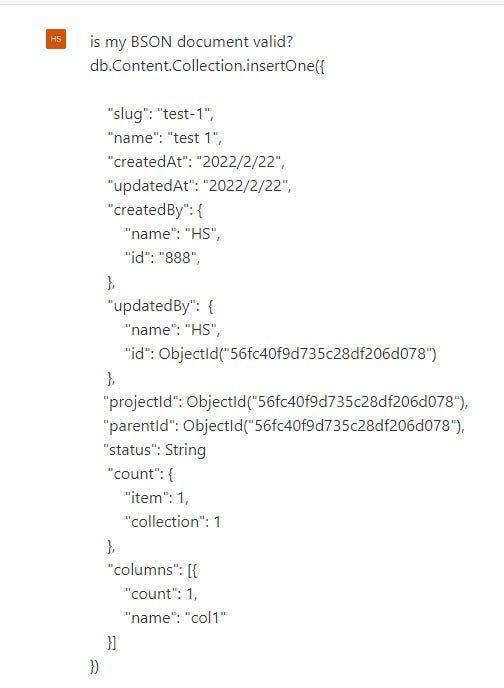
Asking ChatGPT to check my BSON document. 
ChatGPT telling me where the error on the BSON document is. ChatGPT makes it unnecessary to use tools like code converters or validators (e.g., JSON validators) as well.
As ChatGPT is constructed using OpenAI’s GPT-3 series of large language models, it would be worthwhile to attempt some language-related tasks.
While writing this article, I received a message from a relative in my WhatsApp group. However, the message was in Mandarin, and I do not have a strong knowledge of the language. Let’s try using Google Translate, and Bing Translate, and compare the results with ChatGPT.
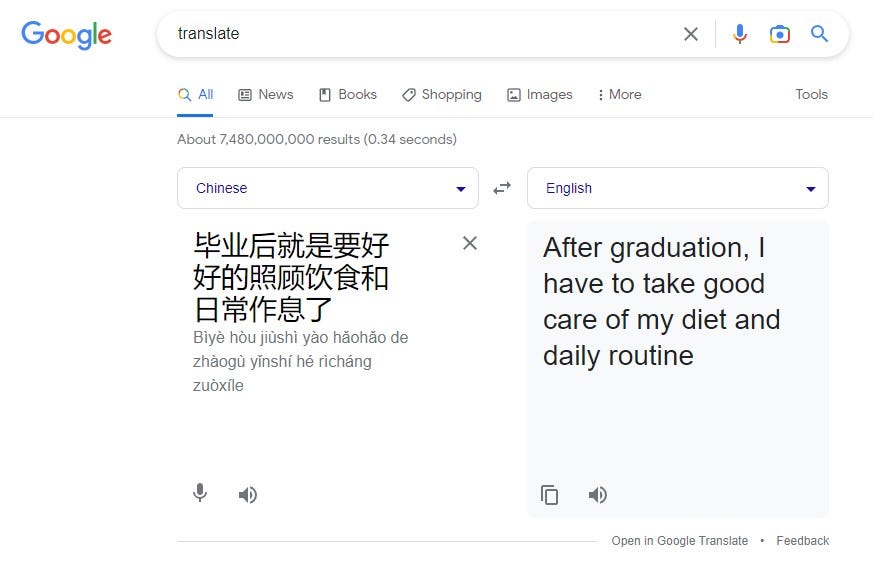
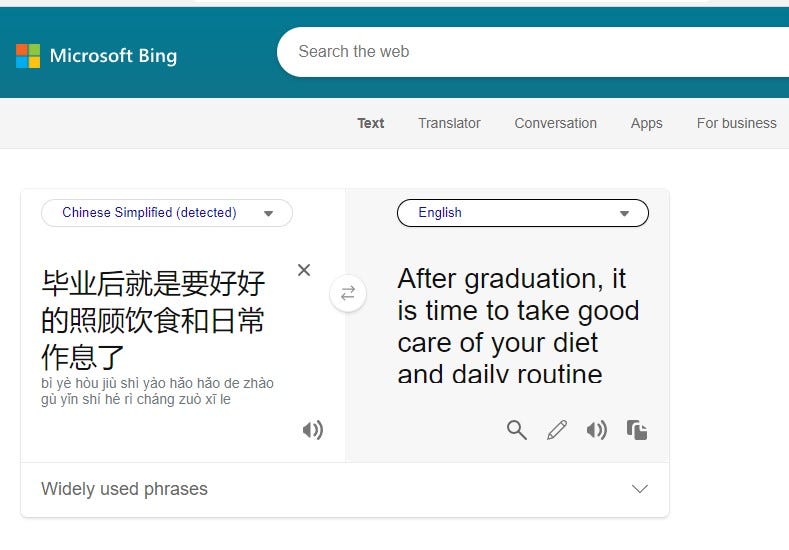
For Google Translate, it is not very accurate as it includes the phrase ‘I have to.’ Microsoft Bing Translate is not very accurate as it includes the phrase ‘Your diet’.
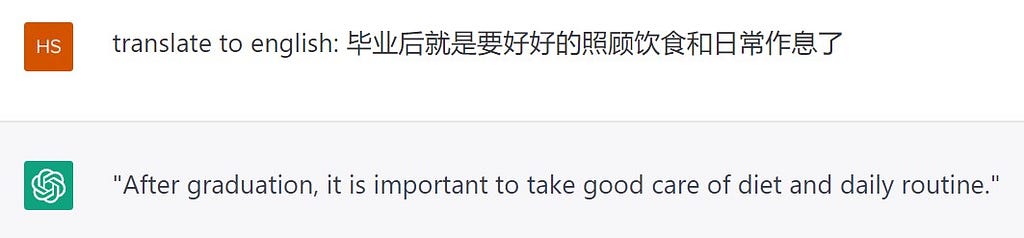
For ChatGPT, it is quite good at translating Mandarin. Let’s see how far it can go. Let’s see if it can do the Hanyu Pinyin and spell it out for us.
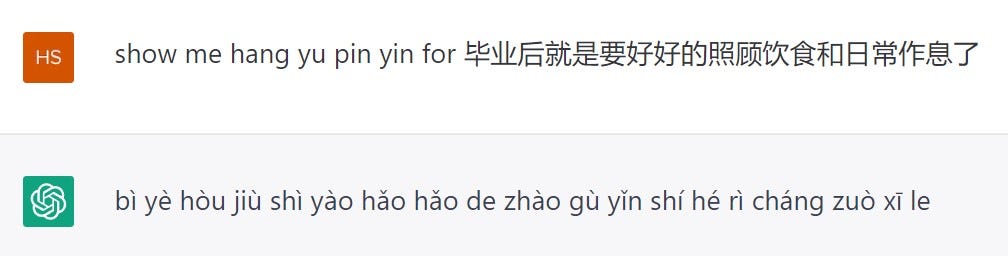
ChatGPT showing Hanyu Pinyin Wow, it can! Let’s try to learn some Mandarin from ChatGPT by asking it to break down the words and explain them to us. Can it do that?
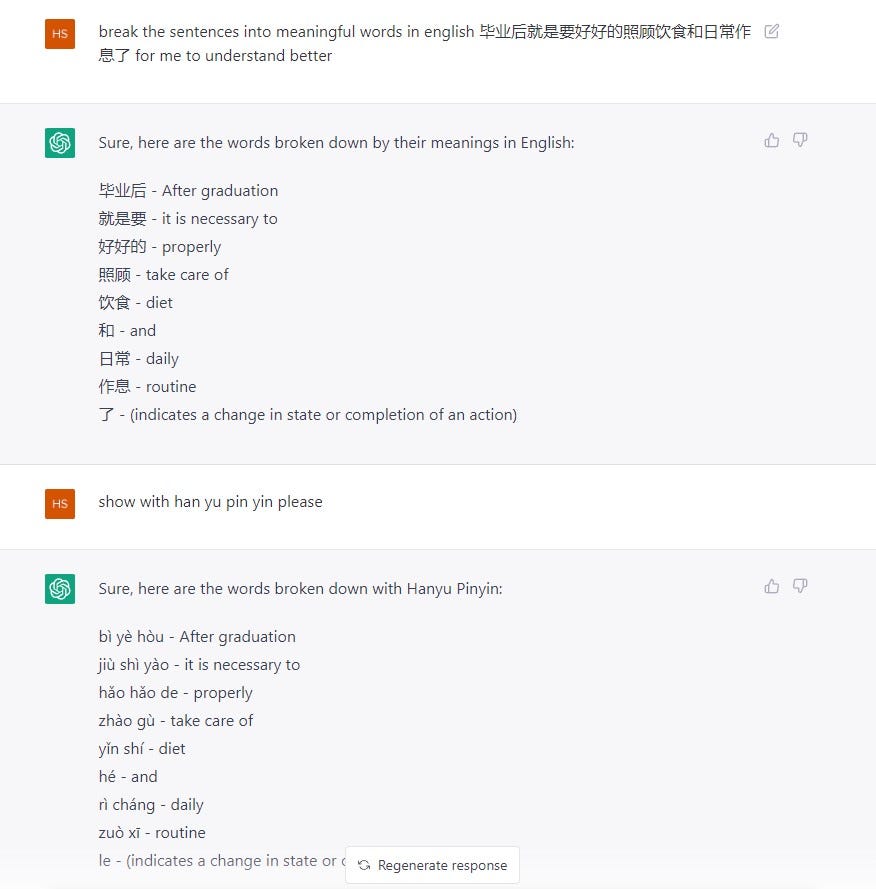
The breakdown of words by ChatGPT facilitates explanation and understanding of textual content. I never anticipated that ChatGPT would be capable of this. It is great that I can now enhance my Mandarin using ChatGPT.
In light of the Chinese New Year celebrations, I am curious about other Chinese dialects. Specifically, I am interested in learning some Hakka phrases since my wife is of Hakka origin. It would be fascinating to observe any differences in the way the dialect is spoken in Hakka as opposed to Kuching. Shall we ask ChatGPT to assist us with this?
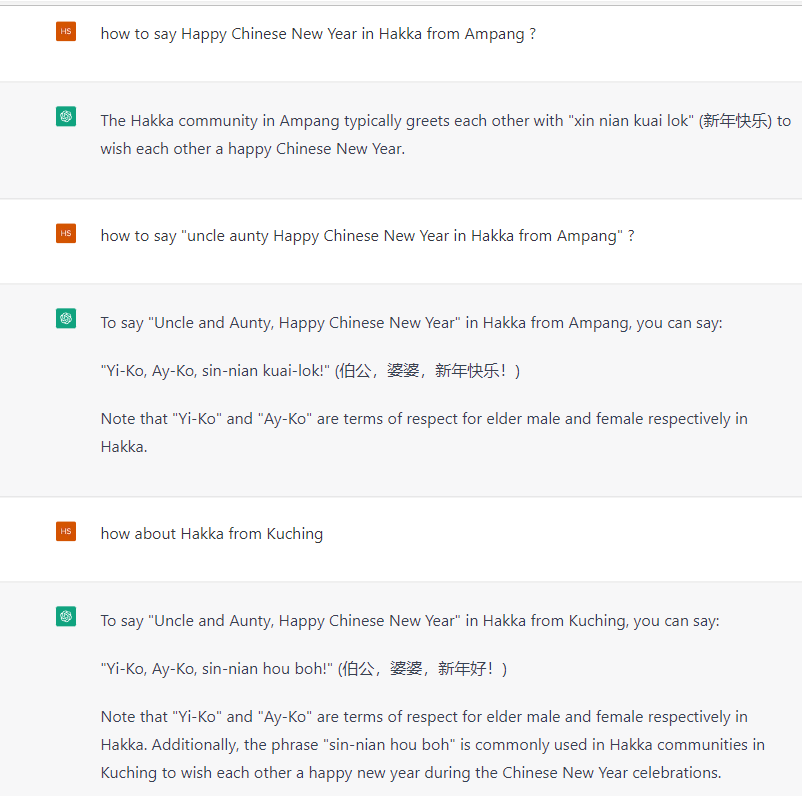
ChatGPT teaching Hakka. During the past two weeks, I challenged myself to use ChatGPT instead of Google for my daily tasks. It was an interesting experience, and I was pleasantly surprised by the convenience and usefulness of ChatGPT. From receiving code snippets to translating Mandarin messages, ChatGPT proved to be a reliable and efficient tool.
Overall, it was a worthwhile experiment that helped me optimize my daily routine.
XIMNET is a digital solutions provider with two decades of track record specializing in web application development, AI Chatbot, and system integration.
XIMNET is launching a brand new way of building an AI Chatbot with XYAN. Join our waitlist to get early access today.

Get Certified in ChatGPT + Conversational UX + Dialogflow
Switching to ChatGPT: My Two-Week Experiment Without Google was originally published in Chatbots Life on Medium, where people are continuing the conversation by highlighting and responding to this story.
-
How ChatGPT really works and will it change the field of IT and AI? — a deep dive
How ChatGPT really works and will it change the field of IT and AI? — a deep dive
Unless you have been living under a rock for the last few months, you have probably heard about a new model from OpenAI called ChatGTP. The model has demonstrated extraordinary abilities in generating both code and textual responses that are not only coherent but most often factually correct and in line with the current human knowledge.
There are many articles describing the possible use cases of ChatGPT, however, they rarely go into the details about how the model works or discuss its border implications.
The goal of this article is to demystify ChatGPT showing how it works and why is it that effective, describing what are language modes, why are they so popular and what is their problem. As everything is explained from scratch but extensively I hope you will find it interesting whether you are NLP Expert or just want to know what all the fuss is about.
The second part of the article discusses the possible use cases of ChatGPT and their impact on respected industries. We will discuss how models such as ChatGPT will affect the work of software engineers and ML engineers. We will answer the question “Will you lose your job?” and we will also explain how GPT can create jobs.
Table of contents:
· What is ChatGPT?
· Why is ChatGPT so effective?
· What is ChatGPT capable of?
· Will ChatGPT replace software engineers?
· Will ChatGPT replace ML Engineers?
· Will ChatGPT replace your job?
· Will ChatGPT create jobs?
· ConclusionsWhat is ChatGPT?
In the first part of the article, we will try to demystify what ChatGPT is and discuss why it is so effective. Unfortunately, the model’s release wasn’t accompanied by a research paper, and its only official description can be found on the OpenAI blog.
Language Models
As we can read in the OpenAI article ChatGPT is a language model optimized for dialogue.
But what is a language model?
Formally, a language model is a probability distribution over words or word sequences. So given words in a sequence, the model tells us how probable the sequence is. In practice, we can ask a language model to continue the sequence with the word it thinks is the most probable.
There are many approaches to language modelling, we can for example ask the model to fill in the words in the middle of a sentence (as in the BERT model) or predict which words have been swapped for fake ones (as in the ELECTRA model). The most simple approach and the one used in the GPT family of models is in fact asking the model to predict the next word in a sequence. This is called casual language modelling. An input sequence that we feed to the model and ask it to complete is called a prompt.
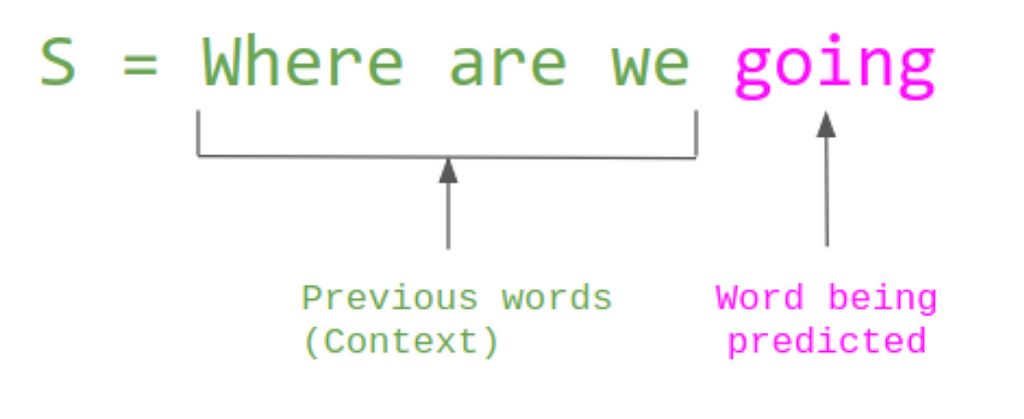
So ChatGPT is nothing more and nothing less than a probabilistic model that predicts the next most probable words given an input string.
This task has however proven to be extremely effective, given a large training set and sufficient model size. Large Language models such as GPT can learn to generate sequences that are not only syntactically but also factually correct. They are able to generalize — meaning, they can generate responses to prompts they haven’t seen before by combining concepts from different examples from the training set. So the model is able to generate a poem about quantum physics because it has seen books about quantum physics and poems and is, therefore, able to generate a sequence that is both a probable explanation of quantum physics and a probable poem.
And as we could have already seen with the release of GPT-3 a few years ago casual language modelling can be used to perform various tasks and has proven to be universal. We can ask the model to generate a python function or a recipe for a cheesecake. We can ask it to translate from one language to another, extract key information from a given text and answer open-domain questions. All those various seemingly unrelated tasks such as Question Answering, Machine Translation, and Keyword Extraction, that are usually performed by specialized models can be represented as the text-to-text problem. Input sequence in form of the prompt and context is converted to the output sequence by casual language modelling.
But language modelling is not enough to create a universal model that answers all the questions of a user. Why? Because language models are jerks.
Chatathon by Chatbot Conference Language models are jerks, InstructGPT isn’t
As we read next on the OpenAI blog :
ChatGPT is a sibling model to InstructGPT, which is trained to follow an instruction in a prompt and provide a detailed response.
Fortunately, InstructGPT was released with a research paper, so we can shed some more light on the inner workings of the model.
In the introduction of the paper, the authors present a few major flaws of language models. Those models, trained to predict the next word in a sequence, are not good at following instructions. And why should they be? Language models are trained to predict the most probable sequence, not the most helpful one. This can lead to the models resenting unintended behaviours such as making up facts, generating biased or toxic text, or simply not following user instructions.
A solution to this problem presented by OpeanAI is reinforcement learning. Reinforcement learning is a machine learning training method based on rewarding desired behaviours and punishing undesired ones.
This approach with the rewards system based on human feedback is applied to GPT3 to create InstructGPT. Here is a brief description of the algorithm:
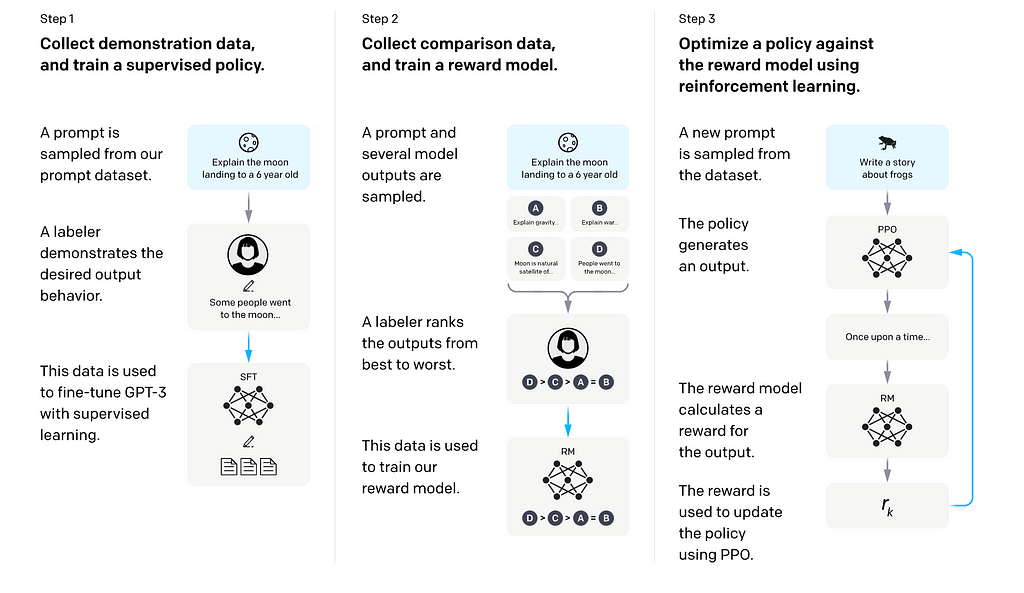
- OpenAI collected prompts submitted by the users to the earlier versions of the model. Then they asked humans to generate their responses to those prompts and fine-tuned the GPT-3 model to match the style of human responses. This ensured the model generated responses in the form of instructions desired by the user rather than simple completions.
- Once the model generated a response in the desired format, the next thing to do was to teach it which responses are useful for the user. For this, the authors asked the model to generate a few responses to the same prompts. Those responses were then rated by humans from best to worst and used the train the reward model — an additional model that was able to classify the response as good or bad.
- The reward model was then used to fine-tune InstructGPT — it was taught to generate the best possible responses that scored the highest
So what is the difference between InstructGPT and ChatGPT?
As we can read in the article, the only difference between InstructGPT and ChatGPT is the fact that the annotators played both the user and AI assistant.
We trained an initial model using supervised fine-tuning: human AI trainers provided conversations in which they played both sides — the user and an AI assistant.
The hypothesis as to why such training was particularly effective is explained in the next section.
To sum everything up we know that ChatGPT is:
- A language model — a model trained to complete the sequence of words with the most probable continuation.
- Trained with reinforcement learning to generate completions that are more desired by the user.
Why is ChatGPT so effective?
The bitter lesson and E2E models
In 2019 Rich Sutton wrote an essay called “The Bitter Lesson” explaining how in the long run end-to-end AI models that leverage computation always wins against human ones that leverage human expertise.
The biggest lesson that can be read from 70 years of AI research is that general methods that leverage computation are ultimately the most effective, and by a large margin ~ Rich Sutton, The Bitter Lesson
Recently ChatGPT has proven to follow this pattern and is perhaps the best example to support this thesis. Instead of relying on different models for each task, it is able to solve a variety of user problems by communicating with a user through a unified chat-like interface.
This end-to-end approach is partially efficient because it removes the human from the equation and leverages computational power and data instead.
E2e learning is nicely consistent with the general approach of machine learning to take the human expert out of the loop and to solve problems in a purely data-driven manner. ~ Tobias Glasmachers, “Limits of End-to-End Learning”
If we have used a separate model for each task (e.g. taught the system to tell jokes based on jokes datasets with premise and punchline, and taught it quantum physics based on a set of questions and answers in quantum physics) we would rely on human annotations limiting the reasoning of the model to those specific unrelated areas. However, by training a model in an unsupervised fashion we are able to use the abundance of data that humans have generated and leverage knowledge transfer between various tasks. The model can use the logic learned by analyzing quantum physics sources to generate twisted logic in a joke. It is simply more efficient to train one model for various NLP as knowledge from one task can be used in another one boosting the overall cognitive abilities of the model.
Recently, it has become increasingly common to pre-train the entire model on a data-rich task. Ideally, this pre-training causes the model to develop general purpose abilities and knowledge that can then be transferred to downstream tasks. (…) Crucially, the text-to-text framework allows us to directly apply the same model, objective, training procedure, and decoding process to every task we consider~ Raffel, Colin, et al. “Exploring the limits of transfer learning with a unified text-to-text transformer.”
To use one model for many different tasks we need a shared interface and a text-to-text approach seems like a good candidate. We can convert almost any NLP task to a text-to-text problem. And this gives us a framework to teach the model many things at once, free it of our limited perception of how a task should be formulated and let it figure out things on its own, where its only limit is computational power and data we can give it.
Text-to-text models
The idea of modelling different NLP tasks as a text-to-text approach is hardly a new one. The paper accompanying the release of GPT3 (a predecessor to GPT3.5 that ChatGPT was based on) was in fact called “Language Models are Few-Shot Learners”
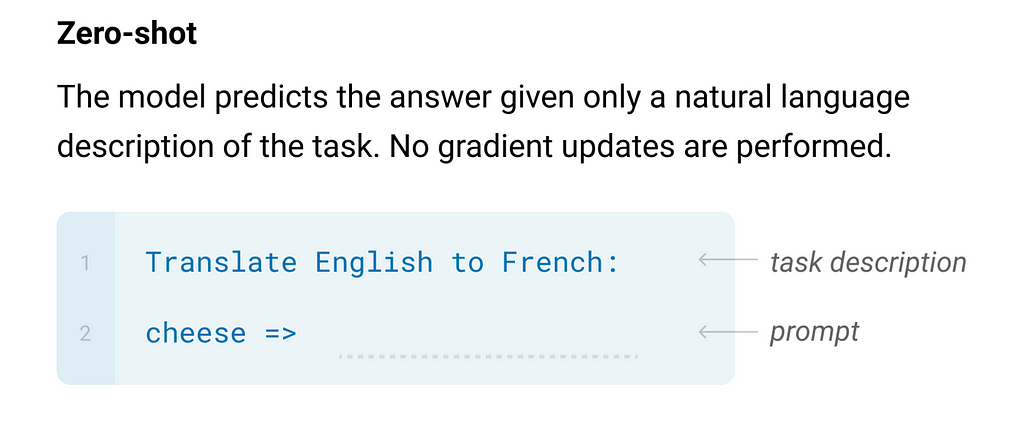
For all tasks, GPT-3 is applied without any gradient updates or fine-tuning, with tasks and few-shot demonstrations specified purely via text interaction with the model. GPT-3 achieves strong performance on many NLP datasets, including translation, question-answering, and cloze tasks, as well as several tasks that require on-the-fly reasoning or domain adaptation, such as unscrambling words, using a novel word in a sentence, or performing 3-digit arithmetic.
The authors have shown that GPT3 is able to solve different problems in a zero-shot learning fashion. We give a model a description of the task we need it to perform in the prompt as an input and as an output, we will get the response. We can see e.g. that the model is able to solve translation tasks without being explicitly trained for machine translation.
This is due to the fact that the model is able to learn from analogous examples in its training dataset and generalize.
Such models can also learn from a set of few examples
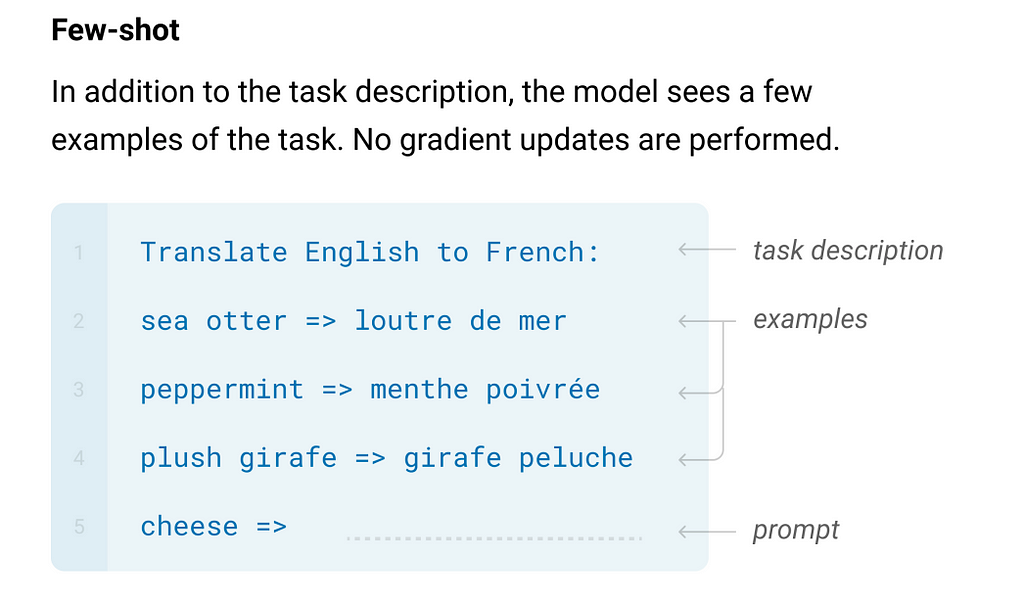
The process of presenting a few examples is also called In-Context Learning, and it has been demonstrated that the process behaves similarly to supervised learning.
A similar approach was used in “Exploring the limits of transfer learning with a unified text-to-text transformer” which introduced a model called T5.
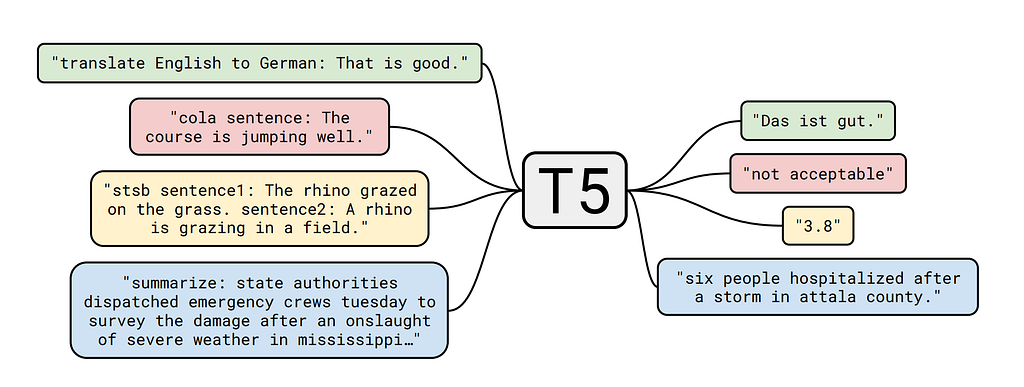
In this model, the authors used explicit unified prompts such as “summarize:” to train the model. We can see that even tasks that would normally be modelled as regression such as STBS (Semantic Textual Similarity) are instead performed in a text-to-text fashion where the model answers by generating a sequence of tokens corresponding to the desired number. This allows us to share knowledge across different tasks e.g. text understanding that is necessary for translation can be relevant for summarization.
But if such models existed before the question emerges:
How is ChatGPT different?
As we currently know very little about the exact process of training ChatGPT outside its minor differences from InstructGPT we can focus on the results distinguishing InstructGPT from other large language models and later hypothesize about the improvements made with ChatGPT over the InstructGPT.
In the paper, the authors compare IntructGPT training using reinforcement learning to GPT3 one of the largest language models trained without using reinforcement learning
What are the advantages of using reinforcement to align language models?
- Better responses: InstructGPT outputs are preferred over GPT-3 outputs 85% of the time
- Fewer hallucinations: InstructGPT models make up information not present in the input about half as often as GPT-3
- Less Toxicity: InstructGPT models generate about 25% fewer toxic outputs than GPT-3
- Better Generalization: IntructGPT follows instructions for summarizing code, answers questions about code, and sometimes follows instructions in different languages, despite these instructions being very rare in the fine-tuning distribution
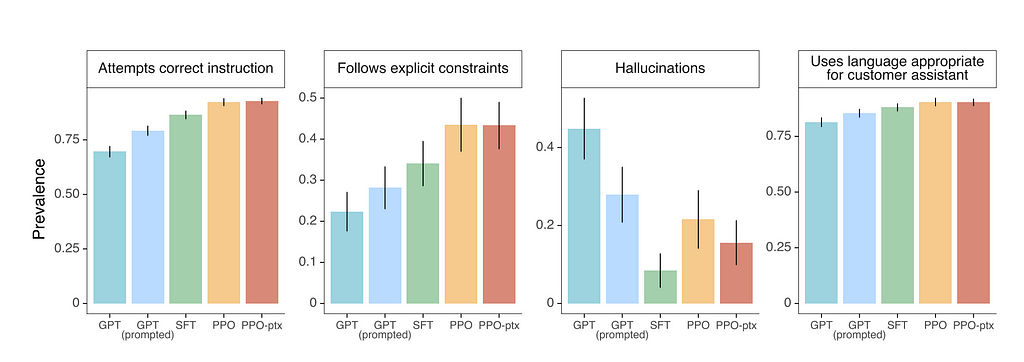
Comparison between InstructGPT (PPO) and GPT-3 (GPT) Why is reinforcement learning so efficient?
As we can see in the previous section InstructGPT model fine-tuned using reinforcement learning can produce much better results than the GPT-3 model even if it was fine tunes using supervised learning (SFT). The SFT technique was based on training the model directly to produce responses submitted by the labellers given the same input as them, without the reinforcement learning process. The difference becomes even more apparent when we compare model sizes.
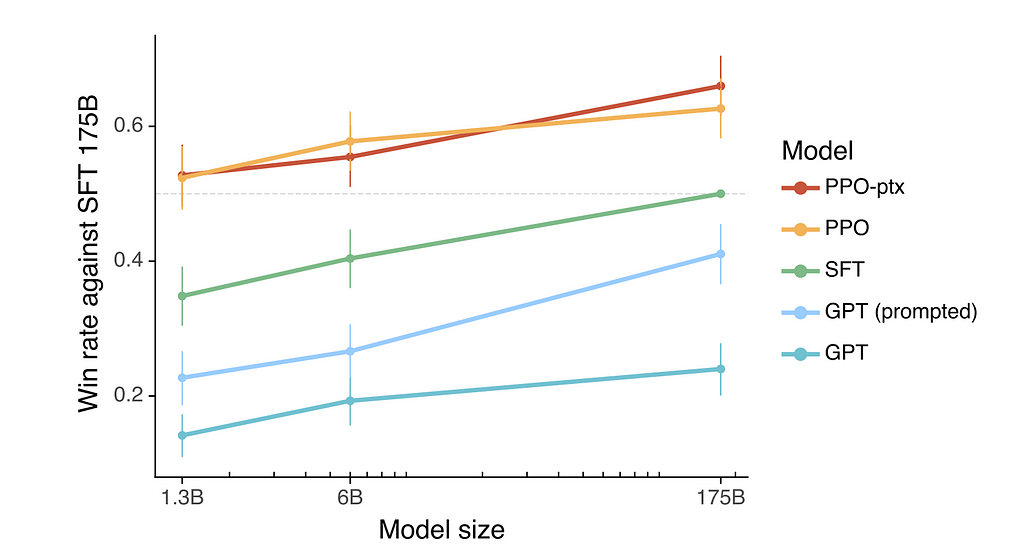
As we can see the InstructGPT model (PPO) is able to produce much better results than the GPT-3 model fine-tuned directly even if its size is 2 orders of magnitude smaller. But why is RL so efficient?
The cost of collecting data and the compute for training runs, including experimental runs is a fraction of what was spent to train GPT-3: training our 175B SFT model requires 4.9 petaflops/s-days and training our 175B PPO-ptx model requires 60 petaflops/s-days, compared to 3,640 petaflops/s-days for GPT-3
Firstly, the RL task is much easier to optimize than the text-to-text task. The reward model is just a simple regression model that takes a string as input and produces the score as output. This is a much simpler task than text-to-text as the output space is only a single number instead of thousands of possible tokens in the text-to-text task.
Secondly, the reward model can help the language model generalize. With a supervised text-to-text task the model only has as many reference points as the number of prompts and outputs. However, the RL model can extrapolate and hypnotize the usefulness of outputs that don’t have a gold standard prepared by humans. The signals coming from supervised learning are also very strong — each input has only one possible output that is seen by the model as 100% accurate during training. With RL the model can observe the variety of outputs and their usefulness as a spectrum.
How is ChatGPT different form InstructGPT?
As we established at the beginning of the article it isn’t really that different. We don’t have any quantitative experiments comparing ChatGPT to InstructGPT and there is no doubt that the phenomenon of ChatGPT is vastly attributed to the release of the open demo and its viral spread rather than major differences in the architecture of the model.
The one difference that we know about is that the human annotators played both sides — the user and an AI assistant. This could have provided the model with more diverse inputs and more aligned input and output pairs as labellers knew what they were expecting from the model when writing prompts.
This difference is however as the OpenAI itself admits — slight. As we can see in the anecdotal evidence of ChatGPT’s superiority over InstructGPT provided in the article, over the 3 examples one is related to hallucinations (the model accepts the suggestion in the prompt that Christopher Columbus came to the US in 2015) and the other 2 are related to responses that can be seen as dangerous. However, an argument can be made that producing dangerous but factually correct responses does not denote the inferior cognitive abilities of the model and limiting such responses is strictly a safety measure taken by OpenAI to limit their liability connected with broader usage of the model.
What is ChatGPT capable of?
As there already exist several good articles describing possible usages of ChatGPT I will not go into great detail explaining every single use case.
If you are looking for a detailed description of ChatGPT usage with examples, I highly recommend an article by Sophia Yang:
Anaconda | The Abilities and Limitations of ChatGPT
Or this one by Damir Yalalov:
100 Best ChatGPT Prompts to Unleash AI’s Potential
There also exists a collection of awesome ChatGPT prompts on hugging face datasets.
fka/awesome-chatgpt-prompts · Datasets at Hugging Face
But let’s give a brief description of what ChatGPT is capable of and what are the implications.
Create Content and ART
ChatGPT can create a variety of texts ranging from copies and blog articles to highly artistic forms such as poems. This definitely streamlines the process of content creation, especially for small companies and individuals that can’t afford a dedicated content writer not having the time to skill up in content creation.
Some people have also shown that it is possible to use ChatGPT for DMing D&D games.
Dungeons & Dragons Player Gets AI Bot To DM, Works Surprisingly Well
This opens entirely new possibilities for AI-mediated games and storytelling, showing that ChatGPT can also be used for entertainment.
Of course, this also extends the discussion about the ethics of using AI to generate, recently sparked by Stable Diffusion and DALL-E to the text field.
An A.I.-Generated Picture Won an Art Prize. Artists Aren’t Happy.
However, as writing is both a skill and a talent, AI-mediated content generation can help those who have the talent but lack the skill, resulting in the creation of work that wouldn’t otherwise see the light of the day. AI artists can be compared to directors that guide the model through their prompts. If you want to read more on that subject check out this excellent article by Kevin Kelly.
What AI-Generated Art Really Means for Human Creativity
Answer Questions, Explain and Tutor
ChatGPT can answer a variety of questions related to specific fields and provide a detailed explanation of complex subjects. This made some academics really worried about their jobs but also present an unprecedented opportunity to lower the educational barriers, giving everyone equal access to advanced knowledge. Of course, as ChatGPT is not perfect giving students unsupervised access to it also creates a danger of them learning inaccurate information and propagating bias. Educators of the future could take on the role of supervisors and consultants rather than ex-cathedra lecturers.
A lot of students have also shown that it is possible to use ChatGPT for completing assignments and performing tests. This challenges the standard educational model focused on memorization and autonomous work. Addressing those fears a tool called GPTZero has been released that helps to identify AI-generated content allowing educators if students have been using such models in their work.
However, a point can be made that if such tools are present in our everyday life, can we really ban them in education? After all, we all know how the argument “You won’t always have a calculator in your pocket” aged.
With the rising popularity and accessibility of generational models, educators will have to think about how to incorporate those models into the academic world, maintaining a balance between giving students knowledge and the ability to think critically, while also allowing them to use modern tools.
Don’t Ban ChatGPT in Schools. Teach With It.
Write and Debug Code
One of the most prominent capabilities of ChatGPT is the ability to write functions and even full modules given the textual explanation of what the program should do. This made some people make far-going conclusions that ChatGPT will replace programmers. However, we have to remember that the possibilities of the model are limited by maximum context length and output size (more about that is explained in the next section). This makes the model useful for writing standalone functions or modules but doesn’t make it suitable for writing complex applications. ChatGPT capabilities can be compared to the ones of GitHub Copilot however the model can also correct bugs in existing code and provide reasoning behind the generated code. This makes the tool extremely useful as a software engineer’s assistant.
Perform various NLP tasks such as Summarization, Named Entity Recognition, Translation, Guided Text Generation
As shown in the previous sections almost any NLP task can be converted to Text-to-text format. For example Named Entity Recognition can be modelled as question answering. This makes ChatGPT especially useful for performing various NLP tasks that were previously modelled by custom models. More importantly, those tasks can be performed in zero-shot scenarios, where the user doesn’t need to provide any additionally labelled datasets. The task can be defined by a self-contained prompt with all the instructions and, if necessary, the examples. It will be harder and harder to justify developing proprietary models, while similar or better results can be achieved with a few cents per input.
Take on different personas such as travel guide, doctor or life coach
ChagGPT can take on the role of different personas presenting not only the specific domain knowledge associated with different jobs but also personality traits based on the guidelines specified by the user. Although the model acts as a highly-skilled, the profession definitely carries a lot of risks. It also, if uses consciously, allows the users to access a variety of services. After all, there is little harm in getting travel destination suggestions from ChatGPT by giving it your preferences, however, it acting as your doctor could be dangerous.
This also means a lot of low-risk consulting services will have to step up their game and think about their unique value proposition over models such as ChatGPT.
What ChatGPT isn’t capable of?
Mistakes of ChatGPT
There are many examples of mistakes done by ChatGPT in open domain questions and specific tasks such as code generations alike. The model is by no means perfect. We won’t focus on the specific mistakes but rather assume that the model can make, with some degree of probability, a mistake in any scenario and discuss its implications.
What is most important, in its current state, ChatGPT isn’t capable of identifying its own mistakes. There is no confidence score system for the user to see, and quite frequently ChatGPT doubles down on the mistakes it makes. This is perhaps the greatest restriction for using the model in a production environment. While we can accept the fact that the model might not know an answer to every question, what isn’t acceptable is the fact that it will always provide one. If we were to use ChatGPT as a medical assistant, we would have no way of knowing if the provided responses are current or not. Even if the model is correct 90% of the time that 10% could prove fatal. If human doctor encounters a question they don’t know the answer to, they will consult their colleagues, perform additional tests, read the latest research articles or, in the worst-case scenarios, simply restrain from giving a diagnosis. ChatGPT on the other hand will always utmost confidence even if it is completely wrong.
The real question you have to ask yourself is: “Are you willing to take the risk?”. And the answer is not always “NO”. While you might not accept a doctor that is incorrect 10% of the time, you might accept a translator or a florist.
ChatGPT is offline (at least for now)
In its current state, the system is entirely offline meaning it can only use information from its training dataset and can’t perform any queries or scrape the internet for new information. The most recent training data is of ChatGPT from 2021 September. This severely limits the capabilities of the model as it can’t use any information produced after that date. Although some fundamental truths about the universe might not have changed since 2021 there are some fields (like medicine) that are evolving rapidly and presenting users with information from several years ago might be dangerous. If the system were to serve as a modern search engine taking the place of e.g. Google, its functionality would have to be extended to performing live queries from the relevant fields or at least the training dataset would have to be updated frequently.
ChatGPT has no memory
The capabilities of any generational model (and ChatGPT is no exception) are limited by the maximum context length — the size of the input we can provide to the model. Although we don’t know the exact context length of ChatGPT some people have hypothesized that it is 8,192 tokens. This is quite impressive as it is 4 times the context length of GPT-3. Although the number of words we can input to ChatGPT is smaller as some rare words are split into sub-word tokens (you can check out the mechanism here) we have to remember that the entire US constitution is 4,543 words and this article is 6,554 words meaning both could be fully generated by ChatGPT)
However, this limit is still…limiting as ChatGPT won’t remember anything after 8192 tokens. The system has no persistent internal memory and it will eventually forget relevant information. This severally limits the capabilities of the model as e.g full-fledged coding projects have thousands of lines of code. This necessitates the creation of external systems that store information and decide which information might be relevant to the current query. For example, if we were to use ChatGPT as a doctor we would first have to decide which parts of the medical documentation we want to give the model as a context as some information from 10 years ago might still be relevant while an unrelated condition from a few months ago might not.
ChatGPT doesn’t perform reasoning
As the evidence has shown ChatGPT struggles with tasks such as common sense reasoning.
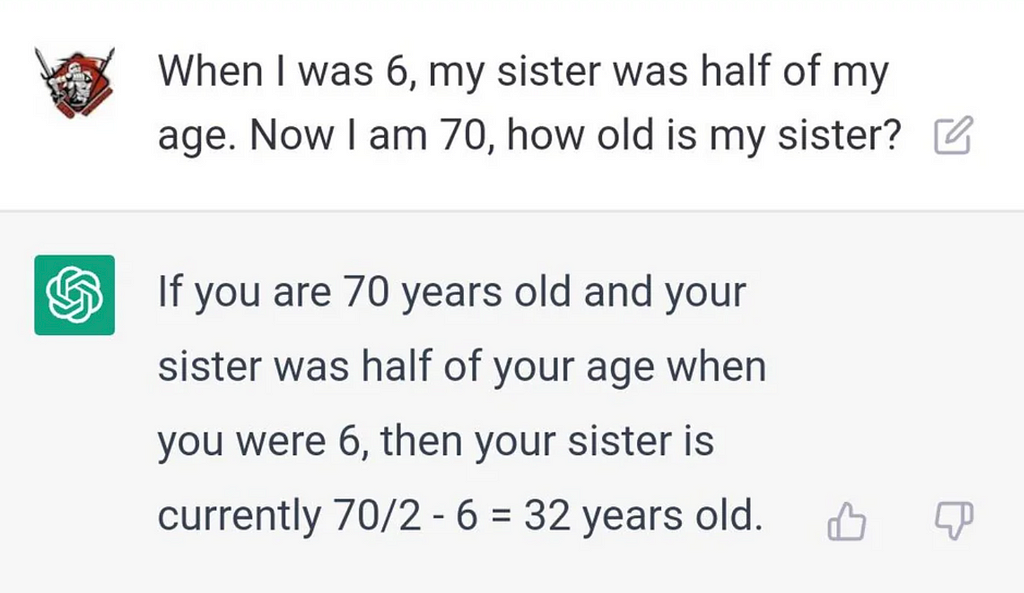
This question, while trivial for most adults, can’t be correctly answered by ChatGPT. Why? Because there is no actual reasoning in language models.
We have to remember that although the capabilities of ChatGPT are impressive it is just a language model that completes the prompt with the most probable sequence of words based on the training data. The training is essential as large enough models can just remember information instead of generalizing. This not only makes the system extremely biased by also makes it more of an intelligent search algorithm than a truly intelligent system. Recently the term stochastic parrot has been used to describe large language models reflecting on their true nature — repeating information instead of producing one.
No actual language understanding is taking place in LM-driven approaches to these tasks (…) languages are systems of signs, i.e. pairings of form and meaning. But the training data for LMs is only form; they do not have access to meaning. ~Bender et al.“On the Dangers of Stochastic Parrots: Can Language Models Be Too Big? 🦜”
Of course, this doesn’t make the work of OpenAI any less impressive, however, we have to remember that the system does not act logically and instead acts probabilistically, and for large language models a lie repeated a thousand times really becomes the truth.
Will ChatGPT replace software engineers?
This question has been asked numerous times following the release of ChatGPT and might even be the reason you decided to read this article. But the answer is not straightforward.
Software engineers are translators
To answer the question if ChatGPT will replace software engineers, we first have to answer the question of what a software engineer’s job is really about. From a high-level point of view, a software engineer can be seen as a translator that translates the vision of a client or product manager into code. The type of code changed over the years, from machine code to low-level languages and then to high-level languages. It appears that with the rise of large language models, we have moved again by one layer of abstraction where the translation result might be a natural language. Software engineers of the future will most probably not write every single function on their own, and instead, use tools like ChatGPT to convert natural language inputs to machine-interpretable code. But someone will conceptualize client requirements, break them down into small pieces interpretable by ChatGPT and then connect those pieces into a larger infrastructure.
Another parallel that can be drawn is that the current situation of software engineers is similar to the translators back when machine translation was introduced. Back then a lot of people were scared about their jobs too, but the profession of a translator didn’t disappear and is still standing strong. Sure, a small piece of text might be translated by Google Translator, but humans still translate important legal documents. Even if those humans use machine translation to speed up the process, someone still has to correct the mistakes and sign off on the quality of the translation. A similar thing might happen with software engineers. People might use ChatGPT to generate simple functions, but the large-scale important project will still require human supervision.
No-code platforms already exist
The idea that not every single lie of code has to be written from scratch is nothing new and is in fact one of the fundamental good practices of programming. Moreover, no-code and low-code platforms have existed for several years and the field of IT is still standing strong. In fact, recent research shows low-code developers are actually happier and make more money on average than high-code developers (72% of low-code users make over $100K USD (compared to 64% of high-code users), 42% of low-code users vs. 31% of high-code users say they are “highly satisfied” with their jobs.)
The Impact of Low-Code on Developer Career Paths
Language models can’t exist in a vacuum
As we have already mentioned in its current state language models can’t be used on their own mainly because of the context length limit and their offline status. This necessitated the presence of humans or an external system that decides what information to provide to ChatGPT as input. This means that even if the language model is perfect, we still need at least databases, user interfaces and search engines. But the language models are not perfect, which means we also need an external vaidatator that knows the domain well and is able to interpret and judge the results. And, as mentioned before. this means that language models are just a higher level of abstraction for the developers.
Will ChatGPT replace ML Engineers?
ML Engineers are translators too
So what is it that makes the ML Engineer fundamentally different from the software engineer? One could argue that the job is different because it requires conducting experiments, and testing hypotheses or training models, which is beyond the scope of a typical software engineer. But most companies don’t care about the research, they care about the results. So from a high-level point of view, ML engineers are also translators as they also translate business requirements into code. The road might be different, but the destination is the same.
Prompt Engineering
As mentioned above we can use ChatGPT to perform a number of different NLP tasks. This means that the company might decide to pay for the subscription for ChatGPT instead of hiring ML Engineers to create custom modules. However, the process of turning other NLP tasks to text-to-text problems is not trivial and the results might vary depending on how we formulate the prompt. Let’s imagine that we want to perform Named Entity Recognition and identify names that appear in a given text (e. g. an invoice) we might ask the model: “Which people are mentioned in the text: x?” but we might also ask it “What names appear in the passage: x” and get different results. This opens up a new field of prompt engineering, and NLP teams of the future might focus on optimizing the language model input for a different task. The topic of prompt engineering is in fact already present in the field of AI and a lot of research has already been made in this area.
Language models can’t exist in a vacuum (again)
While large language models such as ChatGPT might live at the heart of your AI system there is still a need for pre and post-processing. For example, if your input is an invoice, you might use ChatGPT to identify key information but if the user submits an image, you still need an OCR system to convert this image to text first. Or, if your input is a voice, you might use ChatGPT for NLP but still need an ASR and a speech synthesis system. Or the document understanding and voice processing can be a separate end2end system that is better than ChatGPT, as we have established that end2end systems win in the long run. Either way, language models, like ChatGPT. will definitely be more relevant in the field of AI even in seemingly unrelated fields such as image processing but, in their current state, they can’t replace all AI models.
Will ChatGPT replace your job?
So far we have given 2 examples of jobs that will change because of ChatGPT. But what about other jobs? After all, ChatGPT can act as a doctor, content writer, tutor or, to some extent, any profession that doesn’t involve interaction with the physical world. Will your job be replaced by ChatGPT?
This question is perhaps best answered by this quote:
“AI won’t replace radiologists, but radiologists who use AI will replace radiologists who don’t,” ~Curt Langlotz, Director @StanfordAIMI
The same argument can be made for any profession.
Let’s say you are a content writer and your boss decided to use ChatGPT instead of you. A few questions emerge: is ChatGPT the best tool for this? After all other language models exist, maybe some of them are better than ChatGPT in your use case. How to tell ChatGPT about your company and its values? How to make sure the spirit of the article follows the message you want to send? How to correct its mistakes?
Who will have an answer to these questions? Your boss? Do you think he will spend more of his time researching those topics?
No, but you can.
And do you think medical directors will keep up with the latest research on medical language models?
No, but you can.
Your job might become harder (or easier), your job might have fewer openings, and your job will definitely change, it might be completely different in a few years, but it’s a process, and you can also change. If you don’t disappear, your job won’t disappear.
ChatGPT won’t replace people, but people who use tools like ChatGPT will replace those who don’t.
Will ChatGPT create jobs?
Prompt Engineers
As we have established, deciding which prompt to use for the language model is not a trivial thing. The results may vary drastically depending on the specific wording, order of words and semantics given if the intention stays the same.
In the future, prompt engineering can be both a useful skill and a form of artistic expression. If fact we can already see companies offering certified courses in prompt engineering.
Learn Prompting: Your Guide to Communicating with AI
Testers
ChatGPT and other language models are by no means perfect and their behaviour is often hard to predict. Using such a system in a production environment is a challenge and requires a lot of testing to be done beforehand. This might increase the demand for testers specialized in AI models, both manual and automatic as many aspects of the output, such as profanity, semantics, intention and emotion, could be tested automatically or with the help of other AI models
Domain Experts
As we have established, letting models such as ChatGPT roam freely carries a lot of danger, as users can be presented with wrong and potentially harmful information. This means that AI and product teams using ChatGPT will have to work closely with domain experts that could help validate and correct the models. In the future, perhaps one of the standard career paths of a doctor will be, instead of becoming a practitioner, working in AI teams as a domain expert.
AI Ethicists and Compliance Managers
As AI models affect more and more aspects of our life, more and more ethical questions arise that can’t be answered solely by technical teams.
We can also expect an increase in regulations concerning the usage of AI.
What the draft European Union AI regulations mean for business
In the future, each company might have their own dedicated AI Compliance managers and the job might be as common as GPDR Compliance manager.
Conclusions
- ChatGPT is a language model that is optimized for following user instructions with reinforcement learning.
- ChatGPT and other language models will definitely affect many fields, such as content creation, art, programming and consulting.
- ChatGPT cannot be currently used in most production environments without external validation systems.
- In order for ChatGPT to be widely accepted, the authors have to incorporate confidence scores or a similar system to identify the mistakes of ChatGPT and make the model online or at least frequently update the training set.
- ChatGPT will definitely affect a lot of jobs but it is up to you if it will replace you.
- ChatGPT will definitely create a lot of new jobs, as the model not only answers questions but also raises a lot of new ones.
Don’t forget to leave your thoughts
If you liked the article don’t forget to give it a 👏 If you have any thoughts about ChatGPT or want to share your perspective, leave a comment!
About the author
Hello, my name is Aleksander Obuchowski, I am passionate about Natural Language Processing and AI in Medicine. Follow me on LinkedIn if you like my stories.
Get Certified in ChatGPT + Conversational UX + Dialogflow
Are you ready for Godmode?

Chatathon by Chatbot Conference
How ChatGPT really works and will it change the field of IT and AI? — a deep dive was originally published in Chatbots Life on Medium, where people are continuing the conversation by highlighting and responding to this story.
-
A chatbot in your home
What if you have a Replika or a Paradot? What if you reveal your innermost thoughts to it? What if the FBI decides to hoover up all the chat data and run criminal profiling to determine who has committed a crime (or may in the future)?
Well one way to avoid this would be to run the front end on your home computer and just access a publicly available back end for knowledge about the world.
How to Build Your Own AI Chatbot With ChatGPT API (2023) | Beebom
It looks a bit technical, though apparently you don’t have to do any actual programming. I don’t think you need a particularly powerful computer, either. 8GB RAM I think.
The hard part could be getting it to behave as an AI Friend. That would involve emotional/psychological stuff.
Maybe people have already done it. It would be nice if it was really easy to set up, with an application that just has to be downloaded and installed. The “psychological” stuff could be contained in a selection of configuration files that the user could tweak to suit him/herself.
submitted by /u/TubeClover
[link] [comments] -
Miraibot.ai – Build custom chatbot using chatgpt.
TL;DR: Miraibot.ai is a SaaS platform that lets you build your own chatbot using ChatGPT in just 2 minutes.
We are currently looking for real user’s feedback. Try it out and feel free to ping me if you have any suggestion or have any issue.
Site: https://miraibot.ai
submitted by /u/bohemianLife1
[link] [comments] -
How ChatGPT and WhatsApp bot integration can Enhance Customer Engagement

ChatGPT and WhatsApp Bot Integration:

The combination of ChatGPT, an AI-powered conversational platform utilizing machine learning and natural language processing, and WhatsApp, a widely-used messaging app with over 2 billion active users globally, has resulted in an innovative solution for customer support. By integrating ChatGPT with WhatsApp Bot, businesses can offer automated customer service through the messaging app. This integration enables businesses to provide personalized and rapid customer support around the clock, resulting in enhanced customer engagement and satisfaction.
The importance of customer engagement in modern business:
In today’s digital age, customer engagement is critical to business success. Customer engagement refers to the interactions and experiences that customers have with a business or brand, including customer service, marketing, and sales. A strong customer engagement strategy can lead to increased customer loyalty, improved customer satisfaction, and higher revenue growth. The integration of conversational AI, such as ChatGPT and WhatsApp Bot, can help businesses improve customer engagement by providing fast, efficient, and personalized customer support, leading to a better customer experience and increased loyalty.
Benefits of ChatGPT and WhatsApp bot integration:
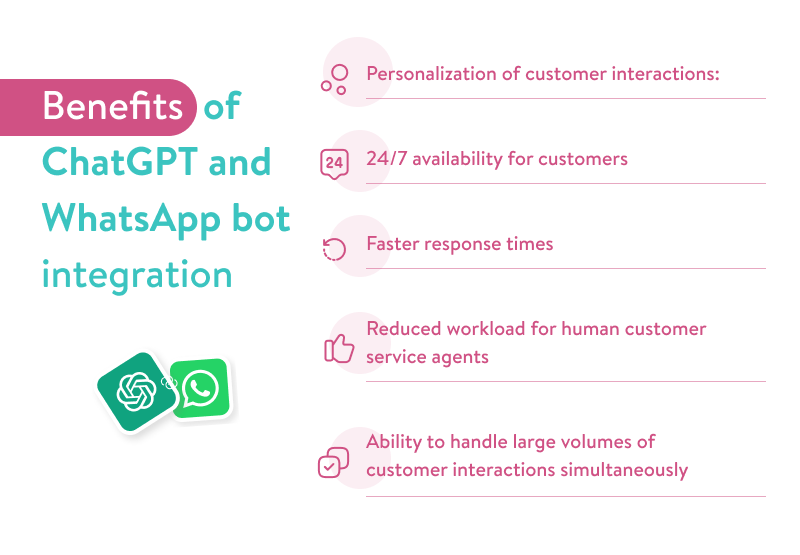
Personalization of customer interactions:
Conversational AI can personalize customer interactions by using data to understand customer preferences, behaviors, and needs. This enables AI-powered chatbots like ChatGPT and WhatsApp Bot to provide tailored responses to customers, making them feel valued and understood.
24/7 availability for customers:
Conversational AI can provide round-the-clock customer support, allowing businesses to engage with customers anytime. With ChatGPT and WhatsApp Bot integration, businesses can provide automated customer service 24/7, ensuring that customers can receive assistance whenever they need it.
Faster response times:
Conversational AI can provide faster response times to customer queries than traditional customer service methods. Chatbots can respond to customer inquiries in real-time, reducing customer wait times and improving satisfaction.
Reduced workload for human customer service agents:
Conversational AI can take on routine customer service tasks, freeing up human agents to handle more complex customer inquiries. This reduces the workload of human customer service agents and allows them to focus on providing more personalized support to customers.
Ability to handle large volumes of customer interactions simultaneously:
Conversational AI can handle large volumes of customer interactions simultaneously, making it possible for businesses to engage with more customers at once. This can help businesses scale their customer service operations, without needing to hire additional staff.
Chatathon by Chatbot Conference How ChatGPT For WhatsApps Works:
As an AI language model, ChatGPT is not integrated with WhatsApp directly. However, there are a few ways you can use ChatGPT to communicate with your WhatsApp contacts.
Use a third-party chatbot platform: There are several chatbot platforms available that allow you to integrate ChatGPT with WhatsApp. These platforms act as a middleman between ChatGPT and WhatsApp, enabling you to chat with ChatGPT using WhatsApp. You can find these platforms by searching online or in app marketplaces.
Use a virtual assistant app: Another option is to use a virtual assistant app that integrates with WhatsApp. These apps use AI to provide conversational responses to your queries. While they may not use ChatGPT specifically, they can provide similar functionality.
Copy and paste responses: If you have a question or want to generate text using ChatGPT, you can do so in a web browser or using an app that integrates with ChatGPT. You can then copy the text and paste it into WhatsApp to send to your contacts.
It’s important to note that while ChatGPT is a powerful language model, it’s not perfect and may make errors or provide inaccurate responses. Always use your own judgment and verify the information before sharing it with others.
Future Prospects of ChatGPT and WhatsApp Bot Integration for customer engagement:
As artificial intelligence (AI) and natural language processing (NLP) continue to advance, the prospects for ChatGPT and WhatsApp bot integration for customer engagement are increasingly bright. Here are a few of the key future prospects for these technologies:
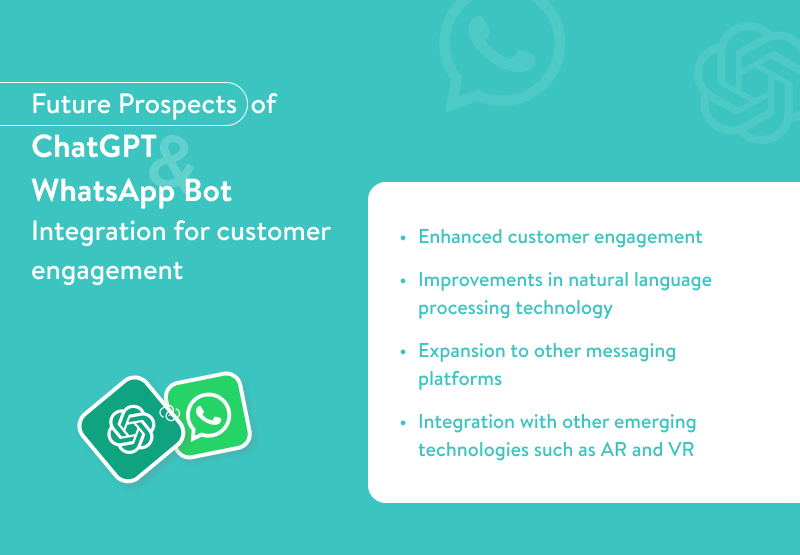
Enhanced customer engagement:
By integrating ChatGPT with WhatsApp bots, businesses can engage with their customers more effectively, providing personalized, timely, and relevant responses to their queries and concerns.
Improvements in natural language processing technology
As NLP technology improves, ChatGPT and WhatsApp bots will be able to more accurately interpret and respond to customer queries and requests. This will enable businesses to provide more efficient and effective customer service, leading to greater customer satisfaction and loyalty. With the development of machine learning algorithms, ChatGPT and WhatsApp bots will be able to learn from past interactions and improve their responses over time, further enhancing the customer experience.
Expansion to other messaging platforms
While WhatsApp is currently one of the most popular messaging platforms, there are many other platforms that businesses can use to engage with customers. As ChatGPT technology improves, we can expect integration with other messaging platforms, such as Facebook Messenger, WeChat, and Line. This will allow businesses to engage with customers on the platforms they prefer, increasing the chances of successful communication.
Integration with other emerging technologies such as AR and VR:
As augmented reality (AR) and virtual reality (VR) become more widespread, there will be increasing opportunities for businesses to engage with customers through these channels. ChatGPT and WhatsApp bots can be integrated with these technologies to provide personalized, interactive experiences for customers. For example, a customer could use a VR headset to explore a new product, while a ChatGPT bot provides information and answers questions in real-time.
Overall, the future prospects for ChatGPT and WhatsApp bot integration for customer engagement are exciting. As NLP technology continues to improve, businesses will be able to provide more efficient and effective customer service, while expanding to other messaging platforms and integrating with emerging technologies such as AR and VR will enable businesses to provide more personalized, interactive experiences for their customers.
Conclusion:
In conclusion, conversational AI has the power to transform customer engagement in today’s digital age. The integration of ChatGPT and WhatsApp bots offers businesses an opportunity to provide more efficient and effective customer service through personalized and interactive experiences. As natural language processing technology continues to improve, we can expect to see even more benefits from these technologies, including integration with other messaging platforms and emerging technologies such as AR and VR. With the power of conversational AI, businesses can engage with customers in new and innovative ways, building stronger relationships and increasing customer loyalty. As such, the use of ChatGPT and WhatsApp bot integration for customer engagement will undoubtedly continue to grow and evolve in the coming years, offering exciting new possibilities for businesses to connect with their customers.

How ChatGPT and WhatsApp bot integration can Enhance Customer Engagement was originally published in Chatbots Life on Medium, where people are continuing the conversation by highlighting and responding to this story.


![[link]](https://i.redd.it/8axr7nejjbza1.jpg)