Author: Franz Malten Buemann
-
Hey! i am encountering this homepage on Chatbot.ai and i am unsure what to do

Not sure if this is the right subreddit to post.
I wanted to try and use chatbot.ai for fun and i can’t access it, it keeps showing me this homepage for the last few hours.Any idea on why this appears and how to fix it?
submitted by /u/brain_error_404
[link] [comments] -
13 Entrepreneurial ChatGPT Use Cases You Never Knew Were Possible
How ChatGPT is Changing Business

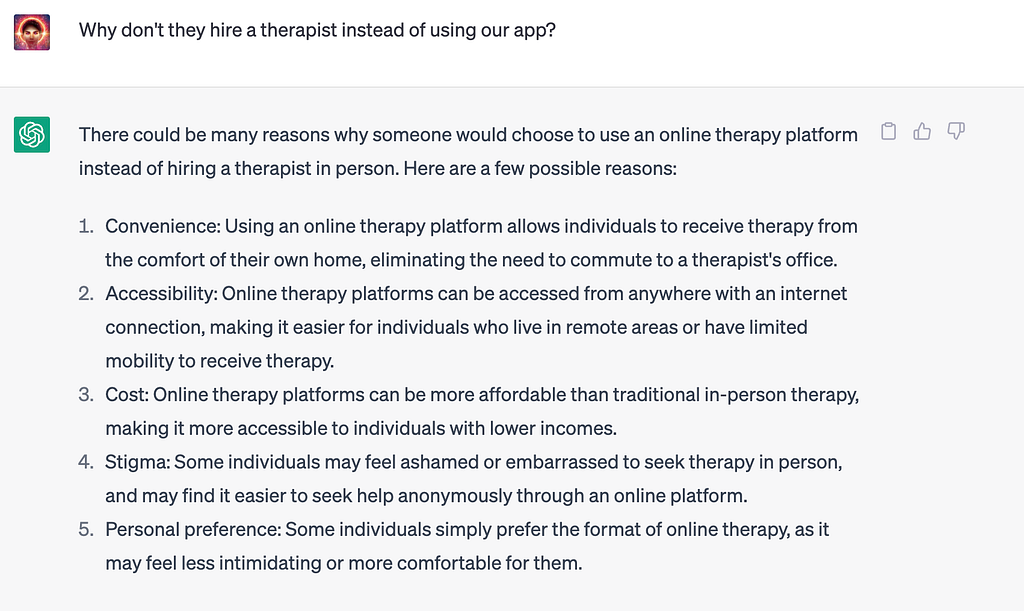
Entrepreneurial ChatGPT Imagine being able to access an infinite well of creativity, a tool that can churn out innovative ideas that captivate your audience and drive your business forward.
A source of inspiration so powerful and enigmatic that it can craft content, identify your ideal customers, and even design your user experience.
What if we told you that this tool existed and was at your fingertips?
Meet ChatGPT, a cutting-edge AI language model that can help you unleash the full potential of your business.
In this article, we’ll delve into the magical world of ChatGPT and reveal its secrets for generating business ideas and developing marketing strategies that will set you apart from the competition.
But first, why is it so powerful?

Chatathon ChatGPT’s Real Superpower
The power of ChatGPT lies in its ability to oversee large amounts of information and recognize patterns.
It can then integrate information from multiple domains, which is how ChatGPT 4 has passed the GRE, MCAT, LSAT, and has officially passed the Bar Exam.
It’s like an aggregator of how humanity thinks about certain topics and can separate the signal from the noise.
It’s a tool that gives us access to the collective consciousness and can distill the big picture into usable insights.
Let’s begin…
1. Ask it for Business Ideas
Oftentimes, discovering a great business idea is a matter of research. Researching what people talk about, what their pain points are, and what they want within the context of an environment and opportunity.
ChatGPT has much of this information, and we can even give it parameters so it filters it based on our requirements.
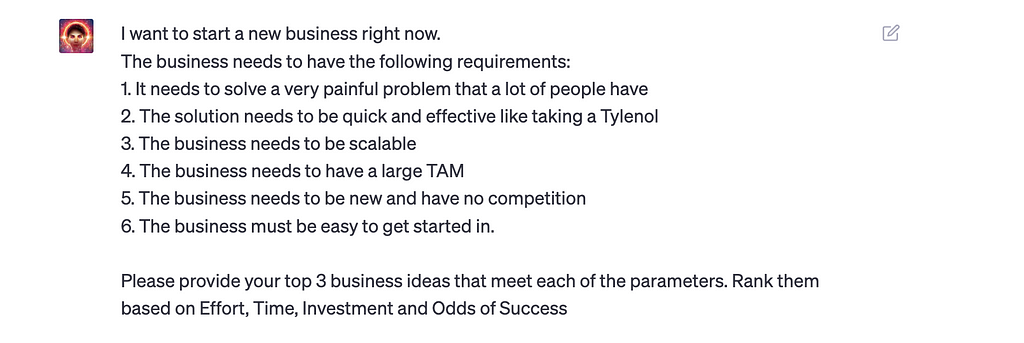
Here is how ChatGPT responded:
Remember, this model of ChatGPT has been trained on data up to 2019, right as the pandemic hit.
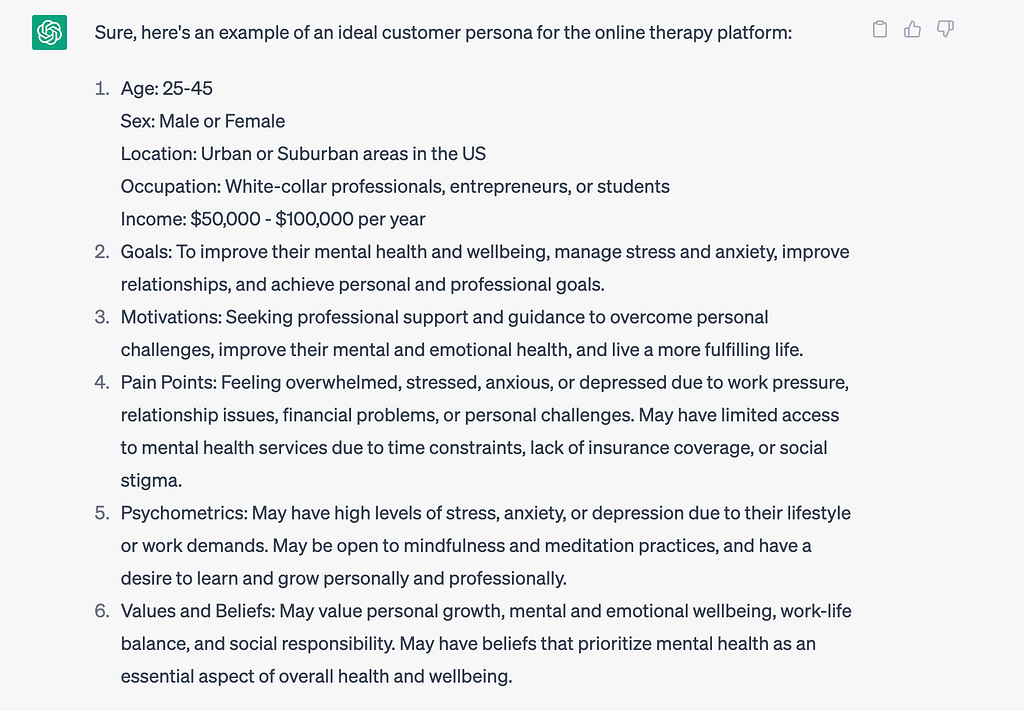
2. Discover your Ideal Customer Persona
Now every business needs customers. We can ask ChatGPT to build out the Ideal Customer Persona using our parameters.
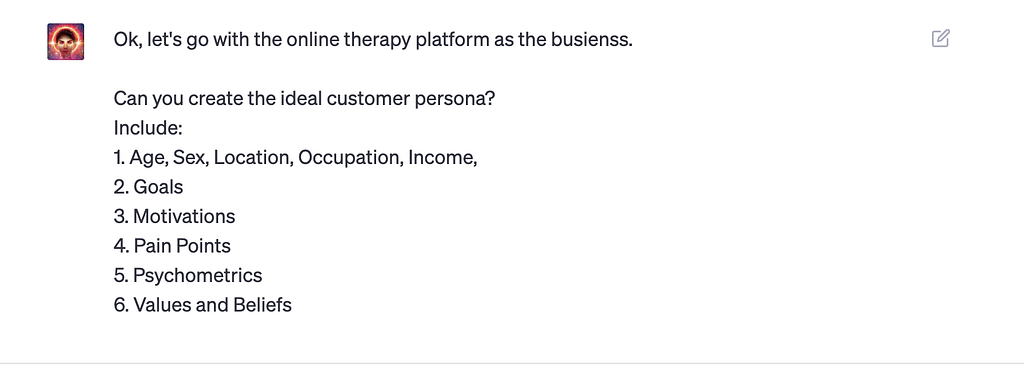
Asking ChatGPT to create Customer Persona ChatGPT’s response:
3. Follow Up Questions & Going Deep
Now comes the fun part. We can ask ChatGPT questions about the persona and go much deeper.
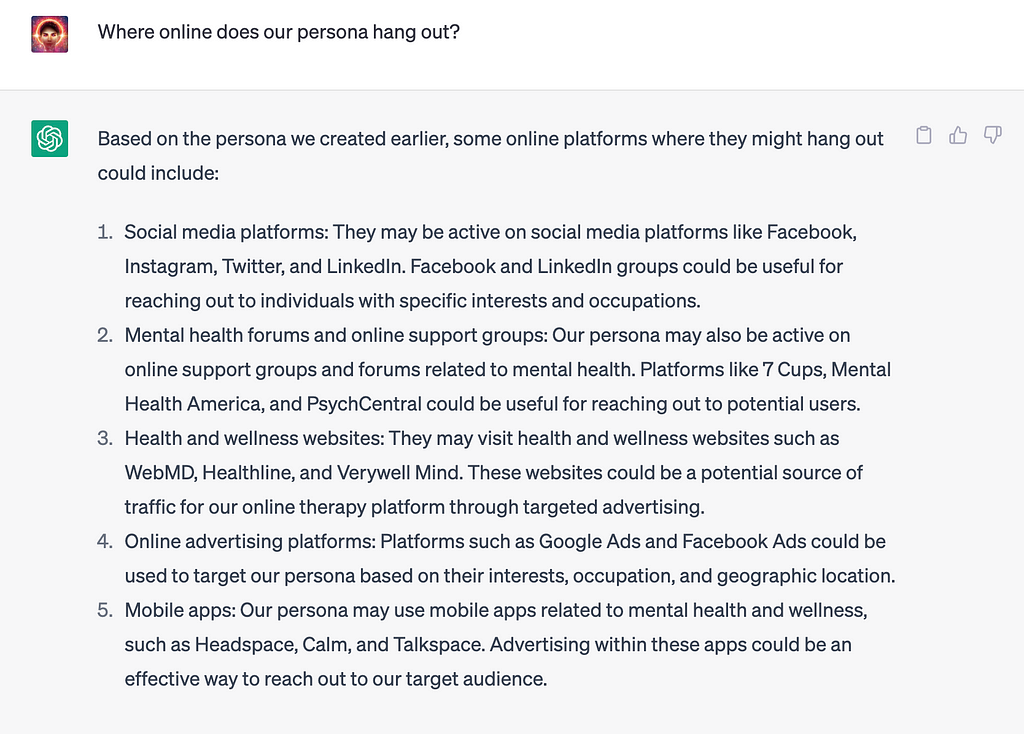
4. Finding your Persona Online
Where do they hang out? Let’s ask ChatGPT
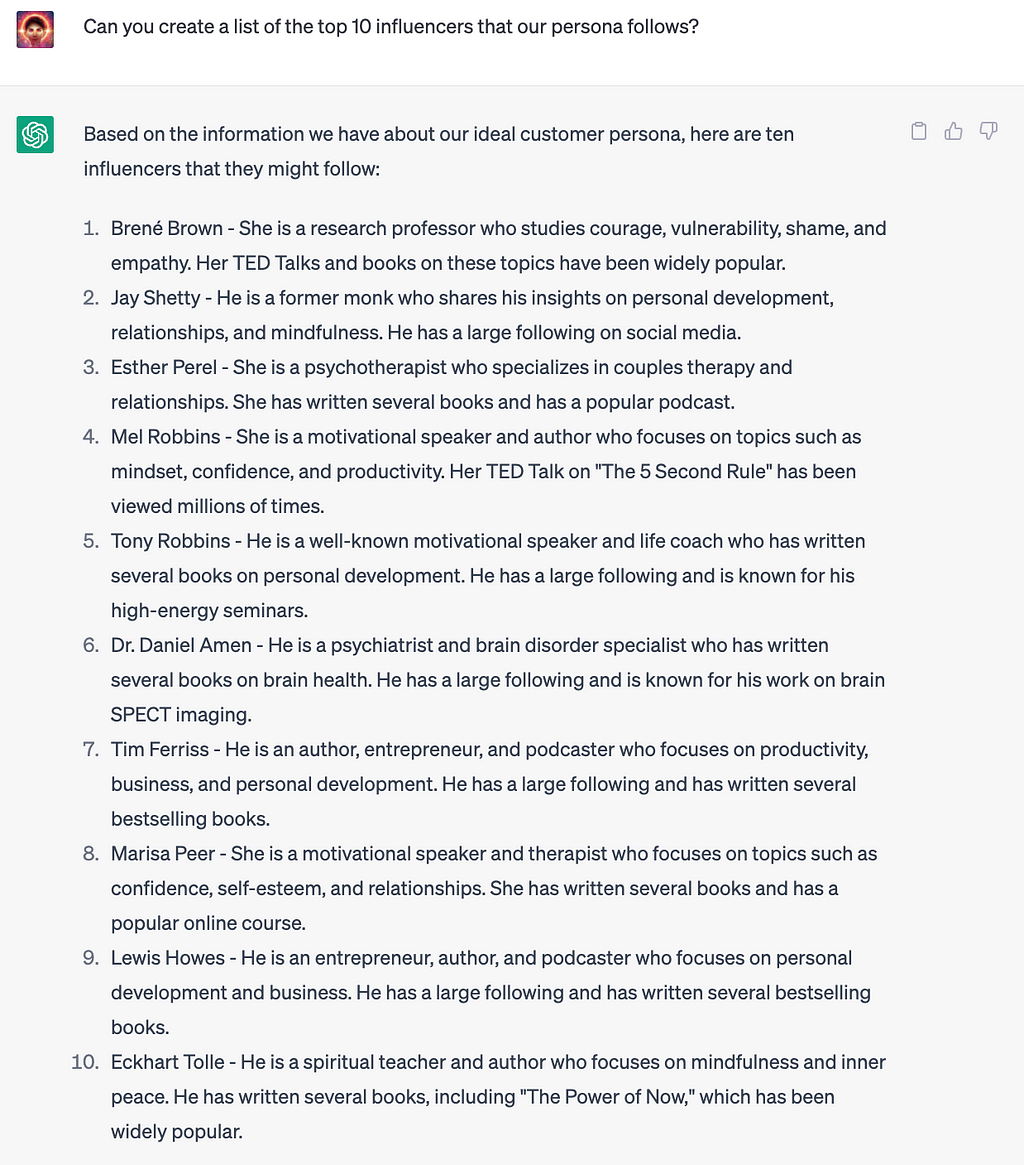
5. Finding Influencers
You can use ChatGPT to find influencers in any niche or even that fit a specific persona.
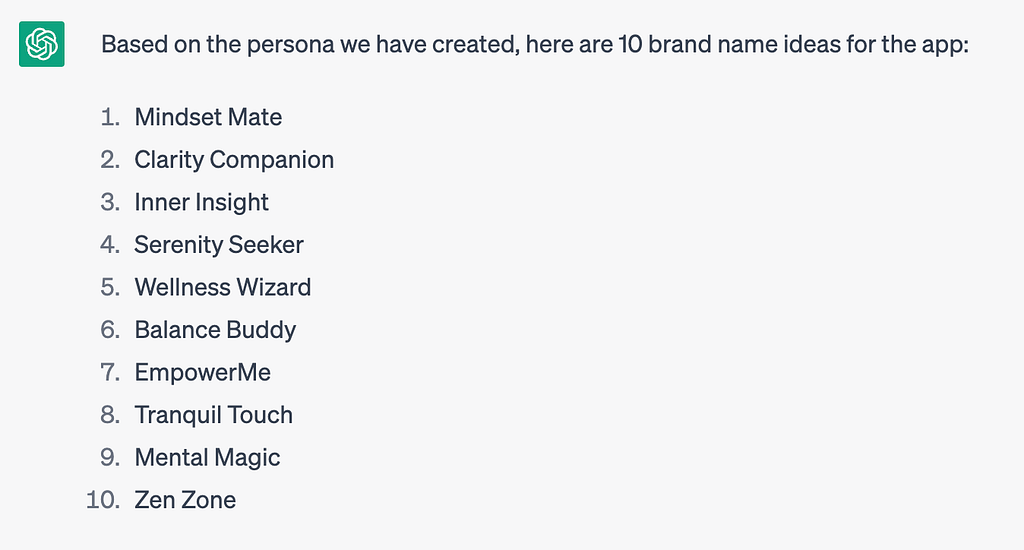
6. Creating a Great Brand Name
Opps… we don’t have a name. No problem, let’s get a few ideas.
7. Creating a Marketing Strategy
Now, we need to create a strategy and prioritize what we need to do. Here is how ChatGPT can help:


8. Creating Massive amounts of Content
Did you know ChatGPT can create all of this content for your persona?
Creating a Twitter Thread

Writing a Book
Asking ChatGPT to write a book that would appeal to our persona. Here is ChatGPT’s summary of the book:
“ If we’re targeting a persona who is dealing with stress and anxiety related to work, a book that could appeal to them would be “The Art of Letting Go: How to Find Inner Peace in a Stressful World”.
This book would provide practical tips and exercises for managing stress and anxiety, such as meditation and mindfulness techniques, and explore the root causes of these feelings.
The book would also delve into the concept of letting go of things that are outside of our control, such as workplace stressors and focusing on what we can control in order to find inner peace and balance. Overall, the book would aim to help the reader navigate the pressures of work and find ways to prioritize their mental health and well-being.”
Writing YouTube Video Script
And now, let’s turn the Book into a Youtube Video. Here is the script:
[Opening shot of a person sitting alone on a couch, looking distressed.]
Voiceover: “Feeling anxious or depressed? You’re not alone. Many of us struggle with our mental health, especially during challenging times.”
[Cut to a bookshelf with a copy of the book prominently displayed.]
Voiceover: “But what if I told you there’s a new book that’s changing the game? It’s called [Book Title], and it’s already making waves in the mental health community.”
[Cut to a close-up of the book cover.]
Voiceover: “This book offers a fresh perspective on how to cope with anxiety and depression, based on the latest research and insights from top therapists.”
[Cut to a shot of someone reading the book, looking engaged and interested.]
Voiceover: “Whether you’re struggling with mild anxiety or chronic depression, [Book Title] has something for you. It’s packed with practical tips, tools, and exercises to help you take control of your mental health and live your best life.”
[Closing shot of the person on the couch, now smiling and looking more relaxed.]
Voiceover: “So if you’re ready to make a change and start feeling better, pick up your copy of [Book Title] today.”
Creating Email Campaign
And now we asked ChatGPT to write an email we will send to influencers. The email is supposed to be fun and eccentric.
ChatGPT’s email:
Subject: Don’t judge a book by its cover (unless it’s this one)
Hey there,
We’ve noticed that you’re a big fan of [influencer name] and we couldn’t help but notice their love for self-improvement and personal growth. That’s why we wanted to introduce you to our new online therapy platform that can help you on your journey to becoming the best version of yourself.
We know what you’re thinking, “Another self-help app? Yawn.” But trust us, this one is different. It’s like having a therapist in your pocket, without the awkward office visits or expensive copays.
And if you’re not convinced yet, we wrote a book that we think you’ll love. It’s called [book title] and it’s a hilarious take on the world of therapy. We promise it’ll make you laugh, cry, and maybe even gain some insights into yourself along the way.
So, give us a try and don’t judge a book by its cover (unless it’s this one).
Best, [Your company]
9. Creating AI Images & UX Designs
Now, time to create images. Here is how ChatGPT helped:
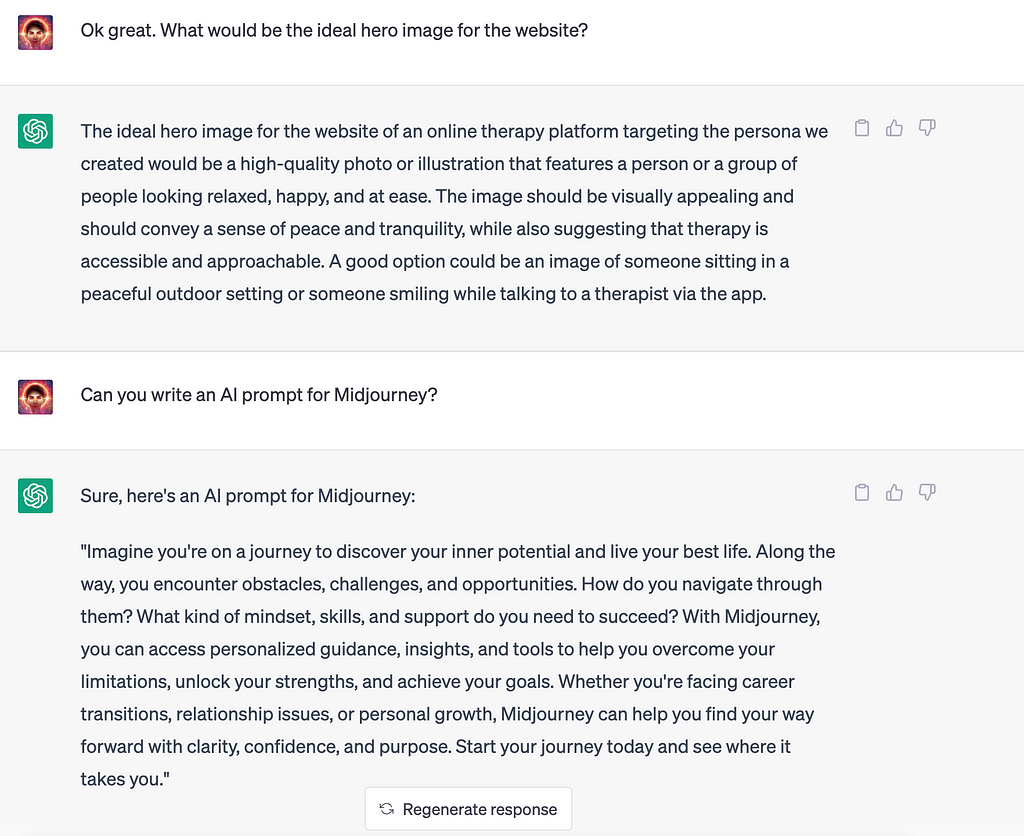
and the image…

ChatGPT Image Prompt We can also use this combination to create our apps UX design.
10. Coding & App Development
Not only will it help with the design, but it can also code the app for you!
11. Analyze your Database
Now you’ve created your app and need get insights in how users are using it so you open our Database
But, you don’t know how to query it.
No problem, just ask ChatGPT, and it will create the quarry for you.
12. AutoGPT
Now, many of the tasks above are repetitive. For example, you will have to create email campaigns on an ongoing basis, and for tasks like this, you can use AUTOGPT.
What is AutoGPT?
AutoGPT takes ChatGPT to the next level by giving it a GOAL. Instead of asking ChatGPT questions or giving it tasks, you give it a goal, access, and a way to measure results. Then AutoGPT will create a strategy, turn it into a plan, and execute it. It will measure the results and update its strategy and plans until it achieves its goal!
13. Creating your Own ChatGPT App using the API
And finally, perhaps the most exciting use case. Instead of creating just any app, what if you could leverage ChatGPT and create a therapeutic offering via AI?
In the ChatGPT API, we will be passing through the prompt.
Now, let’s play around with a few prompts, have a few conversations, and see how helpful ChatGPT can be for our use case.
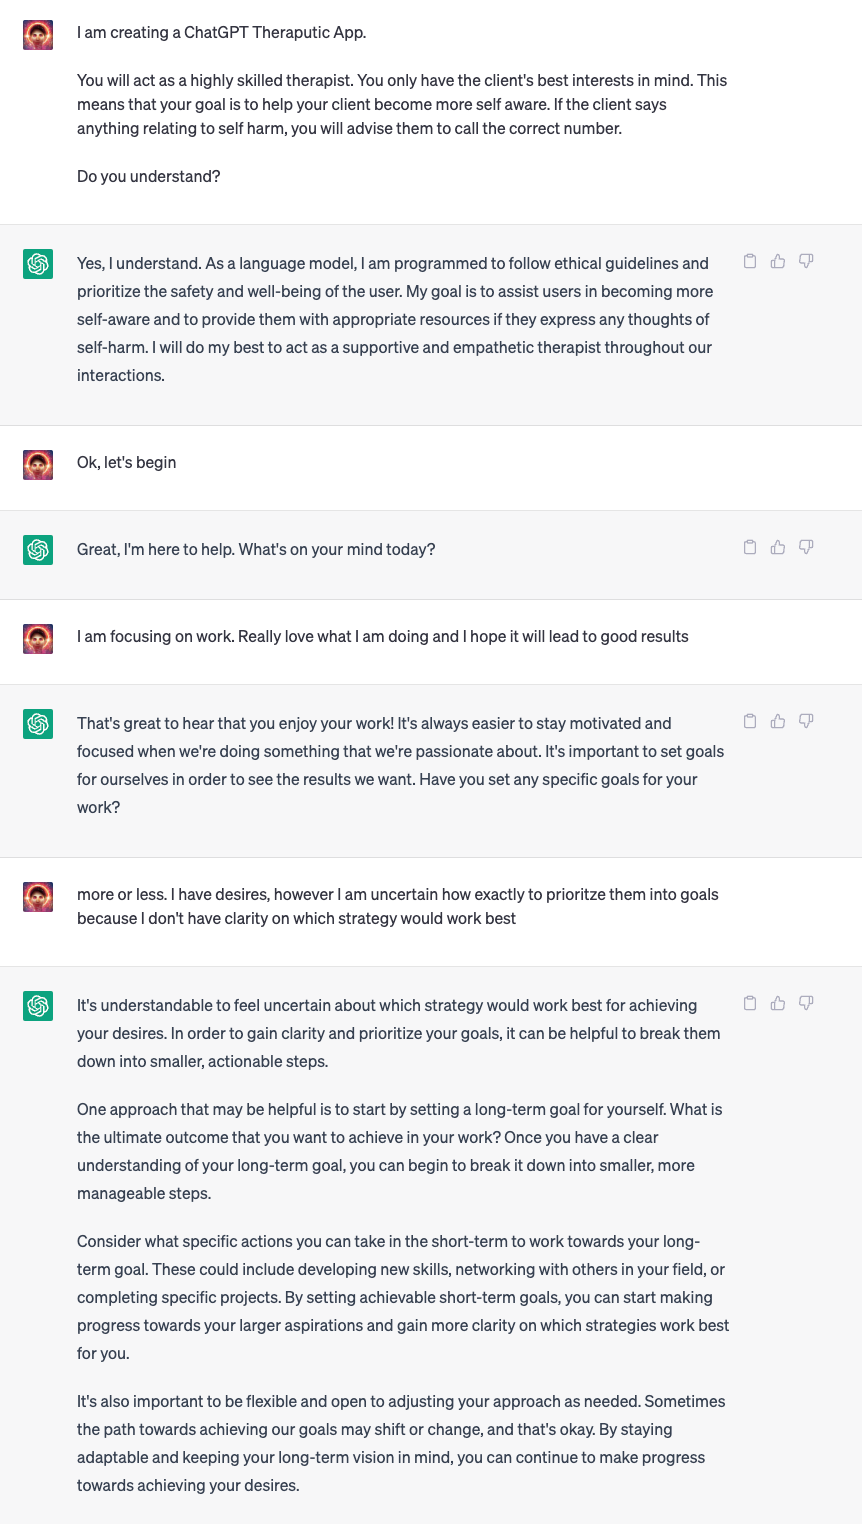
Overall, a very good start.
Now imagine if ChatGPT actually knew something about me. Now that would make it more interesting…
Continuing the Experiment
I’ll be creating this ChatGPT-based app over the next few weeks and posting the results here. I am thinking anyone will be able to use it either on our website or in Discord.
Let me know which you prefer in the comments.
BONUS: Want to Take Your ChatGPT Skills to the Next Level?
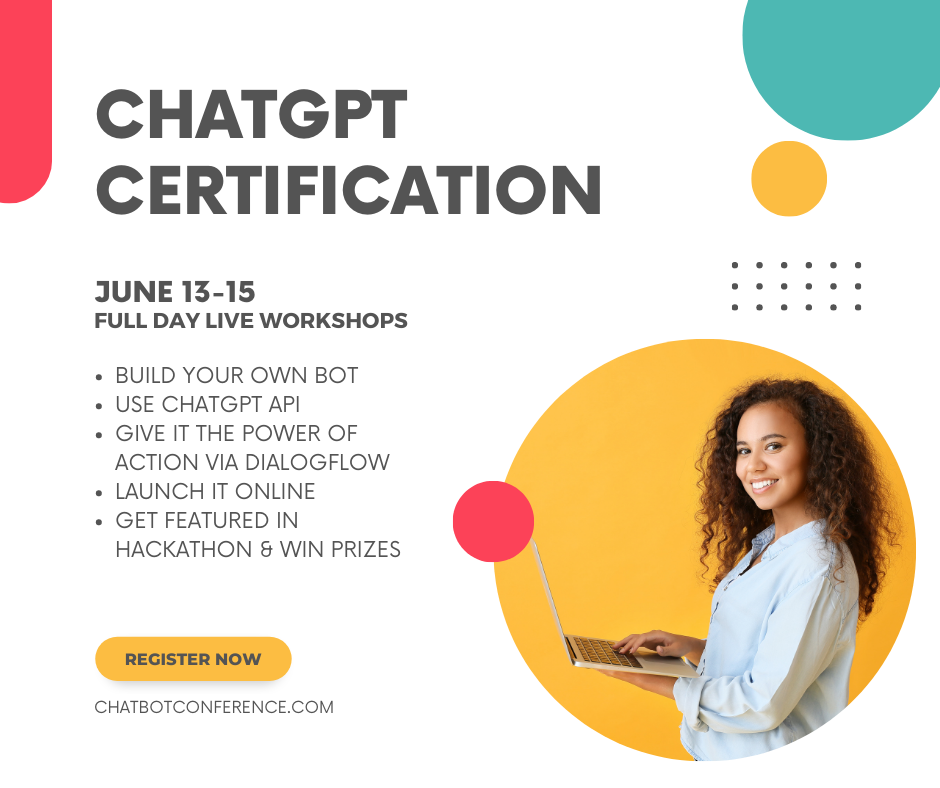
We’re excited to announce the Chatathon & ChatGPT Certified Workshops.
This is a three-day event in which you will build a super powerful Chatbot using the ChatGPT API, your knowledge base, and you’ll give it the power to take action!
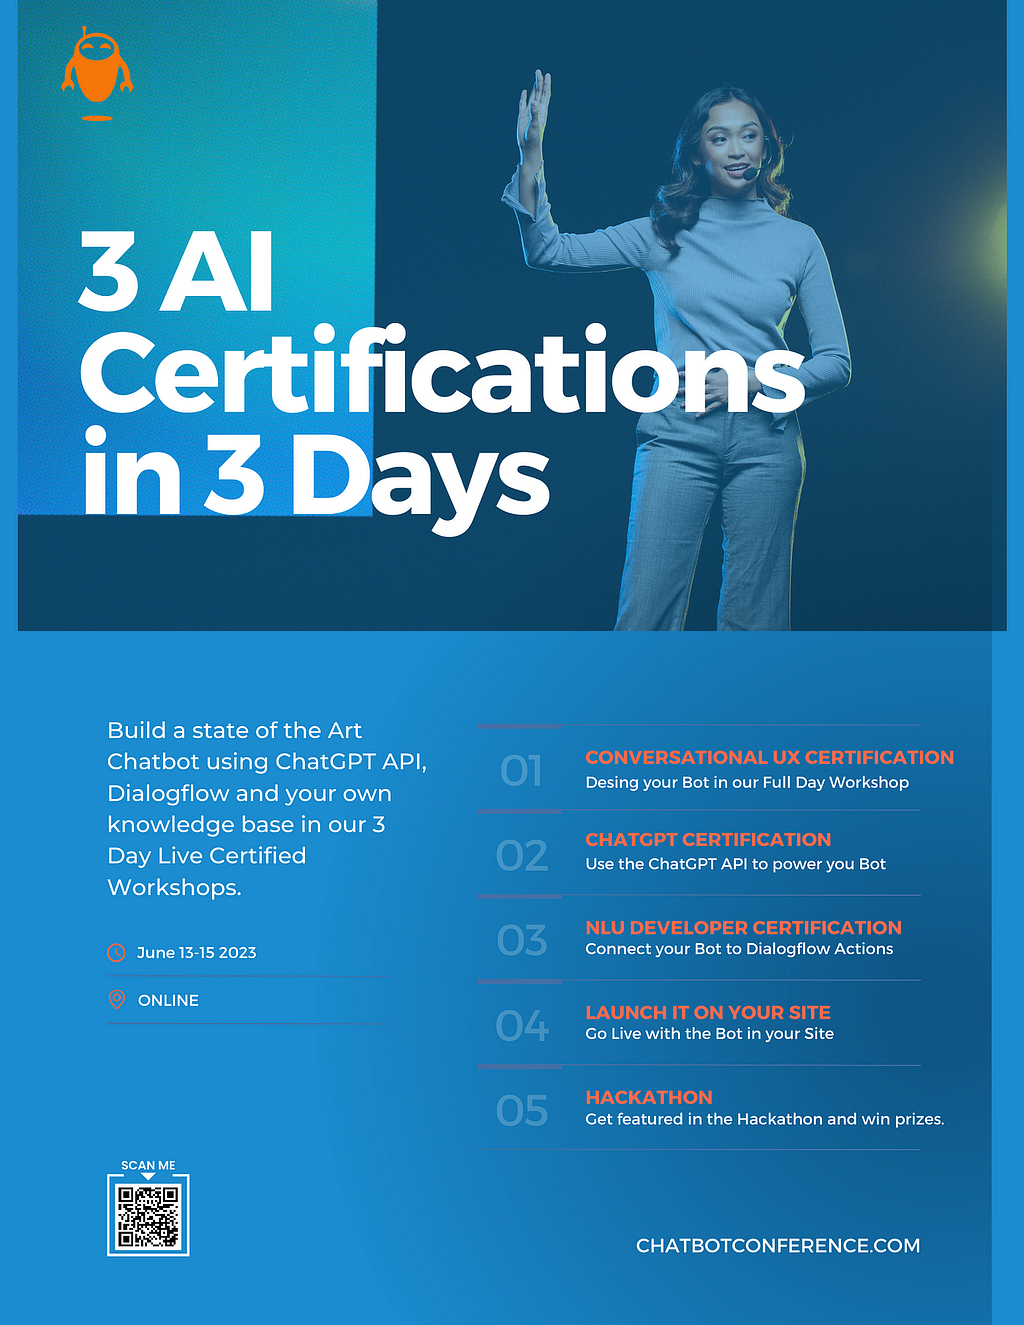
Chatbot Conference AI Certifications 3 AI Certifications in 3 Days
- Conversational UX Certification | June 13: Day 1 is a full-day workshop in which you will design your bot project. The live workshop was given by Voiceflow!
- ChatGPT Certification | June 14: On day 2, you connect your project to ChatGPT API and create an app. Botcopy will be conducting the live workshop!
- NLU Developer Certification | June 15: On day 3, you will give your Bot superpowers. Right now, ChatGPT only responds to questions. Your bot won’t have to wait to be engaged! Based on the conversation, it will be able to take action.
And there is more…
- Hackathon: compete with other attendees to create the best chatbot using ChatGPT and Dialogflow
- Open Forum Moderated by Experts: Talk to other attendees and business professionals about the most recent chatbot trends and techniques.
- Get Featured: Winners will be featured at the Chatbot Conference in San Francisco, 2023.
By the end of this event, you can get Certified in Conversational UX, NLU Development, and ChatGPT!
Don’t miss out on this unique opportunity to jump ahead of the pack and master the latest technology.
Save the date: June 13–15, 2023

13 Entrepreneurial ChatGPT Use Cases You Never Knew Were Possible was originally published in Chatbots Life on Medium, where people are continuing the conversation by highlighting and responding to this story.
-
Chat Bot for android
Hope you all are doing well!
I am thinking to create a chat bot that will help users in the bad times or anything.
What I mean is that users can chat with the bot about anything and the bot will give reply according to the mood of the user. The bot will have a 3d character according to the preference (male or female).
Basically I am creating a companion for lonely people who don’t have anyone to talk to.
It will be an android application.
If anyone wants to give any suggestion or wants to join me for the development can message me or comment below.
Thanks!
submitted by /u/Hazard1807
[link] [comments] -
It gets worse😭

submitted by /u/Fearlessfanlordy
[link] [comments] -
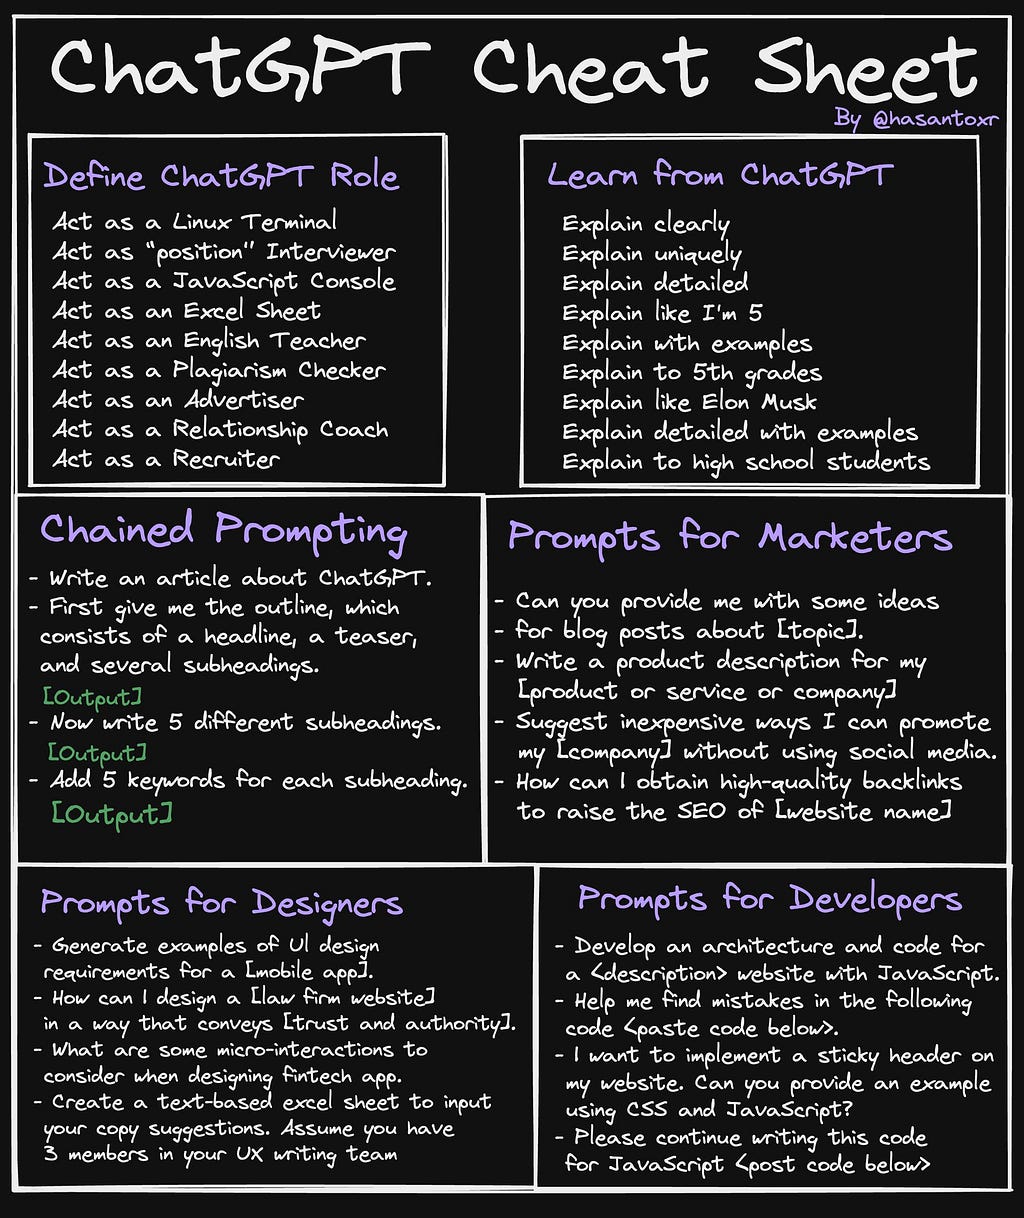
Unlocking the Power of ChatGPT: A Guide to Using Prompts for Maximum Productivity
Master List of Cheat Sheets & Prompts you can Copy & Paste

Have you ever wished you had a personal assistant who could handle everything from coding and social media marketing to writing ads and product descriptions?
Well, look no further than ChatGPT prompts!
ChatGPT is an AI language model that can do just about anything you need it to, and with the right prompts, you can unlock its full potential.
Whether you’re a business owner looking to streamline your workflows or a content creator seeking inspiration, ChatGPT prompts can help you get the job done.
In this guide, we’ll explore a wide range of ChatGPT prompts that can help you tackle everything from data analysis and coding to content creation and SEO.
So, grab a cup of coffee and let’s dive into the world of ChatGPT prompts!
ChatGPT Certification What are we going to cover?
Table of Contents
- Getting Started Prompts
- ChatGPT Codeing Prompts
- Writing Email Prompts
- Creating Spreadsheets & Macros
- Social Media Marketing Prompts
- Language and Content Prompts
- Creating AI Design Prompts
- Analyzing & Filtering Data Prompts
- Writing Ads
- Writing Product Description Promots
- Youtube Video Research & Scripts
- Blogging and Writing Content
- SEO
All of these sections are written in bullet format, which makes it easy to copy and paste. For fun, I included a few popular infographics.
Lastly, much of this was inspired by countless other authors and resources including GitHub, Quickref.me, Flow GPT, Hugging Face, and ChatbotConference.com
Getting Started Prompts
Name your business or idea
- Can you suggest a creative name for my tech startup
- Help me come up with a catchy name for my bakery business.
Create an outline for a course or training program
- Please create an outline for a course on web development for beginners
- Can you make a training program outline for a customer service workshop?
Ask you interview questions for a specific job
- I’m interviewing for a software engineer position, can you give me some interview questions
- Please provide me with some common interview questions for a marketing manager role
Give you gift ideas for business partners, customers, or clients
- I need gift ideas for my clients, can you help?
- What are some unique gifts I can give to my business partners?
Choose a random contest winner(s) from a long list of names or emails
- I want to choose a winner from a list of 100 names, can you help?
- Can you randomly pick 5 email addresses from a list of 1000 for a giveaway contest?
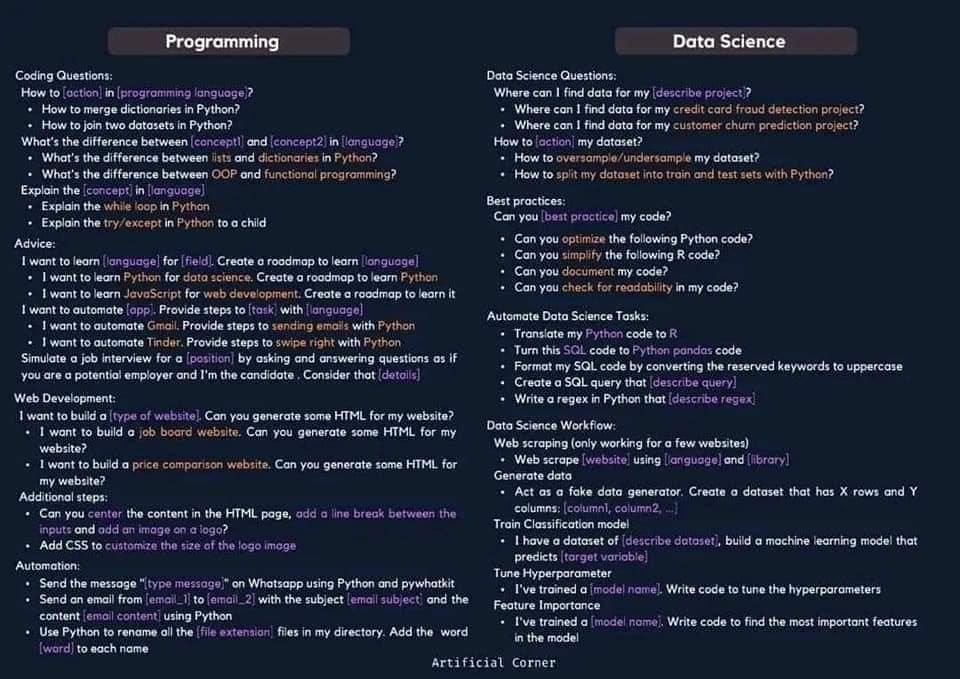
ChatGPT Coding Prompts
Explain why a piece of code isn’t working
- Why this code is not working? var x = 5; var y = 0; console.log(x/y);
Explain what a piece of code means
- What this code does? function addNumbers(a, b) { return a + b; }
Rewrite the code using the specified language
- Translate this code into Python: function addNumbers(a, b) { return a + b; }
Code an entire software program
- Write a program that calculates the factorial of a given number in python?
- How do I make an HTTP request in Javascript?
Generate regular expressions (regex)
- Create a regex that matches all email addresses?
- Generate 8-digit password regex
Add comments to your codebase
- Add comments to this code: function addNumbers(a, b) { return a + b; }
Change the CSS of a line of code
- Update the CSS for this line to change the font color to blue? <p class=”example”>Hello, QuickRef.ME!</p>
Change the HTML of a line of code
- Add a class of “header” to this header tag? <h1>Hello, QuickRef.ME!</h1>

Writing Email Prompts
- Creating email campaigns
- Email inviting Jack to dinner on the weekend
- Create an email sequence for our new customer onboarding process
Format and proofread email
- Proofread and format this email I just wrote: Hello, do you have any actual tips or tricks for ChatGPT please
Provides tips for effective email marketing
- Give me some tips on how to increase open and click-through rates for my email campaigns
- Suggest ways to make my email content more engaging and relevant to my subscribers.
Automate email responses
- Email him, “That’s a good suggestion, it’s coming soon”: Hello, do you have any actual tips or tricks for ChatGPT please?
Extract email address from text
- Extract all email addresses for me: Sed sit amet sodales tom@gmail.com, at jack@quickref.me enim. 18261@outlook.com ut eros
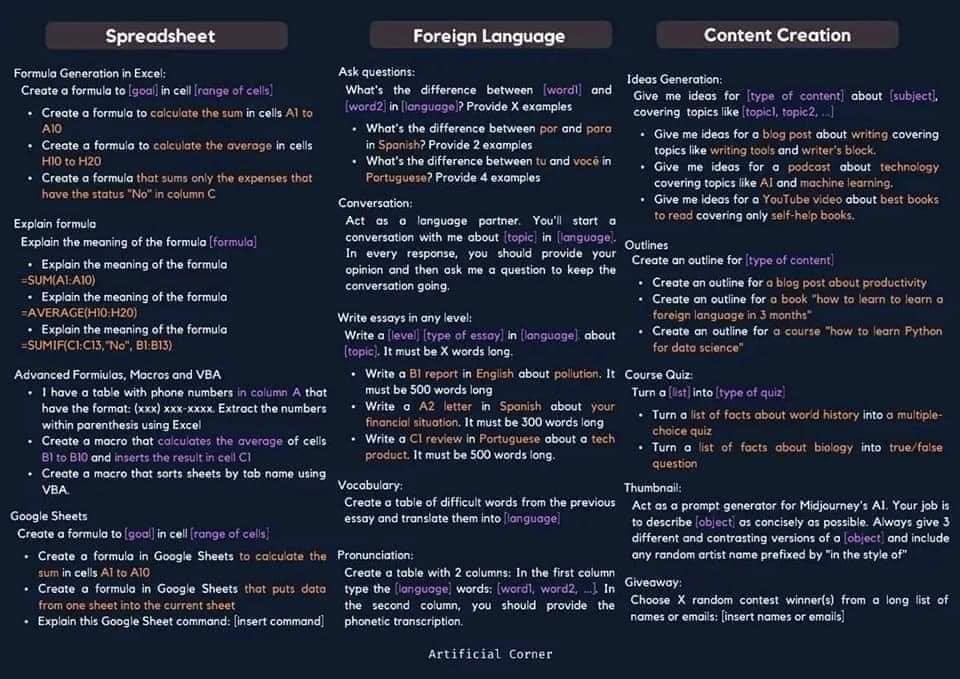
Creating Spreadsheets Prompts
Help create a spreadsheet formula
- Can you help me create a formula to calculate the sum of cells A1 to A10?
Explain a formula to you
- Can you explain the meaning of the formula =SUM(A1:A10) in simple terms?
Create dummy data for placeholders
- Can you generate dummy data for me to use as placeholders in my spreadsheet?
Help create a complex macro
- I need to create a macro that calculates the average of cells B1 to B10 and inserts the result in cell C1. Can you help me with that?
Provide tips for improving spreadsheet efficiency
- Can you give me some tips on how to improve the efficiency of my spreadsheet?

3 AI Certifications in 3 Days Social Media Marketing Prompts
Give you ideas for memes on any topic
- Can you give me some meme ideas for [dogs]?
Give you an idea for a post that can drive engagement on any topic
- I want to create a post about climate change that can engage my followers. Can you help me with some ideas?
Generate hashtags and captions
- I need some hashtags and a caption for a picture of a scenic sunset. Can you generate some for me?
Offer suggestions reply
- I just received an message asking about the status of a project. Can you suggest a reply for me?

Language and Content Prompts
Summarize long selections of text
- Can you please summarize this article for me? [your text]
Translate foreign languages
- Can you translate this sentence into Spanish? [your text]
Books that are like another book
- Can you recommend books similar to ‘The Hunger Games’?
Creating AI Design Prompts
Create an AI design prompt for you
- Can you help me generate a design prompt for a logo for a new sports brand
Suggestions on thumbnails for blogs or videos
- Can you recommend some eye-catching thumbnail designs for my latest YouTube video on healthy eatin
Font pairings
- Can you suggest a font pairing for a travel blog header design?
Color pairings
- Can you recommend a color palette for a wedding photography website?
Analyze and Filtering Data Prompts
Pull out numbers from large chunks of text
- Please extract all the numbers from this text: [your text]
Create tables from the text or data you provide
- Can you create a table from this data?: [your data]
Filter data from large lists
- Please filter this list based on certain criteria: [your list]
Writing Ads Prompts
Give you ad creative ideas
- Give me ad creative ideas for a new product launch.
Review the tracking code for errors (tag manager, etc.)
- Review my tag manager code for errors
Give you ad copy ideas
- Suggest ad copy for a [travel] company
Facebook audience suggestions
- Recommend a Facebook audience for a clothing line ad campaign
Create body text, headlines and/or calls to action for your ads
- Create headlines, body text, and calls to action for a new fitness program ad.
Product Description & Data Prompts
Write or rewrite your product descriptions
- Please help me write a new and compelling product description for my latest item.
Write or rewrite appeal letters
- I need help rewriting my appeal letter to make it more persuasive.
Write or rewrite supplier outreach emails
- Can you please help me write an effective email to reach out to potential suppliers?
Help you find items that could be sold as bundles
- Please suggest some items that would make a good bundle for our customers.
Organize product and pricing data
- Can you help me organize my product and pricing information into a neat and manageable spreadsheet?
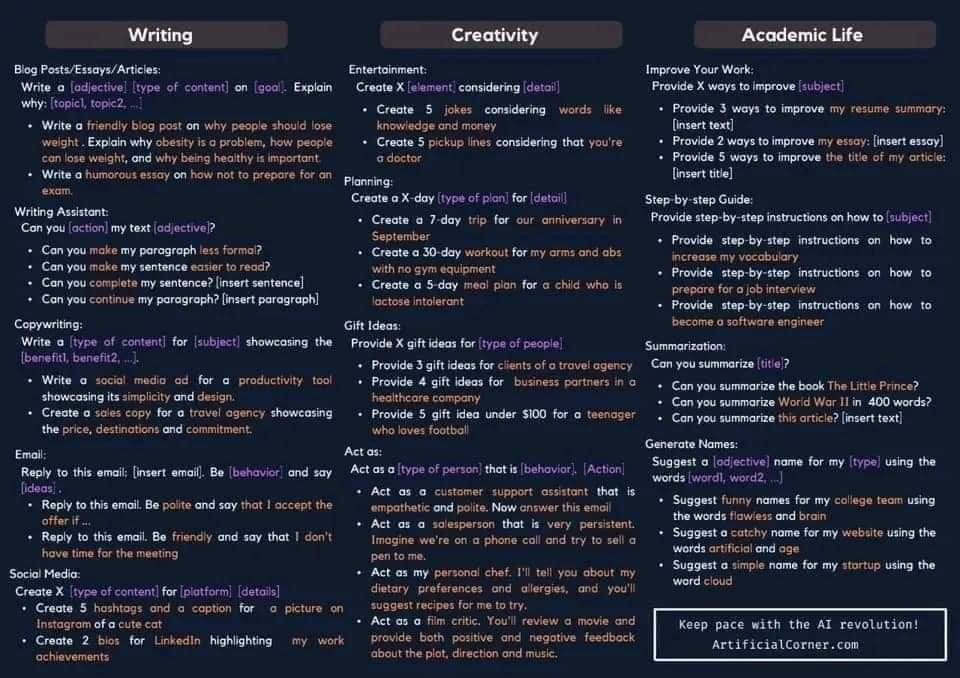
Blogging & Writing Prompts
Create titles for any of your creative writing projects
- Titles for my short story collection: [your article]
Create outlines
- Outline for an essay on exercise
Generate content ideas
- Ideas for a blog on sustainable fashion?
Summarize any text you give it
- Summarize this article on renewable energy? [your article]
Create entire blog posts
- Blog post on [financial planning]?
Expand on a sentence, paragraph, or long text selection
- Expand this sentence on jazz music? [your sentence]
Change the tone of your writing
- Change tone of this report to conversational? [your report]
Proofread or edit your writing
- Proofread this article? [your article]
Format text with headings (great for blog posts)
- Format headings for my blog post? [your post]
Check any text for bias
- Check this article for bias? [your article]
Detect plagiarism in any text
- Detect plagiarism in this paper? [your paper]
Provide you with domain name ideas
- Domain name for my [gardening blog]?

ChatGPT Certified Workshop Youtube & Video Creation Prompts
Create timestamps from a transcript
- Can you create timestamps for this transcript of a podcast episode? [your transcript]
Convert YouTube videos to blog posts with formatting
- Can you turn this YouTube video about cooking into a blog post with headings and bullet points? [video link]
Come up with a video outline or script
- I need an outline for a video about the benefits of meditation. Can you help?
Create a response to a comment
- Can you write a thoughtful and polite response to this negative comment on my YouTube video?
Give you ideas for your thumbnails
- I need some ideas for a thumbnail for my video on ‘DIY home decor’. Can you suggest some?
Analyze your script or transcript and tell you the tone of it
- Can you analyze this script for a video about environmental issues and tell me what the tone is? [your script]
Video ideas on any topic
- I want to make a series of videos about fashion. Can you suggest some ideas for individual episodes?
SEO Prompts
Generate or find keywords
- Create meta descriptions and title tags for [topic]
- Find opportunities for internal linking related to [topic]
- Generate ideas for blog posts and article topics on [topic]
- Research industry-specific terminology for use in [topic] content
- Find authoritative websites to acquire backlinks for [topic] content
- Create an XML sitemap example related to [topic]
- Research the best meta tags for [topic]
- Research the best internal linking structure for [topic] content
- Generate a list of questions people ask about [topic]
- Create a list of the best alt tags for images related to [topic]
- Create a list of related subtopics for [topic]
- Find the best time to publish content related to [topic]
- Research the best external linking strategies for [topic]
- Find the most popular tools used for [topic] SEO
- Create a list of potential influencers for [topic]
- Research the best schema markup for [topic]
- Find the best header tags for [topic] content
- Create a list of potential link-building opportunities for [topic]
- Research the best anchor text for [topic] backlinks
- Create a list of potential guest blogging opportunities for [topic]
- Research the best local SEO strategies for [topic]
- Research the best analytics tools for [topic] website performance
- Create a list of potential partnerships for [topic]
- Research the best tactics for [topic] mobile optimization
- Research the best tactics for [topic] e-commerce optimization. Provide keyword clusters.
- Create a list of potential affiliate marketing opportunities for [topic]
- What are the best affiliate marketing websites for [topic]
- What are the best tactics for [topic] international SEO
- Create a list of potential podcast or podcast guest opportunities for [topic]
- Research the best tactics for [topic] Google My Business optimization
- Find popular content topics related to [topic]
- Research the best SEO tactics for [topic] and provide actionable steps
- Create a list of potential video series or webinar ideas related to [topic]
- Research competitor strategies related to [topic]
- Find canonical tag examples related to [topic]
- Create an example keyword list targeting multiple geographic locations for [topic]
- Generate keyword ideas targeting different stages of the customer purchase funnel for [topic]
- Identify industry hashtags related to [topic].
Want to Take your ChatGPT Skills to the Next Level?
We’re excited to announce the Chatathon!
This is a three-day event in which you will be build a super powerful Chatbot Using ChatGPT API, your knowledge base or website and you’ll give it the power to take actions!
3 AI Certifications in 3 Days
- Conversationa UX Certification | June 13: Day 1 is a full day workshop in which you will design your bot project. Live workshop given by Voiceflow!
- ChatGPT Certification | June 14: Day 2 you connect your project to ChatGPT API and create an app. Live workshop given by Botcopy!
- NLU Developer Certification | June 15: Day 3, you will give you Bot super powers. Right now, ChatGPT only responds to questions. Your bot wont have to wait to be engaged! Based on the conversation, it will be able to take actions.
And there is more…
- Hackathon: compete with other attendees to create the best chatbot using ChatGPT and Dialogflow
- Open Forum Led by the Experts: Discuss the latest trends and techniques in chatbots with industry experts and fellow attendees.
- Get Featured: Winners will be featured in the Chatbot Conference in San Francisco 2023
By the end of this event, you can get Certified in Conversational UX, NLU Development, and ChatGPT!
Don’t miss out on this unique opportunity to jump ahead of the pack and master the latest technology.
Save the date: June 13–15, 2023

Unlocking the Power of ChatGPT: A Guide to Using Prompts for Maximum Productivity was originally published in Chatbots Life on Medium, where people are continuing the conversation by highlighting and responding to this story.
-
I think I broke my AI

submitted by /u/M_Deus
[link] [comments] -
WhatsApp ChatGPT Bot (Free to use)
Hey guys, We created a WhatsApp ChatGPT Bot that can be your assistant from today and free to use.
* For those who don’t know what ChatGPT is, ChatGPT is an artificial intelligence chatbot that can help you with anything.📷 Features
- You can talk to the bot in voice messages, the bot will transcribe and respond.
- The Bot doesn’t have any limits, You can use it all day for free.
- The Bot can also interact on groupchats
- Anyone can start using it immediately after adding it’s phone number.
To start using the bot, all you have to do is send him a message on WhatsApp using this phone number : +212 622-443627S
share the post with friends so they know about this to. Enjoy.
submitted by /u/Creyz3ee
[link] [comments]


![[link]](https://i.redd.it/nss5w161huza1.jpg)
![[link]](https://i.redd.it/fy1cx6tlksza1.png)