How to Collect User Data in Messenger and Export It to Google Sheets with the ManyChat Bot — EmpathyBots
Are you planning to generate leads for your business with Messenger?
Or, just growing a subscriber list of your newsletter?
Whatever it be, you just want to collect user data like name, email, contact number, etc.
And you know what, it is very easy to collect user data in Messenger with the ManyChat bot.
Not just that, In this tutorial, I’m going to show you how to collect user data in Messenger and export it to google sheets with the ManyChat bot so that you can easily access it later.
Before starting out, If you are not familiar with technical terms in chatbot development then please refer to my guide on technical chatbot terminology, because in this tutorial you need to be aware of that technical jargon.
Ok, I’m going to divide this tutorial into 2 parts, first we’ll see how to collect user data and then how to export it to google sheets.
So, let’s dive in!
How to Collect User Data in Messenger with ManyChat Bot
Before starting, I hope you have a ManyChat account, if not, then go create one.
Ok!, for this tutorial, we will collect 4 types of user data such as first name, last name, email address, gender, and user ID.
If you are wondering what is the user ID, then it is nothing but a unique ID given to each user by Facebook. I will tell you why we need a user ID in a while.
You just follow the following steps to collect user data in messenger with ManyChat.
Trending Bot Articles:
2. Automated vs Live Chats: What will the Future of Customer Service Look Like?
4. Chatbot Vs. Intelligent Virtual Assistant — What’s the difference & Why Care?
Step 1:
Go to the Automation tab > New Flow > Start From Scratch.
Step 2:
Now you will see a starting step connected to blank Messenger content block.
Click anywhere on the Messenger content block, the new window will open where you will see Add Text section, just delete/cancel it.
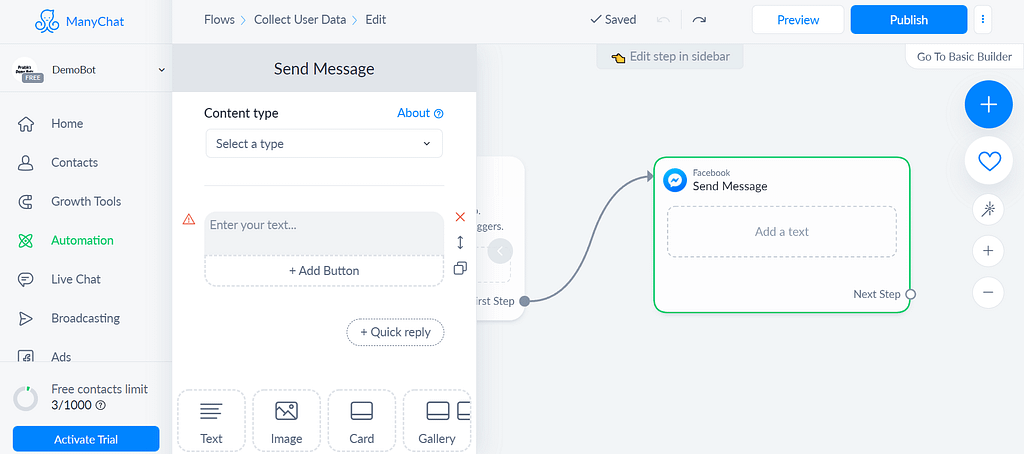
Step 3:
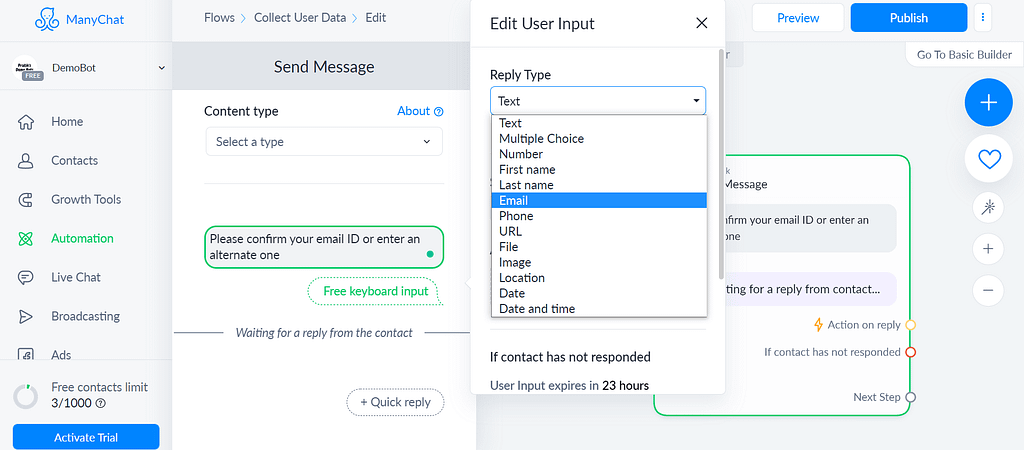
Scroll a little and you’ll see a User Input option, select it.
User Input is a feature to accept user inputs in multiple formats such as text, number, email, phone, etc.
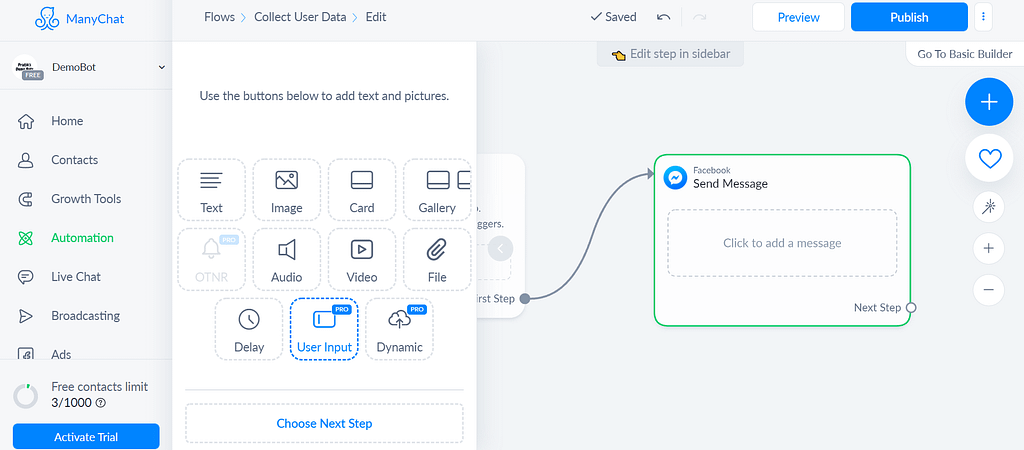
Step 4:
Write the text you want in the text box or simply paste this one,
“Please confirm your email ID or enter an alternate one”
Then, select the reply type to Email.
Now you can see the two toggles such as Save Input to System Field and Set Email Opt-in.
Turn off the first one because we are going to create a custom field to store email addresses.
Select your custom field, if you haven’t created it, you can create one by just typing the name you want and selecting New User Field.
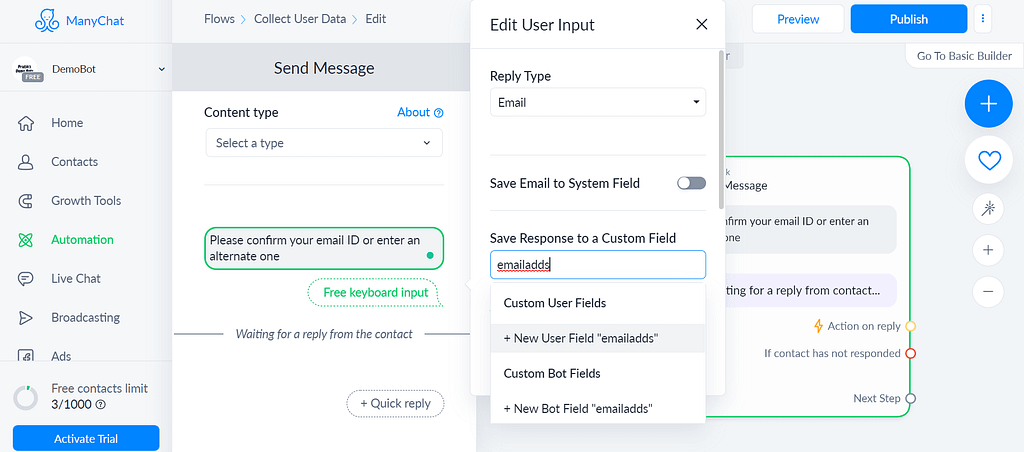
I have already created one, so I will just select that.
If you scroll down a little, you will see an option to add the Skip button, I’m not going to add it, you can if you want.
Woohoo! You have just created your first user data field.
What it does is send a message and show a user’s email address as a quick reply button so that they can quickly enter an email address or type an alternative one if they want.
You need not ask users for their user ID, first name, and last name because you can extract it from their profile directly. I will show you how in the google sheets section.
Step 5:
Repeat the same process to collect the gender of a user.
Add the following text into a textbox,
“Please select your gender”
This time select the reply type as Multiple Choice because we’re going to give users the ability to select from the options.
Then, check the box asking to allow free text input as well, select your custom field, and add the options to select beneath a textbox.

That set! We’ve performed all the steps to collect user data and now it’s time to export it to google sheets.
So, let’s do it in the next section.
How to Export User Data to Google Sheets with ManyChat Bot
Step 1:
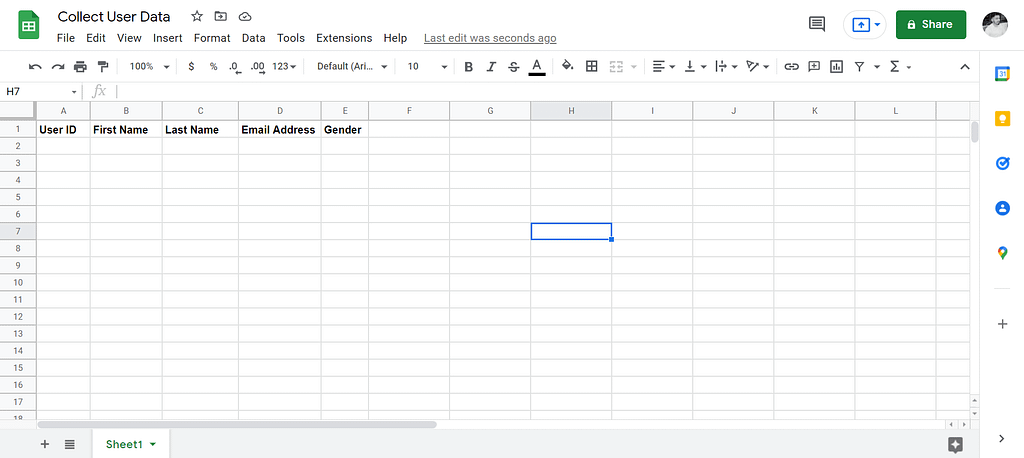
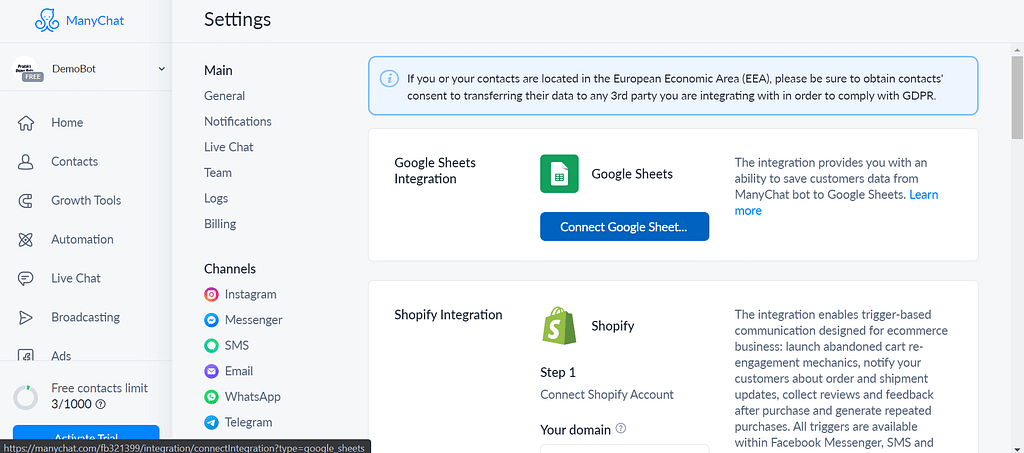
Before going to export user data to google sheets, you need to set up two things.
First, create a Google sheet like this,
And second, integrate google sheets with your ManyChat account by going into Settings > Integrations under the Extensions section.
For doing so, you just need to connect your Google account with ManyChat. Make sure it is the same account on which you have created a Google sheet.
Now, you’re all set to export user data to google sheets with ManyChat Bot.
Step 2:
Jump over to the same flow you have created to collect user data and click on the content block, and then on a first textbox.
There you can see an option as Perform Actions which allows you to create an action to perform when the particular input is received from the user.

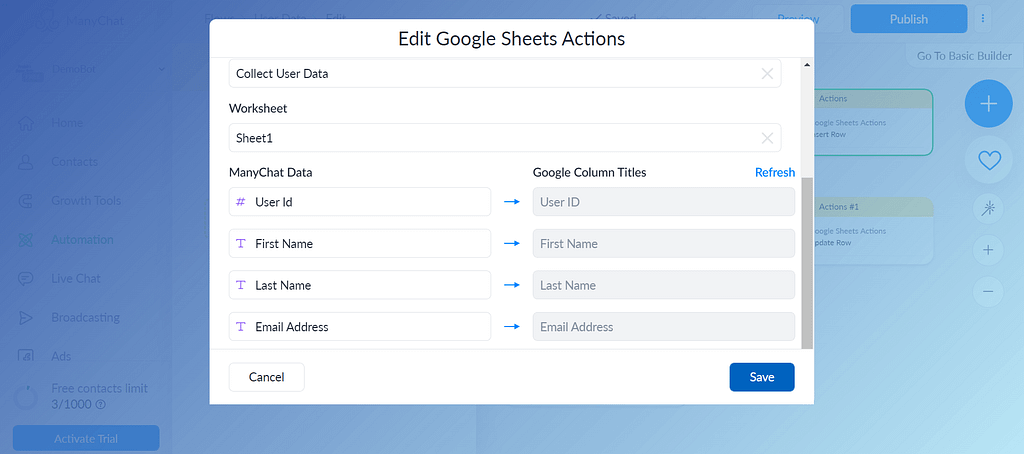
Click on it, then on an action block > Actions > Google Sheets Action.
Then, click on Select Action under Google Sheets Action > Insert Row > and select your sheet.
Now as I told you before, you can extract the user Id, first name, and last name directly from the user’s profile, just insert the following system fields in ManyChat data in front of respective column titles,
User Id
First Name
Last Name
And then, insert a custom field you have created to collect email addresses in front of the Email Address column title,
Email Address (my custom field)
Step 3:
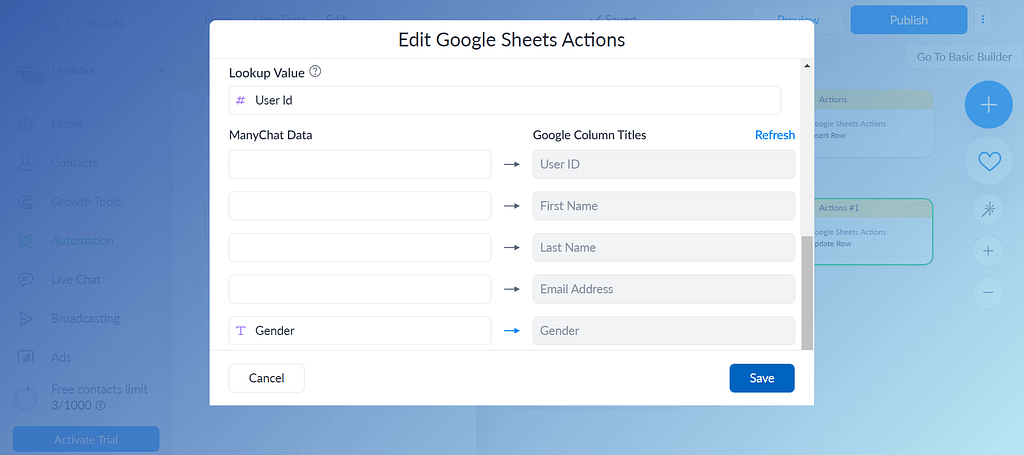
Repeat the same process to export Gender’s data.
But this time select Google Sheets Action as an Update Row, otherwise, it will add this data in a new row in the sheet.
And to update a row you need to have some lookup column and value to identify a user.
And then, the user Id came into the picture which is the most accurate parameter to identify a user.
Just add the Lookup Column’s name as in sheets that is “User ID” in our case and Lookup Value as a system field “User Id”.
And insert a custom field you have created to collect gender in front of the Gender column title,
Gender (my custom field)
Here’s how this feature is working on my chatbot,
Now, go and test yours by clicking on the Preview button.
Suggested Guides:
- How to Build a Simple FAQ Chatbot with ManyChat (No-Code) in 202
- 11 Chatbot Best Practices You Should Follow to Create a Powerful Chatbot
Let’s wrap this tutorial!
Wrapping Up
So, we have just seen how to collect user data in Messenger and export it to google sheets with the ManyChat bot.
This is a very important and useful feature especially when it comes to lead generation.
Just go and implement it!
Liked this story? Consider following me to read more stories like this.
Don’t forget to give us your 👏 !


How to Collect User Data in Messenger and Export It to Google Sheets with the ManyChat Bot —… was originally published in Chatbots Life on Medium, where people are continuing the conversation by highlighting and responding to this story.