“Be careful with your money!”, my mother used to yell at me with a lovely tone, when I ran out of money before my next allowance. “Do you even know on what you have spent it? You should really keep track of your spending!”
And it is a wise piece of advice, right? I bet a good majority of us, responsible millennials attempting to do some proper adulting, sincerely try to do so. Yet there are only a handful of activities that I consider more tedious than writing down every expense I make. I mean it. I don’t think anyone reading this will happily turn down a couple of hours of Netflix to do some exciting accounting instead.
The good news is, my virtual pals, that we live in a world where technology offers the widest variety of possibilities! From filters that transform your face into a cute puppy, to the chance to program your very own minions and make your life easier. Your very own bot fleet! What if you could send a two word message to your digital servant and they would write it down in that dreadful spreadsheet for you?
With this in mind, I programmed a Telegram bot that takes care of this unpleasant but necessary activity for me, and it was far simpler than I had thought. You only need some basic understanding of Python to get your own bot running and accounting. Let me show you how easy it is!
Building your Bookkeeping Bot, step by step

Step 0: Create your Google sheet
I will be using Google Drive to store the spreadsheet. I chose to do that because it allows me to access it from anywhere if I need to. It also keeps your data safe and you do not have to worry about having local files. Therefore, you will need a Google account. If you don’t have that already, you will have to create one.
Step 1: Set up Google API access
In order to connect the Python script to your Google account, you will need to enable the Google Drive/Sheets API. This video in YouTube from Tech With Tim explains the process perfectly, which in summary is:
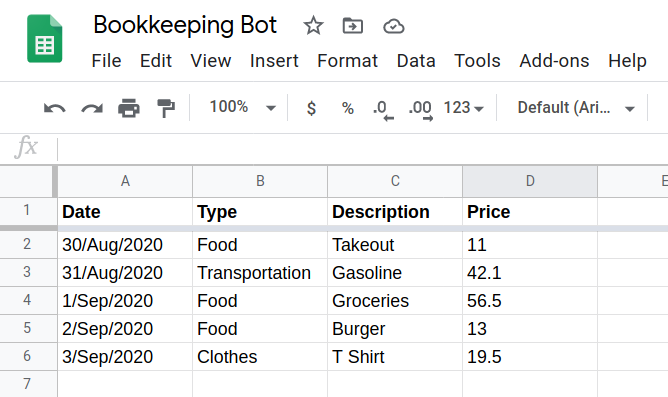
- Create a spreadsheet and fill in some cells, we will use that for testing. Give it a proper name.
- Go to Google Cloud Console and create a new project.
- Enable Google Drive API, setting web server access, to read application data, with Project>Editor role. Make sure to download your credentials in JSON format and store it in your project folder (keep it safe!).
- Enable Google Sheets API.

Step 2: Install libraries and test Google sheet access
Now, to make sure the script and your sheet are playing nice, we can do some testing in Python. The first thing you will need to do is install some libraries to interact with you freshly created spreadsheet:
pip install gspread
pip install gspread-dataframe
pip install oauth2client
Now you can already try things like downloading data from your sheet, edit the data, and upload again to update the sheet:
Now you want to put some data in your sheet to test it out:

And then go to your creds.json file, and look for the “client_email”. That is your assigned address in Google Drive API. Share the sheet you created with that email:

Now, you can initialize your client in Python and connect to the sheet:
We are getting the data into a dataframe, since this will help later when we start manipulating rows. The dataframe will look like this:
            Date              Type    Description    Price
0    30/Aug/2020              Food        Takeout     11.0
1    31/Aug/2020    Transportation       Gasoline     42.1
2     1/Sep/2020              Food      Groceries     56.5
3     2/Sep/2020              Food         Burger     13.0
4     3/Sep/2020           Clothes        T Shirt     19.5
5            NaN               NaN            NaN      NaN
6            NaN               NaN            NaN      NaN
7            NaN               NaN            NaN      NaN
8            NaN               NaN            NaN      NaN
..           ...               ...            ...      ...
Now all these columns get imported as strings (dtype: object), so let’s give them the right format:
At this point you can get summaries for your data however you like. I am not going to get into that here, but just to give an example, you could aggregate using pivots and produce things like this:
Type        Clothes     Food     Transportation
Date
2020-08         NaN     11.0               42.1
2020-09        19.5     69.5                NaN
Trending Bot Articles:
4. How intelligent and automated conversational systems are driving B2C revenue and growth.
Step 3: Create a Telegram Bot
Now it’s time to create your Telegram bot, and a channel where you will send your expenses. To create a bot, you will need to write to Telegram’s BotFather, send the command /start, and follow the instructions to create your bot. You will receive a TOKEN, save it securely!
After creating it, send the command /setprivacy, choose your new bot, and then Disable. This allows your bot to read all messages coming to the channel, instead of just the ones beginning with a “/” (called “commands”).
Now create a Telegram channel, and add your bot’s username.
Step 4: Write your script
We can start now to write the python script that will handle all our expenses. You can begin with the following steps:
- Import all the libraries you will be needing
- Define variables
- Open a connection with your expenses sheet
- Get the data into a formatted dataframe
Next to the functions. We want a simple workflow:
- We input an expense description and its price, separated with a comma.
- The bot asks what type does the expense belong to, offering a predefined set of possible types as buttons.
- We select the type by pressing the button, and the bot saves the expense as a new row in the sheet.
For this we will create 2 methods, one that handles incoming messages and offers “types” of expense to choose from (“input_expense”), and the other that saves the expense in the sheet once we push a button (“callback_query_handler”, you must respect this name):
Finally, create the bot object, add handlers, and start polling:
Step 5: Test your Bot!
By now you should be able to send expenses to the channel (remember to send it in the form: description, price), and the bot will save your expenses in the sheet:

Conclusion
As you can see, getting your own app to handle daily expenses using Telegram and Google Sheets is really easy.
But this is just the beginning. You can use this as a starting point and take your expense tracking to a whole new level! For example, you could add commands to get monthly spending reports per spending type, or to search for expenses by text… You are only limited by your imagination here!
Now, we can both finally tell our parents that we learned how to be careful with our money!
Don’t forget to give us your 👏 !


Your own Bookkeeping Telegram Bot with Python was originally published in Chatbots Life on Medium, where people are continuing the conversation by highlighting and responding to this story.