Expo, React native… onboarding chatbot: Part three
How onboard user, simply and efficiently.
Third part of my on boarding chatbot article. It’s gone a be hot, today ! We will put everything working together.
If you missed the first part, it’s over here !
The second part, it’s here !
In summary for the moment we have, bubbles for the chatbot and the user, animation to simulate the chatbot’s text input.
We still have to link all these components together, make them communicate.
React allows us to create contexts, to encapsulate a part of our components to make them communicate with each other.
We will share in this context a very usefull react hook : UseReducer. This hook will allow us to manage complex state logic.
Then we will modified the chatbot screen and the bubbles factory to use the state management thought his context and update the app.
Let’s start by create and initialise a UseReducer.
UseReducer
const [state, dispatch] = useReducer(ChatBotReducer, InitialChatBotState)
UseReducer takes 2 arguments :
- a reducer function (ChatBotReducer),
- initial state as input (InitialChatBotState),
This hooks will returns the current state and a dispatch function as output with array destructuring.
Too well understand the redux logic, let’s start to talk about state.
ChatBot State
UseReducer is the state management solution.
A state is immutable. It is a picture taken at a given moment. For example our this is our initial State :
export const InitialChatBotState = {
    currentAction: ChatBotStates.STATE_ONE,
    renderItem: RenderItems.CHAT_BUBBLE,
    showButton: false,
    nextAction: ChatBotStates.STATE_TWO
}
It is a object with specific properties who describe our statement.
The render item used for this state will be chat-bubble , no button and the currentAction is State One for example !
Now, we have to determine, analyse the Figma board created by the UI / UX team :
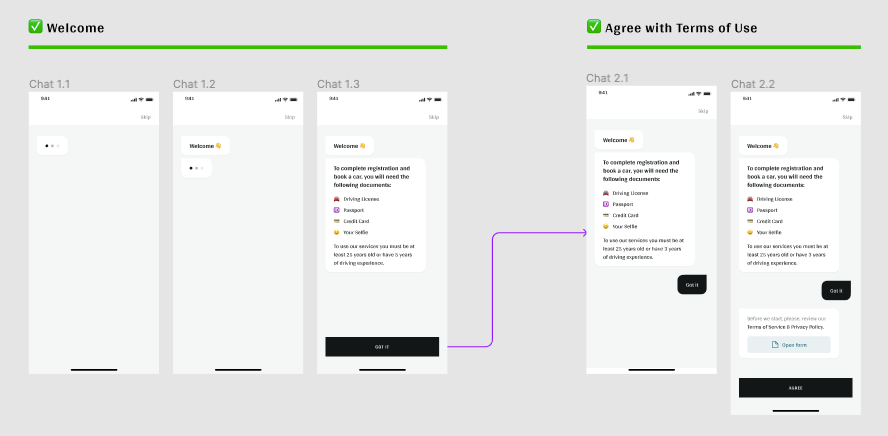
Let’s describe what we have :
- the chatbot start to write, chatbot bubbles start to be visible.
- at the end typing a button is showing,
- Click on the button (here, purple arrows are actions in figma board) and show a user bubble,
- …
the first bullet is is exactly our initialState ! that’s good !
For this article part, we won’t follow the board figma above. We will make 2 states in addition to the initial one and put them in a enumeration object :
export const ChatBotStates = Object.freeze({
    STATE_ONE: 'stateOne',
    STATE_TWO: 'stateTwo',
    STATE_THREE: 'stateThree'
})
Trending Bot Articles:
2. Automated vs Live Chats: What will the Future of Customer Service Look Like?
4. Chatbot Vs. Intelligent Virtual Assistant — What’s the difference & Why Care?
Chatbot Reducer
The first argument to create a useReducer is reducer (also called a reducing function). this function will manage and centralised all those states.
Reducers calculate a new state based on the previous state and an action.
export const ChatBotReducer = (state, action) => {
switch (action.type) {
case ChatBotStates.STATE_ONE :
return {
            currentAction: action.type,
            renderItem: RenderItems.CHAT_BUBBLE,
            showButton: false,
            showModal: false,
            nextAction: ChatBotStates.STATE_TWO
        }
case ChatBotStates.STATE_TWO :
return {
            currentAction: action.type,
            renderItem: RenderItems.USER_BUBBLE,
            showButton: true,
            showModal: false,
            nextAction: ChatBotStates.STATE_THREE
        }
case ChatBotStates.STATE_THREE :
return {
            currentAction: action.type,
            renderItem: RenderItems.CHAT_BUBBLE,
            showButton: false,
            showModal: false,
            nextAction: null
}
    }
}
This is our reducer called, ChatBotReducer. We find here our 2 new states, with their own particularities. let’s dive in this reducer function.
A reducer is a function with 2 arguments :
- State which is the current state with all properties (currentAction, renderItem, etc.).
- An action is a plain object that represents an intention to change the state. Actions are the only way to get data into the store. Those actions will be dispatched by the dispatch function
We use a conditional switch / case statement to manage the states in relation to the received action.
ChatBot Context
To create our chatbot context we use createContext method form react library. this method have argument, the defaultValue, is usefull when we dont have a provider, but, in our case we will create a provider with a useReducer as value, so we set defaultValue to undefined.
const ChatBotContext = createContext(undefined)

export default ChatBotContext

export function ChatBotProvider ({ children }) {
const [state, dispatch] = useReducer(ChatBotReducer, InitialChatBotState)
const reducer = { dispatch, state, ChatBotStates }

return (
        <ChatBotContext.Provider value={{ reducer }}>
            {children}
        </ChatBotContext.Provider>
    )
}
We will use our context in a component, ChatBotProvider. This component is a wrapper, as AnimatedWrapper for the chat-typing component.
Every Context object comes with a Provider that allows consuming components to subscribe to context changes.
Provider component accepts a value prop to be passed to consuming components that are descendants of this Provider.
As you can see, we use the userReducer inside our ChatBotProvider.
Next, we create a reducer object that includes the dispatch function, the state from the initialisation of useReducer and the list of all states. We pass this reducer object to the props value of the provider.
This way we share all the tools used to communicate between all components, chat-bubble, user-bubble, bubbles-factory, etc. Chat bot state will be available for each component wrapped in our provider.
Let’s update the main screen of our app, Chatbot !
Modify chatbot screen
const ChatBot = (props) => {
const [components, setComponents] = useState([])
const { reducer } = useContext(ChatBotContext)
const { state, dispatch } = reducer

    useEffect(() => { console.log('ChatBot - props', props) }, [])

    useEffect(() => {
// console.log('state', state)
        if (data) {
            setComponents([
                ...components,
<BubblesFactory
data={data.chatBot[state.currentAction]}
bubble={ComponentsFactory(state.renderItem)}
interval={state.renderItem === RenderItems.CHAT_BUBBLE ? 3000 : 1500}
callback={() => {
                        state.nextAction && dispatch({ type: state.nextAction })
                    }}
                />
            ])
        }
    }, [state])

return (
        <SafeAreaView style={styles.container}>
            <ScrollView>
                {components.map((component, index) => {
return (
                        <Fragment key={index}>
                            { component }
                        </Fragment>
                    )
                })}
            </ScrollView>
        </SafeAreaView>
    )
}
To access to our context we initialise a useContext hooks with a context object (ChatBotContext)
const { reducer } = useContext(ChatBotContext)
This will returns the current context value for that context, in our case, the reducer object created in the ChatBotProvider.
We will retrieve the state and the dispatch function with an array destructuring of the object reducer.
const { state, dispatch } = reducer
We will listen our state with the useEffect hooks. The state object contains all the information to update our messages list, data, bubble type to render.
To facilitate the insertion of components, I have set up a component factory :
function ComponentsFactory (type) {
switch (type) {
case RenderItems.CHAT_BUBBLE:
return <ChatBubble />
case RenderItems.USER_BUBBLE:
return <UserBubble />
case RenderItems.BUTTON:
default:
return <View />
    }
}
Modify Bubbles Factory
I have added a callback to the bubble-factory component. It is used to dispatch the next action sent by the state when there are no more messages to display in the current state.
The call back method is called in the bubbles-factory in the stopBubbles method.
End of the day !
It’s done for today, it was a hard day, understand hooks logics is not easy. i recommended you to play with the code, create your own component, state, etc.
You can find the all source code here.
Thank you for taking the time to read this article. Don’t hesitate to leave comments, ask questions, improvements, and play with the code.
The next part, will be on how to add user interactions using our reducer…
Don’t forget to give us your 👏 !


Expo, React native… on boarding chatbot : Part three was originally published in Chatbots Life on Medium, where people are continuing the conversation by highlighting and responding to this story.