Is it possible to take the url the extension is opened in and feed it into the chatbot
submitted by /u/largomouth3
[link] [comments]
Is it possible to take the url the extension is opened in and feed it into the chatbot
submitted by /u/largomouth3
[link] [comments]
Hi, I’m looking for up-to-date resources (books, videos, articles) how to create open-domain chatbot.
submitted by /u/TonyGodmann
[link] [comments]
 |
submitted by /u/ADSPLTech7512 [link] [comments] |

The biggest and the most hateful challenge in software development is writing test cases and maintaining them. This is no different when it comes to chatbot development. At Botium we don’t write the regression tests, we generate them. This article shows you how we do this with the least amount of effort invested.
To reach the best coverage you have to define all possible conversations of your conversation model. To implement and maintain it manually is really time consuming and sometimes a boring task, not to mention the human mistakes which can easily happen even in the case of a pretty simple chatbot. We have implemented a Crawler tool which will help you to do it in a very simple way.
The Crawler detects the buttons and the quick replies and makes conversations along them. The conversation tree is traversed by a little bit customized depth first algorithm. Each time the Crawler reaches an open-ended question (which means no button or quick reply is found), then the conversation is ended, the path marked as visited and a new conversation is started from the beginning (from the ‘conversation start message’) to keep the context of the conversation safe. (The Crawler process starts the conversations with the messages which are defined in the ‘conversation start messages’ parameter.) When all paths are visited in the conversation tree, then the session is ended and you get all the possible conversations as result so you will have a full regression test. Let’s see how it works in practice in Botium Box.
For better understanding I use a very simple banking chatbot example, which is mixed with buttons and open-ended questions.
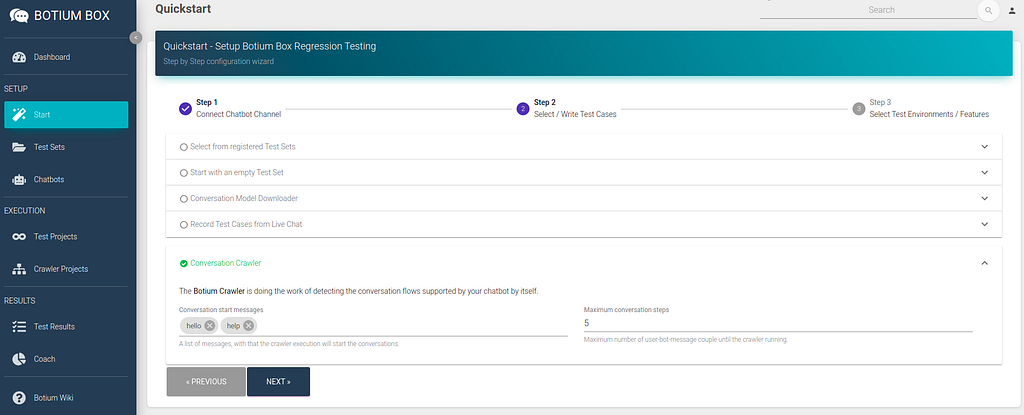
With quick start you can define a Crawler project in three simple steps. In the first step you have to choose or register a new chatbot. Then in the second step you can configure some basic settings of the conversation crawler. In the third step you can save the Crawler project or you are able to start the first Crawler session immediately.
Finishing the registration you will be redirected to the dashboard of your Crawler project. Here you can see the previous Crawler sessions and the current execution settings.
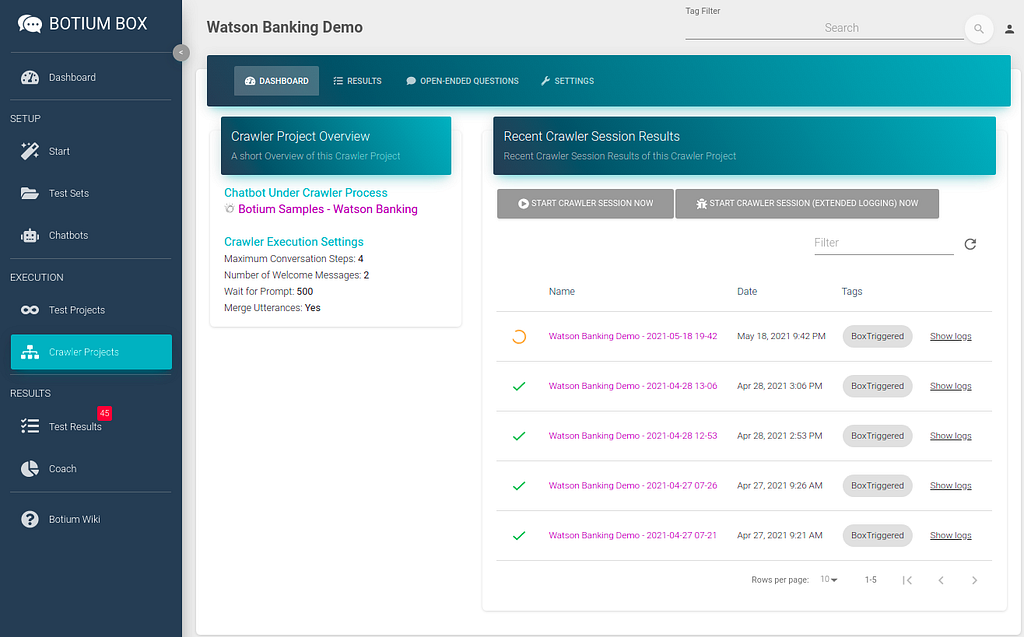
During a Crawler session as many parallel processes are going to be started as many ‘Conversation start messages’ are defined in the execution settings. These processes will detect all possible conversations along buttons and quick replies as it was already mentioned in the Crawler concept.
The example banking chatbot has bot initiated conversations. The Crawler is able to detect the buttons and quick replies in the welcome messages as well, so in this case we can let the ‘Conversation start messages’ field empty.
2. Automated vs Live Chats: What will the Future of Customer Service Look Like?
4. Chatbot Vs. Intelligent Virtual Assistant — What’s the difference & Why Care?
And here is the biggest value of the Crawler: the generated conversations. This chatbot is pretty small and simple, so in this case we have just five conversations generated as a result. In case of a more complex chatbot hundreds of test cases can be found, which is enormous work to do manually.

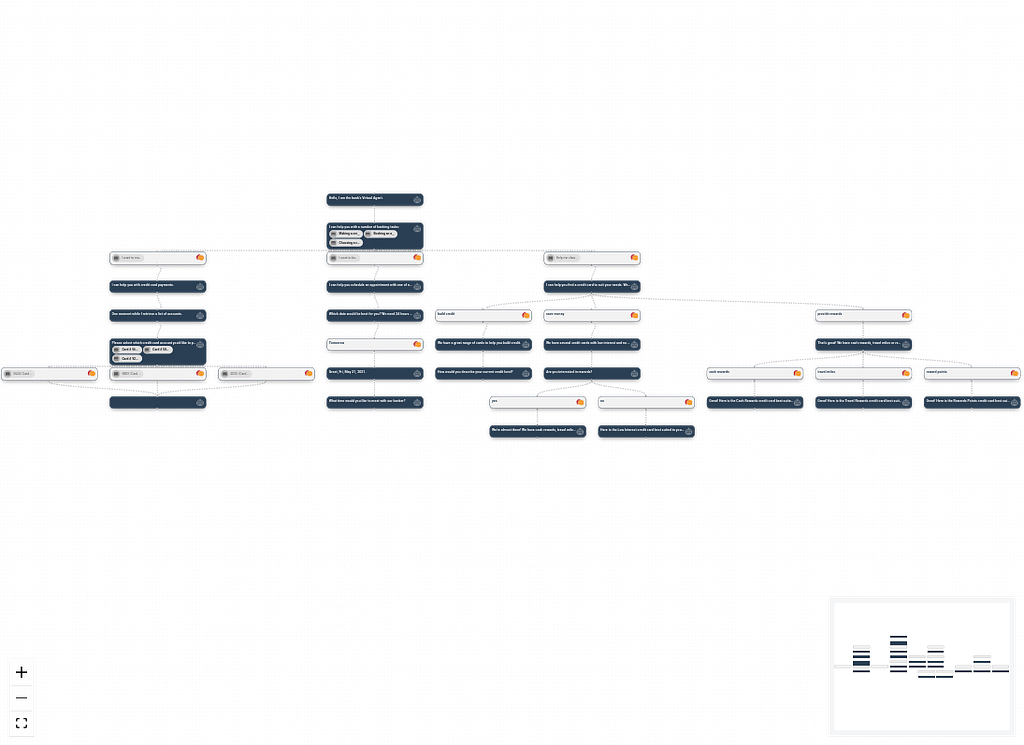
The other feature, which is as useful as the generated conversations, is the flowchart, which shows the whole detected conversation tree in visual form to get a big clear picture about your chatbot.
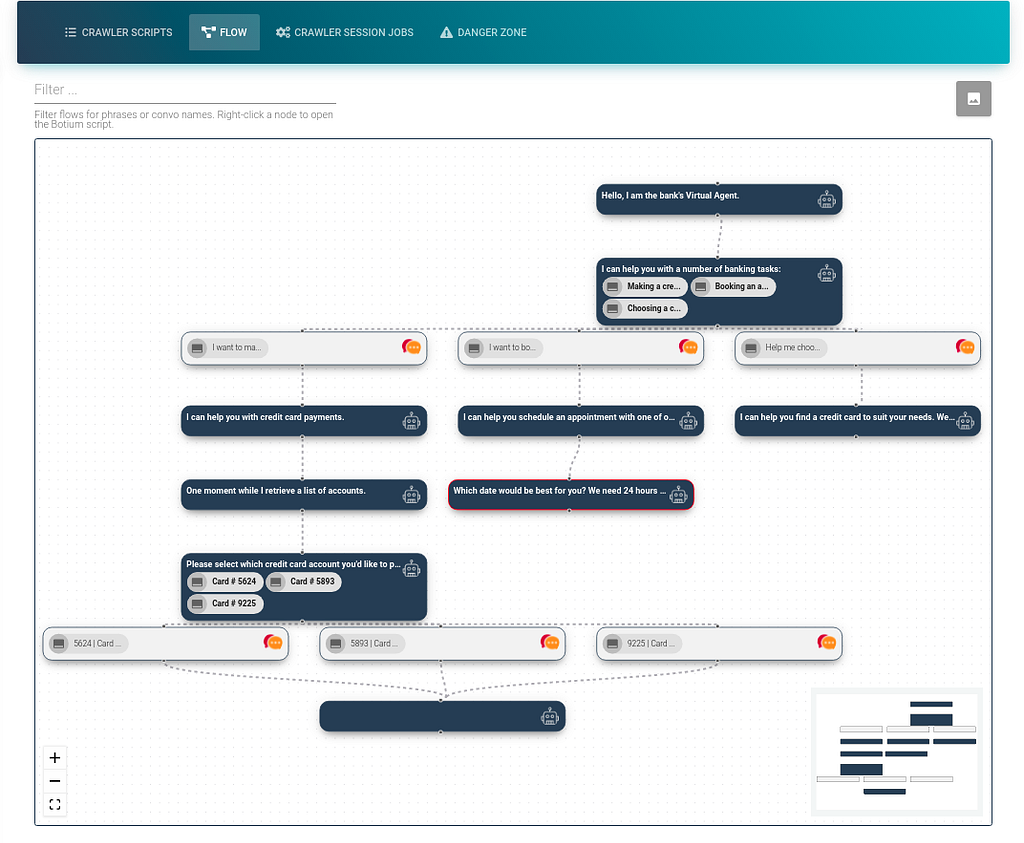
As you can see in the previous section at the bottom of the flowchart there are ‘open-ended questions’ like ‘Which date would be best for you? We need 24 hours …’. In this case the conversation is stopped from Crawler point of view, but with human interaction it could be continued. We have a solution for this problem as well.
For ‘open-ended questions’ you can define multiple user answers. These responses will be recognized in the next Crawler session as if they would be buttons. After adding some user response at the end of non-finished conversations the flowchart became much bigger and the generated conversations were doubled.
As you can see with some minutes of easy work we generated ten conversations for this bot. In case of a fully button based bot, you have even less work, just press the start button and wait for some minutes.
But what can we do with these conversations? In other words these are test scripts. Clicking on ‘Copy Test Scripts into Test Set’ you are able to copy them into a new or an existing test set.

A test set is a collection of test cases which can be added to a test project. At this point the regression test with a pretty good coverage is ready for this bot.

Botium Crawler is a very powerful tool for creating regression tests. It’s able to generate all test cases on a happy path without user interaction in case of fully button based chatbot and with minimal user interaction in case of partially button based chatbot. With the flowchart you can overview your chatbot conversation tree and detect circles.
It’s a brand new tool, so there is still a lot of room for improvements, and we already have many ideas. For example we would like to introduce different tree traversal algorithms to reach more effective performance so you will be able to choose the best fit algorithm for your chatbot. Furthermore you will be able to add RegExp as exit criteria, we are planning to make the open-ended question feature more handy, and so on.
Without proper tools you will be lost. The Crawler feature is the part of our flagship product Botium Box which helps you in your path to successful chatbot testing.


How to maintain chatbot regression tests with minimum effort was originally published in Chatbots Life on Medium, where people are continuing the conversation by highlighting and responding to this story.

The driver for this article is not to start a debate on what things need technological prowess to understand versus the logical components of a highly scalable SaaS-based platform. We intend to help you fit a complex system into a logical block in a way that a layperson can understand.
Let’s take an example where you are talking to your friend. If the two of you speak in the same language, it’s convenient for one person to understand what the other is saying.

But imagine having the same discussion with a person who doesn’t speak the language. It seems tricky, right?

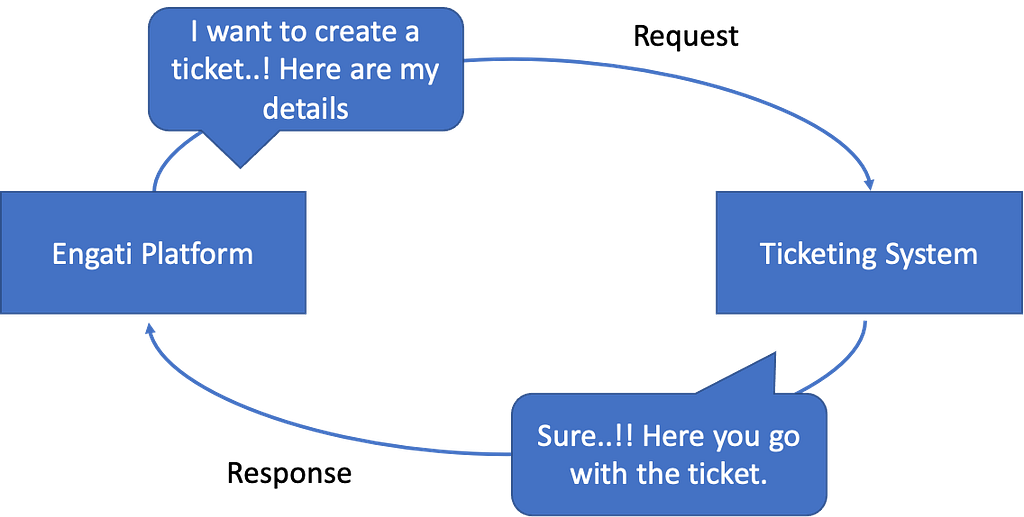
Replace the people in these pictures with systems. APIs can be thought of as the communication medium across the system. Let’s take an example. You have two systems; System A is Engati, and System B is a ticketing system. Say you’d like to create a ticket using System B through Engati. To achieve this, both systems need to communicate in one language; They need to follow one API standard.
Now you must be wondering if there are different languages to communicate between these systems. Of course, there are. Similar to how languages like English, French, Italian, and Hindi exist, there are multiple ways to communicate, like HTTP REST, SOAP, GraphQL, Sockets, etc. And just like English is a language that most people try to talk to communicate globally, systems often tend to support REST API-based communication (then again, there is always a group of people who don’t like to speak English)!
2. Automated vs Live Chats: What will the Future of Customer Service Look Like?
4. Chatbot Vs. Intelligent Virtual Assistant — What’s the difference & Why Care?
Just like how every language has grammar, syntaxes, and dos and don’ts, communication between systems has its own set of rules. Let’s look at the details of the parts of speech/grammar equivalence for a REST API.

Going back to our example of Engati attempting to create a ticket in the ticketing system, that is a create operation. Hence Engati will have to invoke a REST API in the ticketing system. To invoke the API, you would need to know the parts of speech/grammar equivalence, i.e., the URL, Parameters, Request Type (which ideally should be POST), Request Body.
Similar to how you use a language dictionary to understand the words of the language, we need to look at the documentation of a system to understand the request and the response formats. What details will be sent and what will be received are more specific to each system that we talk to.
The next time you are looking for an integration between two systems, remember that APIs are just two people (systems) talking to each other under all the technical layers.
Engati’s extensive documentation page can help you navigate through APIs to create extensive functionality around the platform.
This article was originally published in Engati blogs.
How technical are APIs? was originally published in Chatbots Life on Medium, where people are continuing the conversation by highlighting and responding to this story.

The first part of the tutorial can be found here — https://chatbotslife.com/building-a-weather-bot-with-bot-framework-composer-fa62b7cc9623
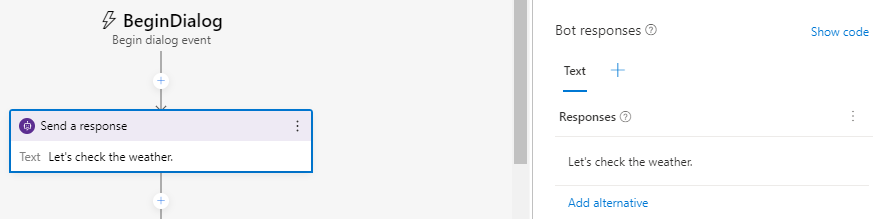
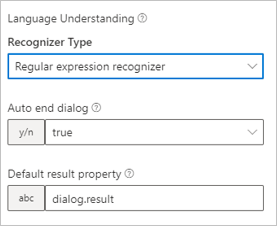
A dialog contains one or more triggers. Each trigger consists of one or more actions which are the set of instructions that the bot will execute. Dialogs can also call other dialogs and can pass values back and forth between them.
In this tutorial, you learn how to:
The main function of the bot is to report current weather conditions.
To do this, you will create a dialog that:

2. Automated vs Live Chats: What will the Future of Customer Service Look Like?
4. Chatbot Vs. Intelligent Virtual Assistant — What’s the difference & Why Care?
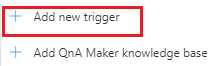
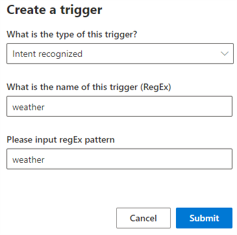
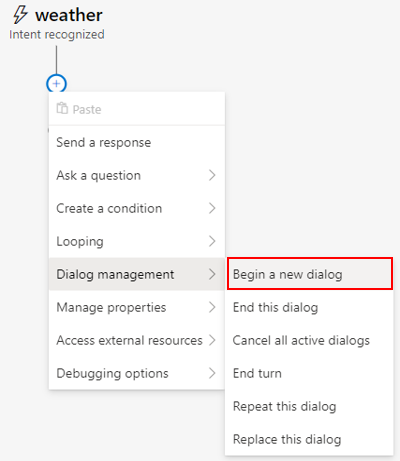
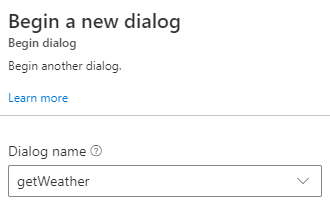
You can break down a conversation flow into different dialogs and then connect them. The following steps explain how to connect the newly created getWeather dialog to the main dialog.
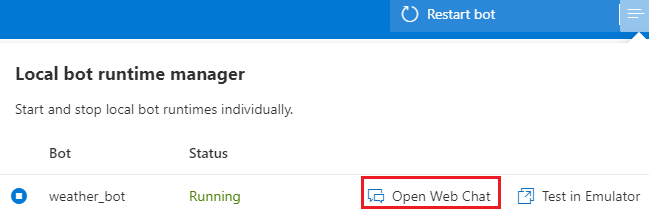
You can now test your bot, and the trigger and dialog you added to it.
Building a Weather Bot using Bot Framework Composer- Part 2 was originally published in Chatbots Life on Medium, where people are continuing the conversation by highlighting and responding to this story.

")

![[link]](https://i.redd.it/a1kgw5wckv871.jpg)