
The first part of the tutorial can be found here — https://chatbotslife.com/building-a-weather-bot-with-bot-framework-composer-fa62b7cc9623
A dialog contains one or more triggers. Each trigger consists of one or more actions which are the set of instructions that the bot will execute. Dialogs can also call other dialogs and can pass values back and forth between them.
In this tutorial, you learn how to:
- Add dialogs to a basic bot.
- Run the bot locally and test it.
Prerequisites
- Completion of the tutorial Tutorial: Create and test a bot
- Knowledge about dialogs in Composer
What are you building?
The main function of the bot is to report current weather conditions.
To do this, you will create a dialog that:
- Prompts the user to enter a postal code to use as a location for weather lookup.
- Calls an external API to retrieve the weather data for the specified postal code.

Create a new dialog
- Start Composer.
- Select the weather_bot bot project from the Recent bot list on the homepage.
- Select the three dots next your weather_bot bot project. Then select + Add a dialog.
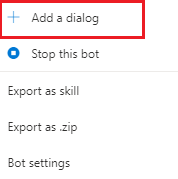
- In the pop-up window, enter the following:
- Name: getWeather
- Description: Get the current weather conditions.

- Select OK to create the dialog.
- Now select the + button under the BeginDialog dialog event in the center of the authoring canvas. Select Send a response.
- On the right in the response editor, enter the following:
- Bot responseCopy
- Let’s check the weather.
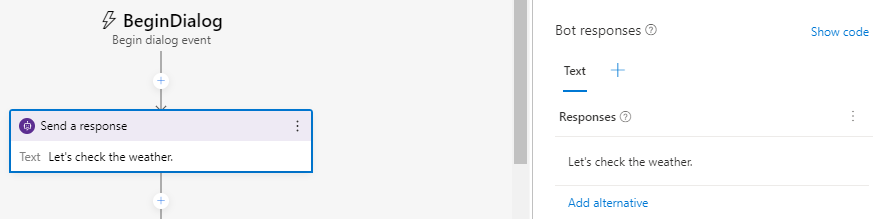
- We will add more functionality later, like retrieving the weather forecast, but first we need to connect the getWeather dialog to the bot with a trigger.
Trending Bot Articles:
2. Automated vs Live Chats: What will the Future of Customer Service Look Like?
4. Chatbot Vs. Intelligent Virtual Assistant — What’s the difference & Why Care?
Connect the new dialog
You can break down a conversation flow into different dialogs and then connect them. The following steps explain how to connect the newly created getWeather dialog to the main dialog.
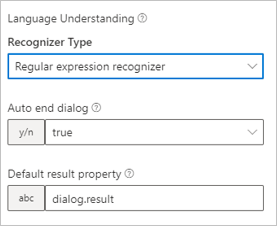
- Select the weather_bot dialog. Then go over to the right and change the Recognizer Type to Regular expression recognizer.
- Now select the three dots next to the weather_bot dialog on the left and select + Add new trigger.
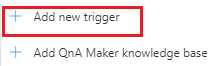
- In the Create a trigger pop-up window, enter the following information:
- In both What is the name of this trigger (RegEx) and Please input regex pattern text boxes, enter weather.
- Select Submit.
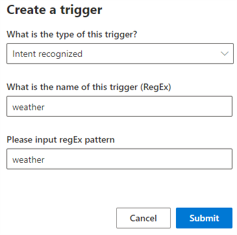
- Note
- This tells the bot to look for the word weather anywhere in an incoming message. Regular expression patterns are generally much more complicated, but this is adequate for the purpose of this example.
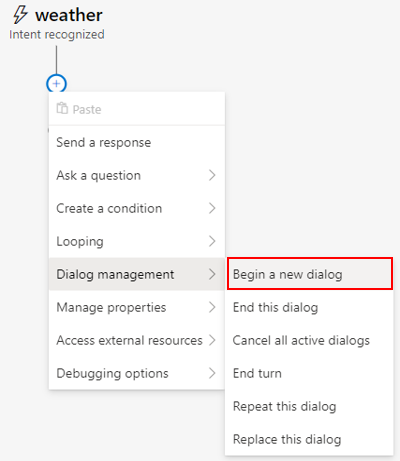
- In the center of the authoring canvas, under the weather Intent recognized trigger, select the + button.
- Hover over Dialog management and then select Begin a new dialog.
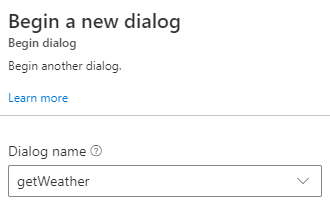
- On the right, under Dialog name, select getWeather. Now your weather bot is connected to the weather trigger.
You can now test your bot, and the trigger and dialog you added to it.
Test the bot
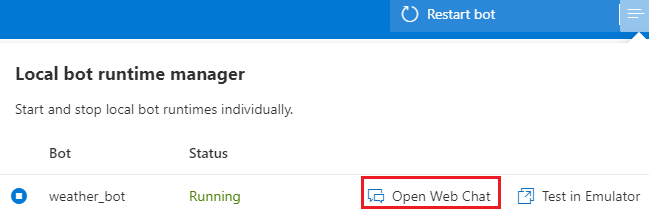
- Go to the top right of Composer and select Start bot. It may take a few moments for your bot to start.
- Note
- If the bot is still running from the previous tutorial, you can select Restart bot. This will update the bot runtime app with all the new content and settings.
- The Local bot runtime manager will open. Select Open Web Chat. The Web Chat pane on the right will appear.
- Now test some different phrases. Notice that the bot will send the message in the getWeather dialog if the word weather is in your response. Otherwise the bot will send the message in the Unknown intent trigger.
Don’t forget to give us your 👏 !


Building a Weather Bot using Bot Framework Composer- Part 2 was originally published in Chatbots Life on Medium, where people are continuing the conversation by highlighting and responding to this story.